Category: Fauna

  • Understanding Copepods and Detritus Worms: The Invisible Ecosystem

    Understanding Copepods and Detritus Worms: The Invisible Ecosystem

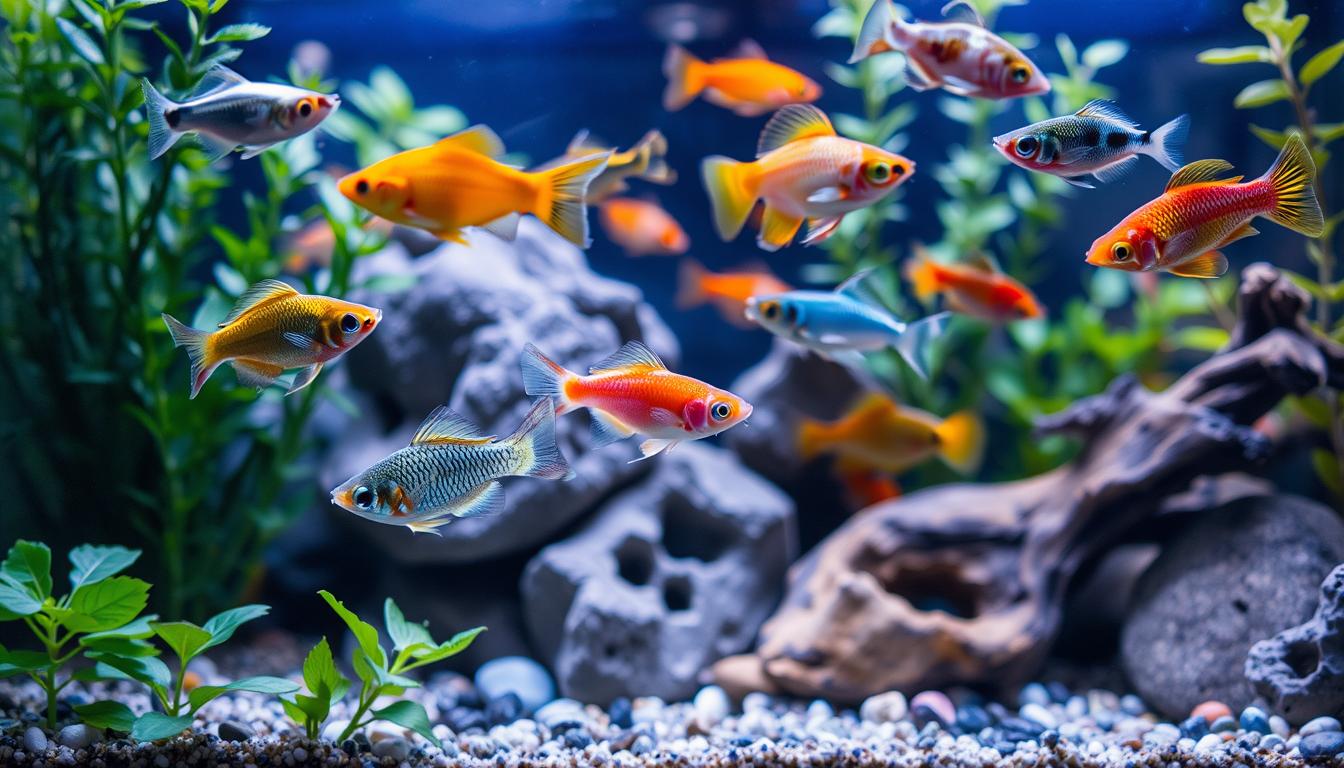
    You love your nano tank because it’s alive and balanced. Copepods and detritus worms are key to this balance. They keep your tank healthy and thriving.

    Copepods are like tiny workers. They eat algae and feed your fish and corals. By adding species like Tisbe, your tank starts to feel like a mini ocean.

    Detritus worms help break down food and waste. They live on plants and substrate. This keeps your tank clean and healthy.

    To keep your tank balanced, start by introducing copepods carefully. Feed them small amounts of phytoplankton regularly. Also, create quiet spots for them to hide among plants and rocks.

    Using social media can also help. It lets you learn from other aquarists and find tips on seeding your tank.

    In short, focusing on the tiny life in your tank makes it easier to care for. It also makes your corals healthier and your tank more self-sustaining. You get to enjoy watching it all thrive.

    The Role of Microfauna in Nano Tanks

    A vibrant underwater scene showcasing nano tank organisms, specifically copepods and detritus worms. In the foreground, gracefully swimming copepods with translucent bodies, tiny appendages, and delicate antennae. Surrounding them, slender detritus worms weaving through the substrate, their segmented bodies glistening under the light. In the middle ground, clusters of biofilm and tiny plant structures add life to the habitat, while a soft glowing light filters from above, creating a serene environment. The background features blurred outlines of a rich aqua-colored tank, enhancing the focus on the microfauna. The atmosphere conveys a sense of discovery and the hidden beauty of miniature ecosystems, captured with a macro lens to emphasize intricate details, while a gentle light bathes the scene to evoke tranquility.

    Microfauna is key to keeping a small tank balanced. Copepods and other tiny animals help by breaking down waste and eating algae. This reduces harmful nitrate and phosphate levels.

    These tiny creatures also feed corals and small predators. They provide important nutrients like fatty acids and proteins. These nutrients help corals grow and stay healthy.

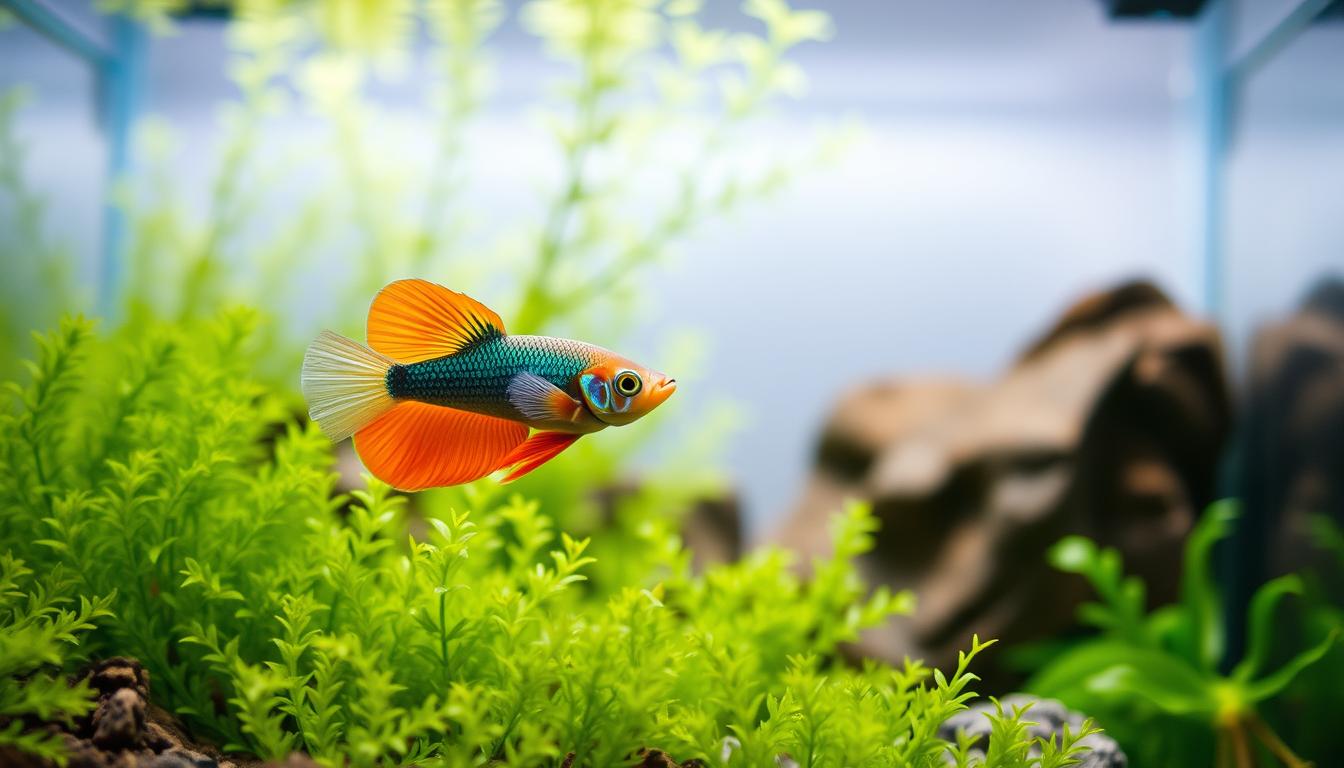
    Adding different types of microfauna to your tank makes it more diverse. A growing copepod population feeds fish like Mandarin Dragonets and pipefish. This creates a self-sustaining food chain.

    Plants in your tank help by providing homes for microfauna. They also help filter the water naturally. This keeps the ecosystem stable and healthy.

    • Reduced maintenance: microfauna consume waste and reduce manual cleaning.
    • Improved diet: tiny tank animals enrich the food web for specialized feeders.
    • Greater resilience: a diverse community resists population crashes and stressors.

    Learning from others can help you set up your tank better. Look at examples of refugium setups and how microfauna behave. This helps you choose the right species for your tank.

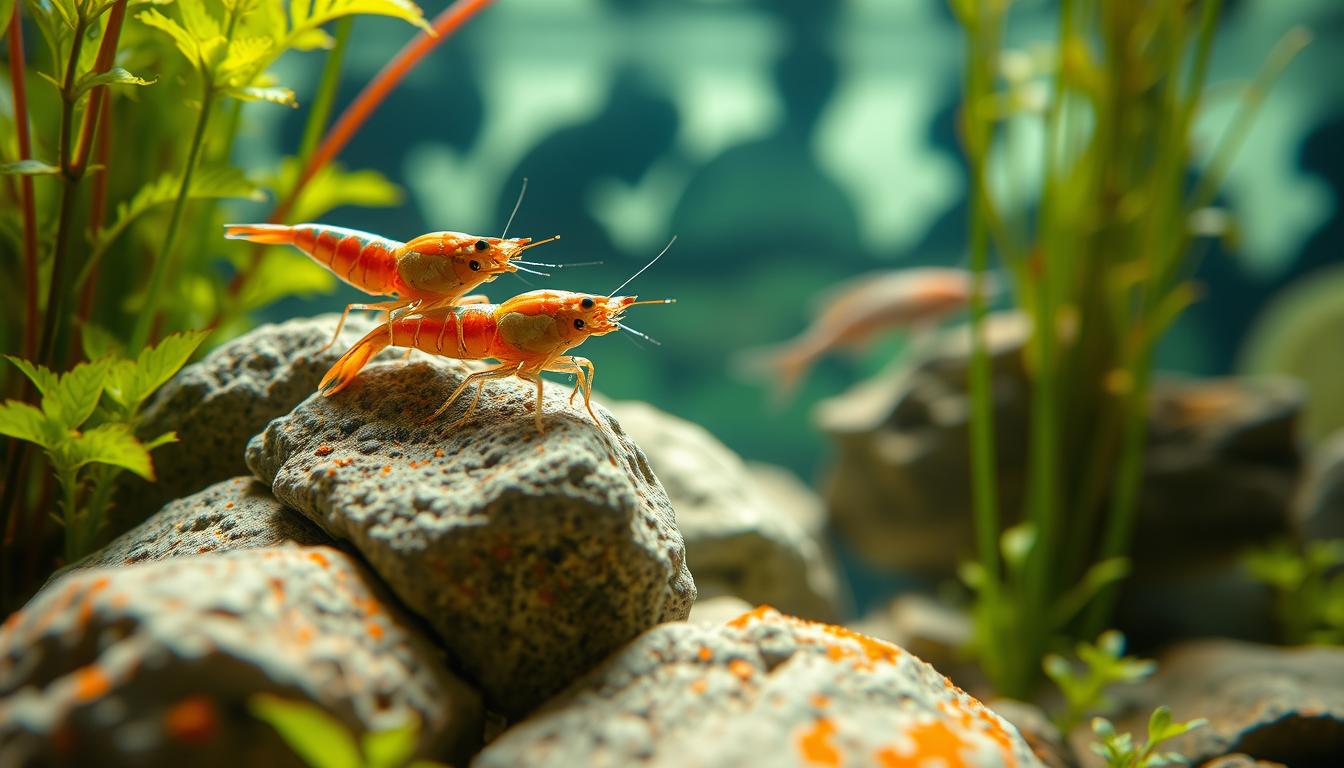
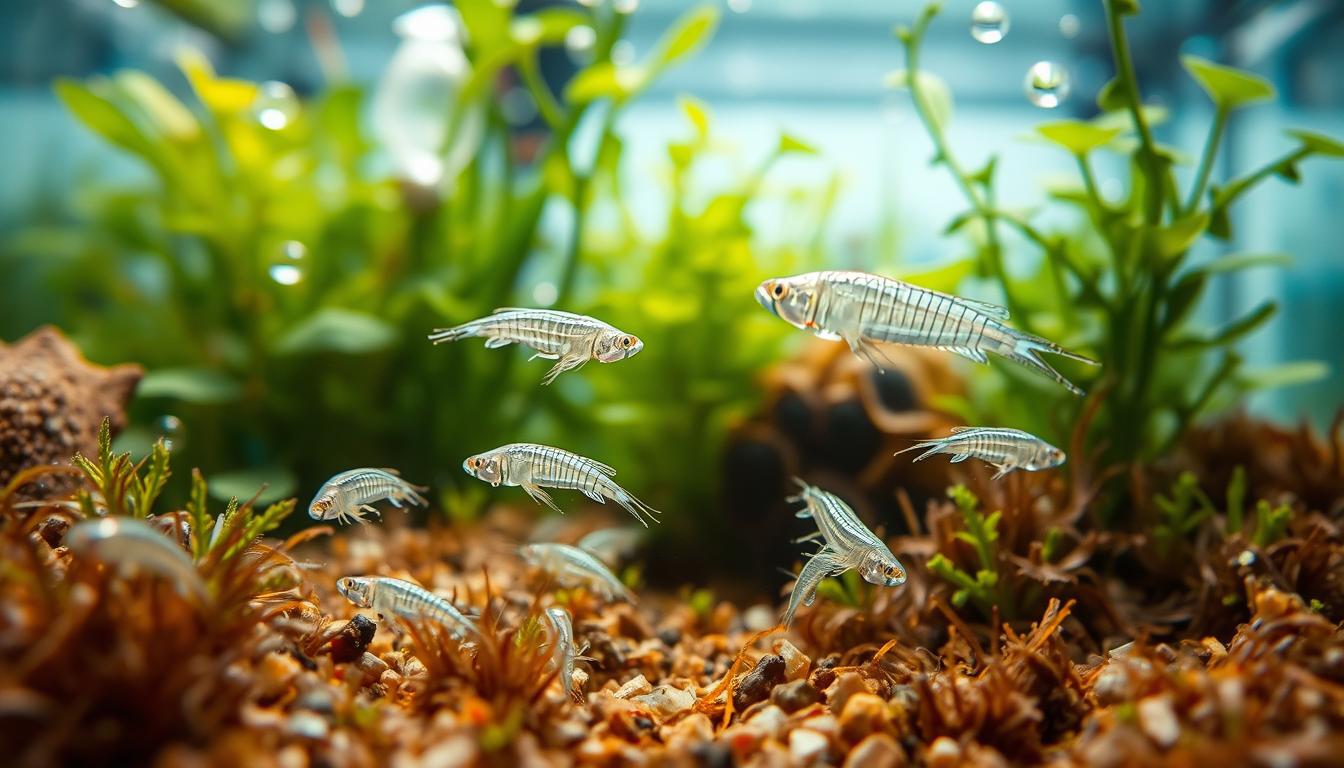
    Copepods: Tiny Creatures with Big Benefits

    A close-up view of a vibrant nano tank ecosystem teeming with microfauna, prominently featuring detailed copepods and detritus worms in a lush aquatic environment. In the foreground, the tiny, translucent bodies of copepods swim gracefully, showcasing their intricate appendages and vibrant colors under soft, natural lighting. The middle ground reveals delicate strands of detritus worms, intertwined with organic debris, contributing to the ecosystem's richness. In the background, blurred aquatic plants enhance the depth of the scene, creating a sense of immersion. The composition is captured with a macro lens from a slight overhead angle, evoking a sense of wonder and discovery. The atmosphere is serene and lively, reflecting the hidden beauty of this miniature ecosystem.

    Copepods are small but vital for your tank. They come in different sizes and behaviors. Choosing the right mix helps fill your tank’s needs.

    Tisbe biminiensis stays on the bottom and crawls on rocks and substrate. It helps control detritus and builds a lasting population.

    Tigriopus californicus is bigger and swims near the surface. Its swimming triggers feeding in picky fish. It’s great for fattening or breeding projects.

    Apocyclops panamensis swims constantly and reproduces quickly. It feeds pelagic corals and small predators.

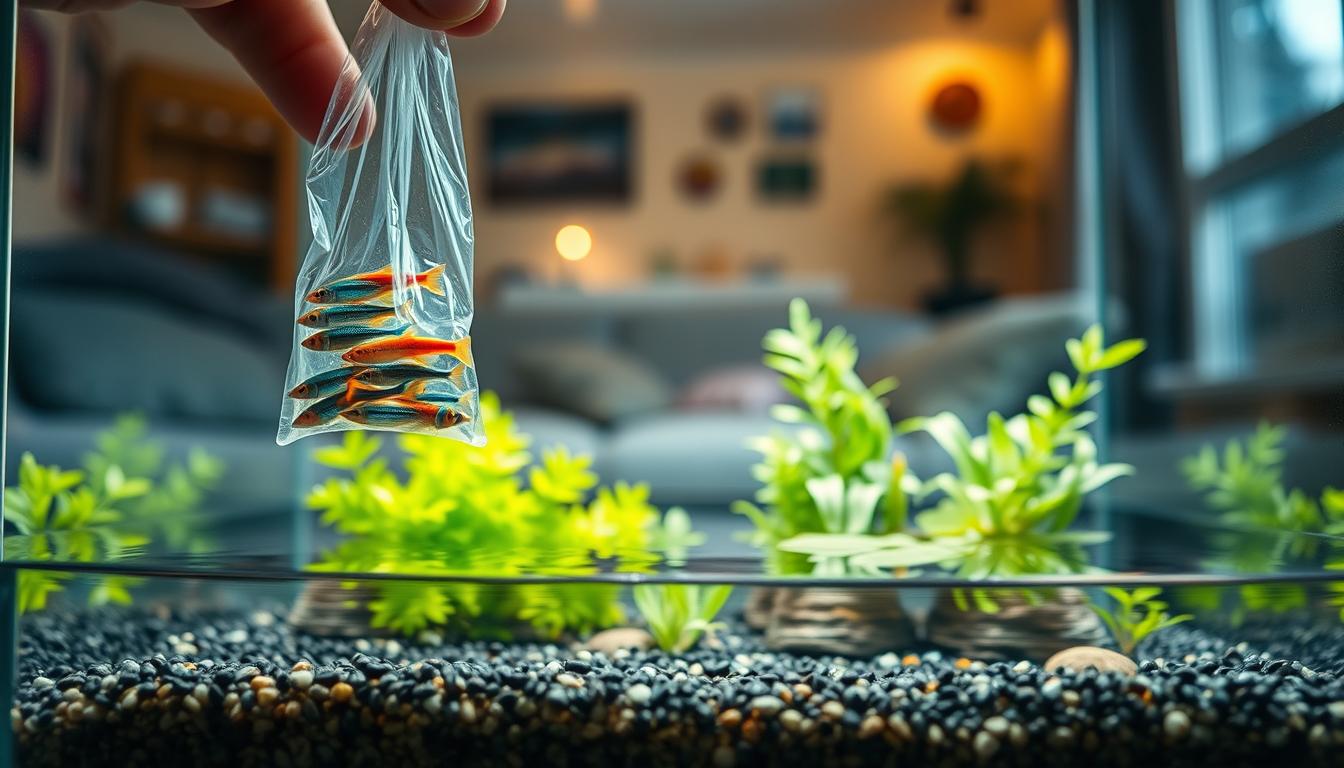
    Use blends or commercial products to seed your tank. Let bags warm up for 20 minutes. Turn off skimmers and powerheads briefly before adding.

    Feed phytoplankton like Nannochloropsis or Isochrysis two to three times a week. Or dose lightly every day in a refugium. Plants and macroalgae increase surface area and biofilm, supporting more nano tank critters.

    • Monitor at night with a flashlight to spot activity.
    • If numbers drop, reduce excess filtration or lower flow.
    • Use planted refugia to boost miniature tank fauna naturally.

    Copepods provide valuable nutrition like HUFAs and carotenoids. With proper care, they become a continuous food source. They add resilience to your reef system.

    Detritus Worms: Nature’s Clean-Up Crew

    Detritus worms are common in small tanks. They eat leftover food and dead plants. You’ll see them in the substrate and on decorations when there’s too much organic matter.

    These worms are part of the tank’s cleanup team. They break down waste into nutrients for plants and bacteria. By digging through the substrate, they help prevent water quality problems.

    Too many detritus worms can mean you’re overfeeding or have poor water flow. If you see a lot of worms, cut back on food and improve water circulation. Also, clean the substrate and siphon it now and then to keep things balanced.

    In planted tanks, detritus worms are less of a problem. Live plants absorb ammonia and nitrate, keeping the worm population in check. Fast-growing plants like Hygrophila and Rotala compete with bacteria for nutrients.

    Photos and forum reports can help you tell if you have a problem with detritus worms. Use these resources to learn what’s normal and when you need to take action.

    • Signs to watch: visible clusters on substrate, cloudy water, or sudden spike in worms.
    • Immediate steps: cut feeding, increase gentle flow, and light substrate maintenance.
    • Long-term strategy: add live plants and maintain consistent water changes.

    Creating a Suitable Environment for Microfauna

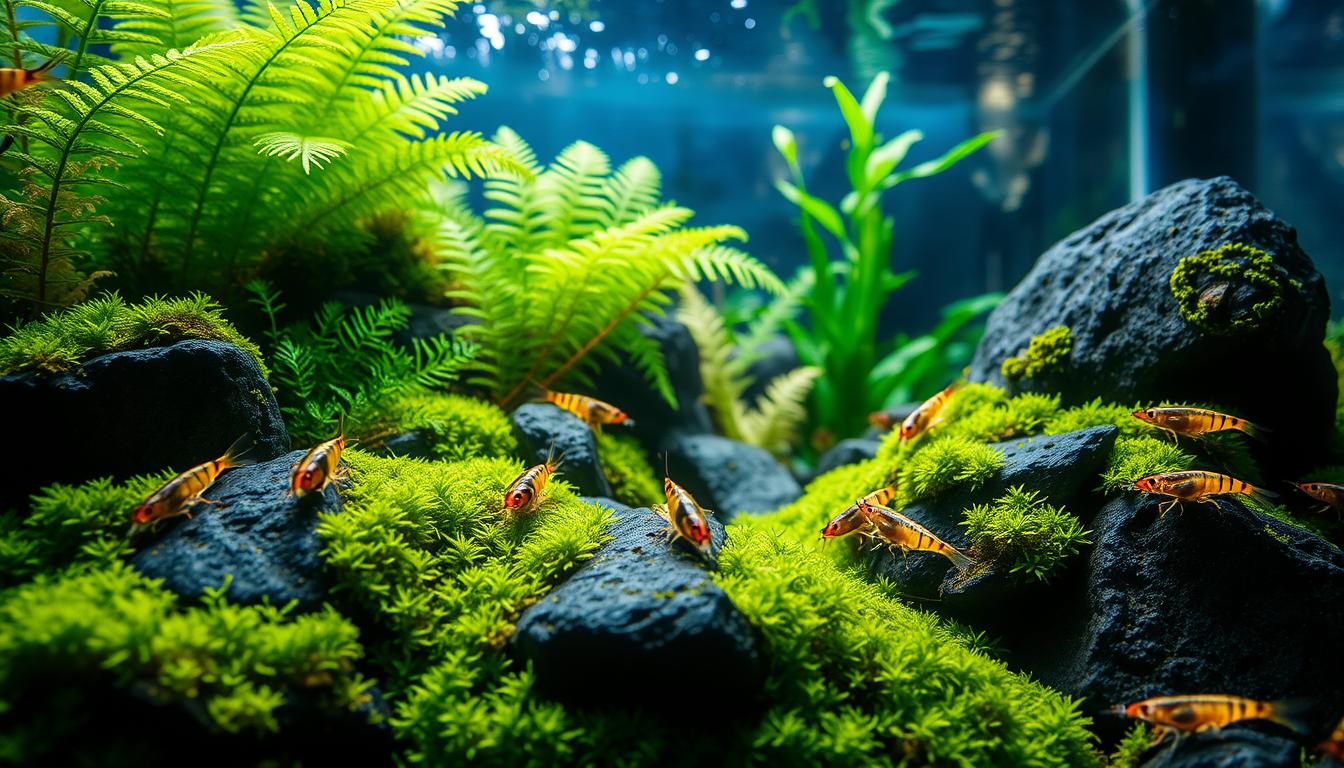
    You want a setup that shelters tiny life while keeping the system stable. Create low-flow zones in live rock, macroalgae, and coarse sand or rubble. These spots help nano tank biodiversity by giving copepods and worms places to rest and reproduce.

    Balance circulation so food reaches microfauna without blasting them into skimmers or filters. Use adjustable powerheads for gentle, indirect flow. Set flow paths that feed miniature tank fauna but leave calm refuges behind rocks and plants.

    Place a refugium or a strand of Chaetomorpha in a moderate-flow area. This provides shelter and grazing surfaces. Live plants, mosses, and carpet species expand surface complexity and boost biofilm. This extra habitat supports small tank inhabitants and increases available food.

    Keep sand and rubble deep enough for burrowing species. A few centimeters of coarse substrate gives detritivores room to tunnel and hide. This depth supports healthy miniature tank fauna and more stable biological processes.

    When introducing pods, acclimate gently. Float sealed containers for about 20 minutes, then release them into calm zones. Turn off aggressive skimming or pumps for the first few hours so nano tank microfauna can disperse into shelters.

    Avoid overly aggressive chemical filtration if you want consistent microfauna numbers. If populations drop, pause carbon or GFO briefly and rely on planted refugia or live plants to rebuild biofilm. These measures encourage long-term nano tank biodiversity and keep small tank inhabitants thriving.

    • Low-flow seeding zones: rocks, macroalgae clumps, rubble
    • Balanced circulation: adjustable powerheads, indirect flow
    • Refugium placement: Chaetomorpha or planted refugia in moderate flow
    • Substrate depth: enough for burrowing miniature tank fauna
    • Acclimation: float sealed pods ~20 minutes, minimize skimmer action

    Feeding Your Microfauna

    Feed copepods a steady diet of phytoplankton to keep them healthy. Use Nannochloropsis or Isochrysis two to three times a week. Or, dose lightly every day in a refugium to keep them nutritious for corals and small fish.

    Detritus worms and benthic tiny tank animals love biofilm and decomposing matter. Keep macroalgae, live rock rubble, and leaf litter. This provides them with grazing surfaces and shelter in nano tanks.

    Be careful not to overfeed. If pods coat surfaces or you see sudden blooms of green water, reduce phytoplankton. Too many nutrients can harm your display animals.

    • Feed schedule idea: phytoplankton 2–3× weekly or light daily dosing in a refugium.
    • Keep macroalgae and rubble for detritus worms and benthic tiny tank animals.
    • Gut-load pods so they pass HUFAs and carotenoids to corals and fish.

    Plants are great for feeding without fouling the water. Fast-growing plants take up extra nutrients. They also create biofilm that supports microfauna in nano tanks. Adjust lighting and plant mass to match your dosing routine.

    Community schedules and visual guides from hobbyists can help refine timing and brands. Test a routine, monitor populations, and tweak feedings. This will keep your nano tank microfauna balanced and productive.

    The Interaction Between Copepods and Detritus Worms

    Copepods and detritus worms live together in a healthy nano tank. Copepods eat phytoplankton, biofilm, and fine detritus. Some benthic copepods also eat from the substrate.

    Detritus worms break down dead plant and animal matter. They help turn the substrate into nutrient-rich soil.

    The food supply is key to their balance. A steady amount of phytoplankton helps copepods reproduce. Too much food or low flow can lead to worm blooms.

    Adjusting food and flow helps control the community. You can use dosing and feeding to favor copepods over worms.

    Flow and filtration affect which organisms thrive. Strong skimming and high flow can wash out copepods. This leaves space for worms.

    Low flow, on the other hand, favors detritus worms. Adjusting return pumps and refugium flow helps keep pods while reducing waste.

    Habitat complexity allows both groups to coexist. Plants, macroalgae, live rock, and rubble create microhabitats. Pods hide in plants and macroalgae, while worms stay in softer substrate.

    Practical management keeps populations stable. Use a planted refugium or Chaetomorpha for food and shelter. Adjust skimmer settings and flow to retain copepods.

    If worms surge, cut feeding and boost substrate siphons. Increase gentle flow to discourage overpopulation.

    Real hobbyists have seen success with small changes. Adding more plants can lower nutrients that cause worm outbreaks. Refugium changes and controlled feeding help maintain a balanced mix of microfauna in nano tanks.

    Monitoring Microfauna Populations

    Tracking nano tank microfauna is easy with regular checks. Use a small flashlight after the main lights go off. This will help you see if copepods are present.

    Look for signs of a healthy miniature tank fauna. Good coral health, active fish, and visible pods are good signs. If pods disappear, check for water quality issues or feeding problems.

    • Night flashlight test: perform weekly to note abundance trends.
    • Visual markers: polyp behavior, fish activity, and visible tiny tank animals.
    • Troubleshooting: reduce skimmer runtime or pause aggressive carbon and GFO use if populations drop.

    Don’t count every single microfauna. Just watch for trends. More or fewer pods, changes in polyp behavior, or fish health can tell you a lot. Adjust your tank’s flow and add more phytoplankton if needed.

    Planted tanks can be more stable for microfauna. Healthy plants, bright colors, and balanced nutrients show a thriving ecosystem.

    Learn from others by watching videos and posts on Instagram and YouTube. Seeing what experienced hobbyists do can help you understand what’s healthy. You won’t need to count every microfauna to know your tank is doing well.

    The Impact of Microfauna on Tank Aesthetics

    Healthy copepod populations make a big difference in your tank. Corals grow faster, get richer colors, and spread out more. This is because copepods give them the nutrients they need.

    Small fish also benefit. They get to hunt for tiny animals, which lowers their stress. This makes them more active and colorful, exploring their surroundings.

    • Reduced visible waste: copepods help clear film algae and detritus from surfaces.
    • Mixed-species pods feed a wider range of corals and fish.
    • Continuous movement from microfauna adds subtle texture to the viewing experience.

    Plants instantly change a nano system’s look. They host biofilm that attracts tiny animals. A planted area or a leafy display adds structure and depth.

    More habitat for small animals improves balance. You’ll see more microfauna in crevices and on plants. This reduces visible pests and keeps the tank clean.

    Hobbyist galleries and social feeds show amazing transformations. Tanks go from sterile to lively with microfauna and plants. Active corals, foraging fish, and more biodiversity give a museum-quality look to small tanks.

    Designing with microfauna in mind adds motion, color, and cleanliness. These tiny creatures turn a basic tank into a rich, authentic ecosystem. It’s a treat to watch.

    Conclusion: Embracing Microfauna in Your Nano Tank

    Adding microfauna to your nano tank changes how you feed your fish. Start by choosing different types of copepods for the bottom and top of the tank. Make sure to introduce them slowly and give them places to hide.

    Feed your tank with phytoplankton like Nannochloropsis or Isochrysis regularly. This keeps your copepods healthy and strong. It’s a simple way to keep your tank balanced.

    Adding plants to your tank helps with cleaning and gives more space for beneficial bacteria. Check on your microfauna weekly with a flashlight. If you see any problems, adjust the skimmer, water flow, or food amounts.

    These small changes can make a big difference. Your corals will grow better, and your fish will be healthier. For more tips, look at online forums, Instagram, and setup guides. They can help you create a thriving ecosystem in your nano tank.

    FAQ

    What are copepods and detritus worms, and why do they matter in a nano tank?

    Copepods are tiny crustaceans that act as a live food source and micro-engine in your aquarium. They cycle nutrients, graze film algae and detritus, and provide essential fatty acids, lipids, and proteins that benefit corals and finicky fish. Detritus worms (nematodes and small annelids) break down decaying organic matter and help turn over substrate. Together they form an invisible ecosystem—microfauna in nano tanks—that reduces maintenance, stabilizes nutrients, and supports biodiversity.

    How do microfauna improve water quality and tank stability?

    Microfauna consume uneaten food, biofilm, and microscopic algae, which lowers ammonia, nitrite, nitrate, and phosphate spikes. Copepods recycle nutrients and act as continuous feeders for corals and micropredators, while detritus worms decompose organic waste. When paired with live plants or macroalgae, which remove dissolved nutrients and increase surface area for biofilm, microfauna populations thrive and your small tank ecosystem becomes more forgiving and stable.

    Which copepod species should I choose for a nano tank?

    Select species based on the niches you want to fill. Tisbe biminiensis is a benthic crawler great for detritus control and refugia. Tigriopus californicus is larger and surface-oriented, useful for triggering feeding responses in fish. Apocyclops panamensis is pelagic and reproduces quickly to support water-column feeders and corals. Using a mixed-species blend covers benthic, pelagic, and surface niches for a resilient nano tank microfauna community.

    How do I seed and acclimate copepods safely into my display?

    Float the sealed pod bag in your tank for about 20 minutes to equalize temperature. Turn off skimmers and high-flow pumps briefly to reduce pod loss. Pour pods into low-flow, refugium-style zones—macroalgae clumps, rubble, or live rock crevices—so they can settle. Avoid dumping pods directly into strong flow or directly toward skimmer intakes.

    What habitat features help microfauna thrive in small aquariums?

    Create low-flow seeding zones with complex surfaces: coarse sand or rubble, live rock crevices, macroalgae like chaetomorpha, and planted areas (mosses, carpeting, floating plants). Moderate, indirect circulation delivers food without sweeping pods into filters. A planted refugium or dense plant mass increases biofilm and microalgae—key food sources for tiny tank animals and microfauna biodiversity.

    What should I feed copepods and how often?

    Feed phytoplankton strains such as Nannochloropsis or Isochrysis 2–3 times weekly or use light daily dosing in a refugium to gut-load pods. Benthic species will also graze biofilm and detritus; maintain macroalgae and rubble for natural feeding. Avoid overfeeding—excess phytoplankton or organics can cause imbalances and signal population issues.

    How do copepods and detritus worms interact—are they competitors?

    They typically coexist. Copepods feed on phytoplankton, biofilm, and detritus, while detritus worms focus on breaking down decaying organic matter. Balance depends on food, flow, and habitat complexity. Excess detritus or poor flow can favor worm booms. Plants and macroalgae help by absorbing nutrients and supplying diverse food surfaces, which reduces direct competition and promotes coexistence.

    How can I monitor microfauna populations in a nano tank?

    Simple, regular observation works best. Do night flashlight checks after lights-out to spot copepods on glass and rock. Watch coral polyp extension and the behavior of picky fish—improved activity often indicates healthy pod levels. Track trends (more/less pods, fish vitality) weekly, not by counting individuals. Use community photos and guides for visual benchmarks.

    What are common problems and troubleshooting steps if pod populations crash?

    Common causes include excessive flow/skimming, chemical filtration (active carbon/GFO), lack of food, or sudden water-quality swings. Troubleshoot by reducing skimmer run time, pausing aggressive chemical media, adjusting powerhead flow to be more indirect, and increasing phytoplankton dosing in refugia. Stabilize water parameters and ensure refugium or plant surfaces are available for shelter.

    Can planted tanks help prevent detritus worm outbreaks?

    Yes. Fast-growing aquatic plants and macroalgae absorb excess ammonia, nitrite, nitrate, and phosphate, reducing the nutrient base that fuels detritus worm population booms. Plants also increase surface area for biofilm, giving microfauna more balanced food sources. A planted refugium is very effective in supporting microfauna and minimizing worm overpopulation.

    Will adding copepods change the look and behavior of my display?

    Expect visible benefits. Healthy copepod populations improve coral vitality—faster growth, richer coloration, and better polyp extension—and encourage natural foraging behavior in fish, making the tank feel more dynamic. They also reduce visible detritus and film algae. Combined with plants, a nano tank gains a lush, natural aesthetic that hobbyists frequently document on Instagram and forums.

    How often should I check and maintain conditions for microfauna?

    Weekly checks are recommended—do a flashlight inspection at night and monitor coral and fish behavior. Maintain a regular phytoplankton dosing schedule, tune skimmer and flow settings as needed, and keep plants or macroalgae healthy to sustain biofilm. Adjust maintenance frequency based on population trends, not fixed intervals.

    What products or approaches are commonly used to seed and sustain pod populations?

    Commercial mixed-species blends and branded pod products (pod drops and live copepod cultures) are common for seeding. For sustenance, hobbyists use phytoplankton brands suited to aquarium use and place macroalgae or planted refugia for continuous food and shelter. Community resources and social media posts often show real-world setups and dosing routines that work in nano tank environments.

    Are there species-specific concerns when keeping fish that rely on live microfauna?

    Yes. Specialized feeders such as Mandarin Dragonets and some pipefish need a consistent, reproducing copepod pasture. Choose a mixed-species pod population that includes benthic and pelagic species to supply varied prey sizes. Maintain refugia, steady phytoplankton dosing, and protect pods from excessive skimming to ensure a reliable food source for picky micropredators.

  • Moving Fish Safely: A Complete Guide

    Moving Fish Safely: A Complete Guide

    Moving fish safely is key because your aquarium is a delicate, living space. It includes plants, beneficial bacteria, substrate, and equipment. All these work together to keep the water healthy. If you handle it poorly, you can damage the structure, upset the ecosystem, and stress or make your fish sick.

    But, you can prevent these problems with careful planning, patience, and the right approach. This guide is for moving fish safely in nano aquariums, which are under 20–30 gallons. It’s perfect for apartment movers in the United States who face tight spaces and rules from landlords.

    First, you’ll prepare your fish by fasting and gently netting them. Then, you’ll power down and protect your heaters, filters, and pumps. You’ll also save and transport water to keep the beneficial bacteria alive. Next, you’ll pack your plants and decorations, remove most of the substrate, and choose the right transport containers. These should have temperature control and aeration.

    The guide then explains how to move your tank, set it up at your new apartment, and acclimate your fish. Follow these steps for a smooth fish relocation and to keep your aquarium healthy when moving.

    Understanding Nano Fish and Their Needs

    A beautifully arranged nano aquarium, featuring a variety of tiny, vibrant nano fish gracefully swimming among lush aquatic plants. In the foreground, delicate tendrils of moss and tiny pebbles create a natural look. The middle ground showcases colorful, small fish such as neon tetras and micro rasboras darting playfully through the foliage. The background consists of a clear, softly lit water surface reflecting subtle sunlight filtering through a window, enhancing the serene atmosphere. The composition is captured from a slightly elevated angle, emphasizing the intricate details of the plants and fish. The lighting is warm and inviting, casting gentle shadows that add depth, evoking a peaceful underwater environment for the fish. The overall mood is tranquil and harmonious, embodying the essence of a healthy nano aquarium.

    You might pick a nano aquarium for its small size and beauty. A nano tank is usually under 20 gallons. Sizes like 5, 10, and 20 gallons are common. Tanks under 5 gallons are best for shrimp and snails, not most fish.

    Different creatures fit different tank sizes. In a 20-gallon nano, you can have bettas, most tetras, dwarf puffers, and more. You can also keep fancy guppies, dwarf Corydoras, and small loaches. Plus, white cloud minnows, platies, small gouramis, shrimp, snails, and African dwarf frogs are welcome.

    A 10-gallon setup is good for bettas, neon or cardinal tetras, and dwarf puffers. You can also keep dwarf Apistogramma, guppies, and dwarf corys. For a 5–6.5 gallon tank, bettas, dwarf puffer, and white cloud mountain minnows are fine. Shrimp and snails are also good choices. But, avoid keeping fish in tanks smaller than 5 gallons permanently.

    Nano tanks have advantages when you move. They save space and cost less. They’re also easier to light, plant, and pack for travel.

    But, smaller tanks can be tricky. They can quickly change water chemistry, harming fish. So, you must carefully meet nano fish needs before, during, and after moving.

    For those who move often, stable, modest setups are best. Pico tanks of 5–7 gallons are great for busy lives. But, large reef systems take months to settle and are not good for frequent movers.

    Your moving plan should consider these limits. Nano systems react quickly, so focus on steady water, reliable aeration, and minimizing stress. Follow the best practices for moving fish to protect your stock and keep your tank healthy after the move.

    Preparing Your Nano Fish for the Move

    A serene indoor setting where a person dressed in modest casual clothing is carefully preparing to transport nano fish. In the foreground, a clear, well-lit fish tank containing tiny, vibrant nano fish is being gently scooped into a small, secure transport container. The person has a focused expression, demonstrating their care and attention. In the middle ground, a neatly organized moving space with boxes and packing materials emphasizes the preparation theme. Soft, warm lighting illuminates the scene, creating a calm and reassuring atmosphere. In the background, potted plants add a touch of nature, complementing the aquatic theme without overpowering the main subject. The camera angle captures this intimate moment, highlighting both the fish and the diligent care in preparation.

    Begin planning a few days to weeks in advance. This allows time for permits, following landlord rules, and gathering supplies. A simple checklist can help you remember to pack nets, clean buckets, and other essentials.

    Stop feeding your fish 24 hours before the move. This helps keep the water clean and reduces stress. A short fast before moving is beneficial.

    Turn off all equipment before removing the fish. This includes heaters, filters, and pumps. Let them cool down for at least 30 minutes. Keep filter media moist in tank water to protect beneficial bacteria.

    • Use nets sized to your fish, typically between 3″ and 10″.
    • Pack multiple small bowls or lidded containers for individual or grouped fish.
    • Prepare clean buckets with tight-fitting lids for water and live plants.
    • Bring bubble wrap and padding for tank and equipment protection.

    If your fish are territorial or aggressive, keep them separate. Label each container with species and tank water details. This helps you follow the best practices for moving fish.

    Plan your transport route and choose a stable temperature time. Place containers on a flat, sturdy surface in your new home. Move the aquarium last and set it up first at the destination.

    Review your checklist one last time before leaving. Make sure you have spare batteries, a siphon hose, and airtight lids. Proper preparation will make moving your fish safer.

    Selecting the Right Transport Containers

    Before you move, pick the right containers for your fish. Lidded bowls and sealable plastic tubs are good for short trips. For bigger groups, clean 5–7 gallon buckets with tight lids are sturdy.

    Don’t use glass containers that can break. Also, avoid overfilled tanks that can slosh. Sturdy, sealable food-grade totes are great for moving water and plants together.

    Match the container size to the number of fish and their behavior. This helps reduce stress. Small, peaceful nano fish can share a bowl or bag. But, aggressive or territorial fish need their own containers to avoid injury.

    For trips longer than two hours, plan for aeration. A battery-operated air pump, like an Aqua One unit, keeps oxygen levels safe. For short moves, keep lids on and handle fish gently.

    Keep filter media and live plants in separate containers with tank water. Don’t rinse substrate or media. Keeping media damp helps your biological filter recover quickly after the move.

    Pack equipment carefully. Wrap heaters after they cool and keep filters damp in water. Use cushioning, bubble wrap, and sturdy boxes for pumps and the emptied tank if you transport it separately.

    • Never stack heavy items on top of an aquarium.
    • Label containers for quick identification at arrival.
    • Plan a reliable fish transportation service if you face a long or complex move.

    These steps make moving fish practical and reduce risks during transit. By following them, you ensure safe transport and protect your aquarium’s balance during relocation.

    Packing Your Nano Fish for Transport

    To move your fish safely, follow a simple plan. First, take out decorations and hiding spots like rocks and driftwood. Put each item in a water-tight container with some tank water to keep bacteria alive. Don’t stack items to avoid damage.

    Then, remove live plants and put them in sealed containers with tank water. Trim big leaves if they’re too big. Keep plants away from heavy decorations to prevent damage during the move.

    1. Start by siphoning 75%–80% of the tank water into clean buckets. Label them and seal them to keep the water quality good for later.

    2. Use a soft net to catch fish one by one. Put them in lidded bowls or containers with some tank water. Turn off the lights and keep the containers dark to help the fish relax.

    3. Next, remove filters and put the filter media in a sealed bag with tank water. This keeps the good bacteria alive. Wrap pumps and heaters in bubble wrap before putting them in boxes.

    4. Then, siphon out the rest of the water and scoop up the substrate into watertight containers. Don’t rinse the substrate. This helps keep the bacteria alive when you set up the tank again.

    5. Pad the empty tank with foam and bubble wrap, then put it in a strong box. Make sure it’s secure so it won’t move. For short moves, use a dolly or two people. For longer trips, use a battery air pump and keep the fish in dark, closed containers.

    Keep aggressive fish separate and don’t feed them 24 hours before moving. This lowers waste and stress for the fish.

    Managing Temperature During the Move

    Your nano fish are very sensitive to changes in water temperature. Sudden changes can cause stress, weaken their immune system, and make them sick. Start by recording your tank’s temperature. Then, try to match that range at your new place for safe transport.

    Before you take out your fish, turn off the heater and let the water cool for about 30 minutes. This helps avoid damage to the heater and keeps the water stable for moving.

    • Insulate containers with towels, thermal bags, or a Styrofoam cooler to limit temperature shifts during transit.
    • For short trips, good insulation and stable ambient conditions may be enough for safe fish transport.
    • In very hot or cold weather, add heat packs or cold packs outside the container; never apply packs directly to bags or buckets.

    For long trips or very sensitive species, use battery-powered aquarium heaters or temperature-controlled transport boxes. Place a small waterproof thermometer in a container to check the temperature while moving.

    When you get to the new apartment, don’t put fish in water that’s too different in temperature. Use slow steps to adjust the temperature and acclimate the fish before putting them in the new tank. This helps keep stress low.

    Transporting Your Nano Fish

    Move your fish last and set up the tank first at the new apartment. Keep the journey short. Plan your route and parking to reduce carrying distance.

    Keep containers inside the vehicle cabin to monitor them and keep temperatures stable. Place containers on a flat surface and secure them to prevent tipping or sliding. Avoid sudden stops and sharp turns for safe transport.

    Check lids, watch for water sloshing, and listen to aeration during transit. For trips over two hours, run battery air pumps to maintain oxygen. Keep lights off in containers to calm the fish and support safe transport.

    • Bring spare buckets and extra container lids.
    • Carry additional tank water and a dechlorinator.
    • Pack a small test kit for ammonia and nitrite if you expect delays.

    If a container leaks, transfer fish into another clean, prepped container right away. These steps keep stress low and support healthy transport.

    If you hire movers or a fish transportation service, explain special needs clearly. Tell them containers must stay upright, not stacked, and that fish should ride in the cabin. For long-distance moves, consider local professional fish movers experienced in secure fish moving and safe fish transport.

    Setting Up Your New Apartment

    Choose a spot that’s stable and level. Your tank, substrate, and water are heavy. Stay away from direct sunlight, vents, exterior doors, and busy hallways.

    Check the floor load if your tank is big. Make sure to ask your landlord about any rules.

    Start by setting up the stand or base. Make sure it’s perfectly level. Place electrical outlets and cords where you can reach them safely.

    This makes moving your fish easier and helps with maintenance later.

    Begin by following a clear setup sequence. Add cleaned or new substrate and return rockwork and ornaments. Fill the tank halfway with saved water to keep chemistry stable.

    Top it off with dechlorinated tap water.

    Install equipment in stages to avoid shocking your system. Use moist filter media to seed the filter and start biological filtration. Install pumps, heaters, and lights, then power them on gradually.

    Let the heater reach the target temperature before adding fish.

    • Replant live plants early so roots can settle.
    • Prioritize finishing setup quickly to shorten the time your fish remain in temporary containers.
    • Keep a thermometer visible and stable during startup.

    Treat new water with a reliable conditioner like Aqua One Water Conditioner. Remove chlorine and chloramine. Use a quality kit like NT Labs Aquarium Lab Master Test Kit to test water.

    Check ammonia, nitrite, nitrate, pH, and temperature until they’re stable.

    When the water chemistry and temperature are stable, add fish. Moving aquarium fish after proper setup reduces stress and injury. Setting up your aquarium correctly lets your fish thrive once moved.

    Acclimating Nano Fish to New Environment

    When you move aquarium fish, it’s key to avoid sudden changes. These changes can stress the fish and increase their chance of dying. So, take your time to acclimate them properly.

    For fish in sealed bags, use the float-and-equalize method. Float the bag on the tank’s surface for about 45 minutes to match temperatures. If they’re in lidded containers, add small amounts of tank water every 5–10 minutes over 30–60 minutes. This slowly changes the water’s conditions.

    • Check temperature and pH before release.
    • Watch salinity for brackish or marine nano species.
    • Keep lights off for a few hours after introduction to ease stress.

    Release the fish gently once the water conditions are similar. Use a net for careful transfers or pour the fish into the tank while leaving most transport water behind. Don’t dump the transport water into your display to avoid contamination.

    Watch the fish closely after moving them. Look for signs of distress like gasping, erratic swimming, or hiding too much. If you see any, dim the room and check the water’s ammonia, nitrite, and temperature again.

    If you saved the filter media and bacteria, the filter should recover fast. If you had to replace them, add a good bacterial supplement and test the water daily. Slowly cycling the tank helps stabilize conditions during the move.

    Monitoring Your Fish After the Move

    Check water chemistry within 24–48 hours after moving your fish. Use a good test kit, like the NT Labs Aquarium Lab Master Test Kit. It checks temperature, ammonia, nitrite, nitrate, and pH. Keep records to spot trends early and treat water as needed.

    Watch for stress and disease signs in your fish. Look for lethargy, loss of appetite, clamped fins, rapid breathing, erratic swimming, discoloration, or visible spots. If you see these signs, dim the lights for a few hours. Then, see if symptoms get better.

    Feed your fish carefully after moving them. Wait a few hours before giving a small amount of food. Then, slowly go back to regular feeding. Overfeeding can harm your fish by raising ammonia and nitrite levels.

    • Test daily for the first three days, then every few days for a month.
    • Perform partial water changes if ammonia or nitrite spikes appear.
    • Keep tank equipment running and check heater and filter performance.

    Watch your fish closely for a month after moving them. Track their behavior and water quality. Regular water changes help keep the environment stable while beneficial bacteria grow back.

    If you have ongoing water problems, unexplained deaths, or disease signs, get help fast. Contact a local aquarium shop, a fish veterinarian, or a professional aquarium service. Quick action helps protect your fish and keeps them safe.

    Troubleshooting Common Problems

    If you notice an ammonia or nitrite spike after moving, act quickly. This usually happens when biological filtration is lost. This can be due to dry filter media or decomposing organics. Start by doing partial water changes with dechlorinated water.

    Also, moisten the filter media or substrate and add beneficial bacteria. Reduce feeding and test the water daily until it’s stable.

    Temperature changes are common during transport. Cold weather or lack of insulation can cause temperatures to drop fast. Move fish to a warm place and use a heater or insulated containers.

    Slowly bring the temperature back to normal. Acclimate your fish to the tank’s temperature over an hour to prevent shock.

    Stressed fish may hide or stop eating after a move. This can be due to transport stress, bright lights, or changes in water chemistry. Keep the lights off and provide hiding spots.

    Limit handling and check the water’s basic parameters. Small water changes can help if the chemistry is off. Watch your fish’s behavior for a few days.

    Aggression or injury can occur when fish are crowded or incompatible species are together. Separate aggressive fish into quarantine containers to prevent further harm. Treat wounds with aquarium-safe antiseptics if necessary.

    Reassess the stocking levels and avoid mixing territorial species in the future.

    Structural damage to tanks can happen when they are moved or hit hard. If you find minor leaks, drain the tank and fix the seams with aquarium-safe silicone. For broken seals or cracked glass, do not continue to use the tank.

    Replace the tank or seek professional help. Contact a professional fish movers service or aquarium repair specialist for safe transport and advice.

    If problems persist, don’t hesitate to ask for help. Reach out to local aquarium shops, aquatic veterinarians, or professional fish movers. They can offer hands-on solutions and guide you on moving fish safely.

    Tips for Future Moves with Fish

    Plan ahead and get a compact moving kit ready for last-minute changes. You’ll need nets, a siphon, buckets with tight lids, Aqua One Water Conditioner, a battery air pump, spare filter media, and a test kit like NT Labs. Keep a checklist and log of water parameters and medications to speed up future moves.

    Store some used filter media and cool, dark water to maintain seeded materials. This helps your fish’s new home recover faster and cuts down on cycling time. If you move often or have unpredictable schedules, consider downsizing to a 5–7 gallon tank. Many find these smaller setups easier for moving fish.

    For long trips or complex tanks, get professional fish movers. They know how to keep everything moist, transport upright, and ensure animals are comfortable. Choose hardy, the right-sized fish for busy lives or travel. Avoid starting big reef tanks that need a lot of time to settle.

    Keep records and review them after each move. A simple log of supplies, baseline parameters, and successes or failures will help future moves. These habits—planning, using seeded media, downsizing wisely, and hiring pros when needed—are key to moving fish safely and reducing stress for everyone.

    FAQ

    What is a nano aquarium and which tank sizes are common?

    Nano aquariums are small tanks, usually under 20 gallons. Some people use 30 gallons as a limit. Sizes like 5, 10, and 20 gallons are common. Tanks smaller than 5 gallons are best for invertebrates because they change chemistry quickly.

    Why does moving fish safely matter?

    Aquariums are delicate ecosystems. Moving them wrong can damage the tank, harm fish, and mess up the water. For nano tanks, small water volumes mean chemistry changes fast. So, it’s important to keep the filter media, water, and plants safe during the move.

    When should I start planning my move?

    Start planning days to weeks before. Look up your landlord’s rules and arrange a move route. Get all the supplies you need, like lids and nets. Decide if you’ll downsize your tank temporarily.

    Begin the key steps 24 hours before moving. Stop feeding your fish and put them in temporary containers.

    What core tasks will I perform when moving a nano aquarium?

    The main tasks include stopping feeding 24 hours before, taking out decorations and plants. Then, siphon 75–80% of the tank water into sealed containers. Catch and move the fish in lidded bowls or tubs.

    Keep the filter media damp in tank water. Remove the substrate into watertight containers. Pack and protect your equipment. Insulate containers during transport.

    Rebuild the tank at your new place. Acclimate the fish slowly. Watch the water parameters closely after moving.

    How much water should I save and why?

    Save about 75%–80% of your tank water in clean, sealed containers. This keeps the tank’s chemistry and beneficial bacteria. It helps the tank recover faster when you rebuild it.

    Label the containers and keep them sealed and insulated during transport.

    What containers are best for transporting fish and water?

    Use clean 5–7 gallon food-grade buckets with tight lids. Lidded fish transport bowls, sealable plastic tubs, or sturdy food-grade totes are also good. Avoid glass containers that can break.

    Match the container size to the fish’s needs. Peaceful groups can share a container. But, territorial or aggressive fish should be moved separately to prevent fighting and injury.

    Do I need aeration during transport?

    For trips longer than two hours, use a battery-operated air pump to keep oxygen levels up. For short moves under 1–2 hours, airtight lids and minimizing handling are usually enough. Check the containers periodically and keep the lights off to reduce fish activity.

    How do I handle heaters, filters, and other equipment?

    Turn off and unplug heaters, filters, and pumps before removing them. Let heaters cool for about 30 minutes to avoid damage. Keep filter media and sponges moist in tank water inside sealed bags or containers.

    Wrap equipment in bubble wrap and pack it securely. Do not fully dry bio-media.

    Should I remove substrate before moving the tank?

    Yes. Remove the substrate (gravel or sand) into watertight containers and transport it separately. Do not wash the substrate, as it contains beneficial bacteria. Removing the substrate protects the tank seals and reduces the risk of damage during the move.

    How do I reduce stress for fish during transport?

    Keep fish in dark, closed containers with lids. Avoid feeding them for 24 hours before. Separate aggressive individuals. Use insulation to limit temperature swings and minimize handling.

    Run battery air pumps if the trip is long. Transport fish last and set up the aquarium first at your new apartment to shorten time in temporary containers.

    How do I manage temperature changes during the move?

    Record your tank’s temperature beforehand and aim to match it at the destination. Insulate containers with towels, thermal bags, or coolers. For extreme weather or sensitive species, use heat packs or cold packs outside insulation or battery-powered heaters.

    Never expose containers to direct heat or cold sources. Avoid sudden temperature shifts when reintroducing fish.

    What is the safest way to transport the empty tank?

    Transport the empty tank upright, well-padded with foam and bubble wrap. Place it in a sturdy box so it cannot shift. Move it last into the vehicle and place it on a flat surface.

    For in-apartment carries, use a stable dolly or two people. For vehicle transport, keep it upright and avoid stacking heavy items on top.

    How should I reassemble the tank at the new apartment?

    Choose a stable, level surface away from vents and high traffic. Replace the substrate and decorations. Refill the tank using your saved water to about half-full, then top off with dechlorinated tap water.

    Reinstall moist filter media to seed the filter. Add the heater and pumps, and power equipment up in stages. Reach the target temperature before returning the fish.

    How do I acclimate fish after transport?

    Use slow acclimation. For bagged fish, float sealed bags for about 45 minutes to equalize temperature. For lidded containers, add small amounts of tank water in intervals or use drip acclimation for 30–60 minutes to equalize water chemistry.

    When parameters match, gently net and transfer fish into the tank. Avoid pouring transport water into the display.

    What should I monitor in the first 48 hours after the move?

    Test temperature, ammonia, nitrite, nitrate, and pH with a reliable test kit. Watch fish for signs of stress like gasping, erratic swimming, hiding, and loss of appetite. Keep lights off for several hours, feed sparingly once fish resume normal behavior.

    Be prepared to do small water changes if ammonia or nitrite appears.

    What common problems happen after a move and how do I fix them?

    Ammonia/nitrite spikes—perform partial water changes, reintroduce moist media, add bottled beneficial bacteria, and reduce feeding. Temperature swings—move fish to properly heated area, use heater/insulation, and acclimate slowly.

    Stress or loss of appetite—keep lights off, provide hiding spots, check water chemistry, and give time to recover. Persistent issues may require contacting local aquarium shops, a fish veterinarian, or a professional fish transportation service.

    When should I consider hiring professional fish movers?

    Hire professionals for long-distance moves, complex systems like reef tanks, or if you’re uncomfortable handling transport logistics. Professional fish movers know how to keep media damp, maintain upright transport, place animals in the cabin, and manage temperature and aeration for sensitive species.

    What should be in a moving kit for future moves with fish?

    Keep a ready kit with nets (3″–10″ depending on species), siphon hose, clean buckets with tight lids, lidded transport bowls, battery air pump, water conditioner (dechlorinator), and a reliable test kit (e.g., NT Labs). Also, include spare filter media, towels, thermal insulation, and labels.

    Maintain a small amount of seeded media and a log of water parameter baselines to speed recovery when you move again.

  • Shrimp and Copper Safety: Why It’s Critical for Your Aquatic Ecosystem

    Shrimp and Copper Safety: Why It’s Critical for Your Aquatic Ecosystem

    Healthy water is key for shrimp to thrive, whether in aquariums or wild habitats. Shrimp play a big role in recycling organic matter and supporting other life forms. They are also a good source of protein and omega-3s for humans.

    Copper can be good in small amounts but harmful in excess. It’s important to know how copper affects shrimp. Even a little extra copper can harm shrimp and change the balance of their environment.

    Research in Michigan shows why copper levels matter. Copper from old mines has contaminated beaches and harmed shrimp and other sea creatures. This damage is clear in areas with high levels of copper.

    Rules help us understand these findings. There’s a safe level of copper in sediments, above which harm is likely. In Michigan, areas with high copper levels saw a decline in sea life.

    This article will cover how copper gets into water, its effects on shrimp and other sea creatures, and how to test for it. We’ll also talk about ways to reduce copper in aquariums and seafood, safe levels for aquatic life, and alternatives to copper treatments. Plus, we’ll look at new regulations and monitoring efforts.

    The Importance of Shrimp in Aquatic Environments

    A vibrant aquatic scene showcasing shrimp in their natural habitat, emphasizing their ecological role in marine ecosystems. In the foreground, a group of colorful shrimp, intricately detailed with translucent bodies and elongated antennae, forage among coral and seagrass. The middle layer features various small fish and other invertebrates interacting with the shrimp, illustrating a harmonious food web. In the background, a sun-dappled underwater landscape filled with diverse corals and soft light filtering through the water creates a serene atmosphere. The composition should be captured from a slightly elevated angle, using soft lighting to highlight the shrimp's delicate features and vibrant colors, evoking a sense of tranquility and highlighting the importance of these creatures in aquatic environments.

    Shrimp play a vital role in many water ecosystems. They act as both benthic and pelagic invertebrates. They break down organic matter while feeding.

    As detritivores, they recycle nutrients. This keeps sediments healthy for other life forms.

    Shrimp are a major food source for fish and birds at critical times. Many larval and juvenile fishes rely on them for growth and survival. A decrease in shrimp can weaken fish recruitment and reduce fishery productivity.

    Field sampling in Lake Superior shows the fragility of these communities. Beaches with high stamp sands have fewer benthic taxa and lower zooplankton counts. At high stamp sand sites, zooplankton abundance is roughly two orders of magnitude lower.

    This highlights the vulnerability of shrimp and other small invertebrates to metal contamination.

    Your access to shrimp health benefits depends on maintaining healthy populations. Shrimp provide lean protein, minerals, and omega-3s for your diet. They support fisheries and aquaculture jobs that are important to coastal economies across the United States.

    Protecting these benefits means managing shrimp and copper safety in both wild and farmed systems. Copper contamination can alter invertebrate communities and shift food webs. This affects seafood availability and prompts stricter shrimp consumption guidelines when contamination is detected.

    Not all invertebrates respond the same to copper. Sensitivity varies by taxon. So, habitat protection and monitoring must account for species-specific vulnerability. This approach helps keep shrimp ecological role intact while supporting safe, reliable seafood for your table.

    Understanding Copper’s Toxicity to Invertebrates

    A close-up view of shrimp exhibiting signs of copper toxicity, showcasing their vibrant colors fading to dull shades as a visual cue of distress. In the foreground, focus on the shrimp with their antennae and legs prominently displayed, surrounded by a murky environment that hints at contamination. The middle ground includes a blurred aquamarine background of water with hints of copper particles suspended, shimmering to signify toxicity. Soft, diffused lighting creates a somber atmosphere, casting gentle shadows that enhance the mood of urgency and concern. The image should be sharp and highly detailed to reflect the intricate biology of shrimp affected by copper, illustrating the severity of the threat to invertebrates.

    Copper is vital for life, but its free form (Cu2+) is harmful to small animals. In water, copper can combine with salts and organic matter. This makes it less available to harm, but the free Cu2+ is most toxic to gills, exoskeletons, and nerves.

    In seawater, copper levels are usually around 3 µg/L naturally. In aquariums, copper can stick to rocks, sand, and biofilms. This reduces immediate harm but can release copper later, causing problems for shrimp and other invertebrates.

    How much copper is toxic varies by species and water conditions. Hobbyists and lab studies show that levels over 20 µg/L can harm corals and many invertebrates. Signs include coral bleaching, stressed behavior, and sudden deaths of mollusks and shrimps.

    Sediment-bound copper is also important. Studies in the Great Lakes show it can lead to fewer benthic invertebrates and lower diversity. Different species react differently to copper, making it hard to predict risks.

    Interactions with other elements and organic content affect copper’s toxicity. Ratios with zinc, vanadium, nickel, and molybdenum change how harmful it is. Dissolved organic carbon and biofilms can also reduce free Cu2+ levels. This means you need to consider the balance of elements when assessing copper’s impact on reefs and tanks.

    Even below lethal levels, copper can have effects. It can alter feeding and mating behavior and reduce reproductive success. It can also build up in tissues, posing long-term risks to predators and people who eat seafood. Monitoring for copper toxicity in shrimp and contamination is key for animal welfare and food safety.

    Sources of Copper Contamination

    It’s important to know how copper gets into water to protect shrimp and ensure safety. Copper can come from human activities and natural processes.

    Primary sources of copper pollution include:

    • Old and current mining, like stamp mill tailings and sands that erode into coastal areas.
    • Industrial waste from metal processing and manufacturing plants.
    • Urban runoff with brake dust, roofing particles, and other copper-bearing debris.
    • Municipal wastewater that adds dissolved copper and particles.
    • Antifouling paints on boats that release copper into marinas and harbors.
    • Corroded plumbing and piping in older buildings that release copper into tap water.
    • Certain pesticides and fertilizers that contain trace metals.

    The Lake Superior case shows the lasting impact of copper pollution. Historic copper mining near Gay, Michigan left behind stamp sands on beaches. These sands, carried by waves, contaminated nursery and spawning reefs, harming invertebrates.

    In aquaculture and home systems, copper can come from unexpected sources. Tap water, trace element solutions, some fish and coral feeds, and coloration products can introduce copper. Brands like Fauna Marin warn that trace element solutions and feeds may contain copper, making careful sourcing and monitoring essential.

    Sediments act as long-term copper reservoirs. They can release copper during storms, dredging, or changes in oxygen levels. The relationship between stamp sand and copper concentration is complex, making simple predictions unreliable.

    Legacy contamination can last for decades. Old mining tailings and disturbed sediments can continue to erode and transport copper into coastal habitats. This poses ongoing risks to shrimp and copper safety even after mining stops.

    To better understand copper pollution, combining site history with targeted testing is key. This approach helps pinpoint the main sources of copper in water. It guides focused monitoring in aquaculture and coastal management.

    Testing Water for Copper Levels

    There are many ways to test copper levels in your tank or pond. Home test kits can measure dissolved copper in micrograms per liter (µg/L). Labs can also test total recoverable copper in water and sediment, showing it in mg/kg dry weight for sediments.

    Choose reliable test kits that show µg/L if you have shrimp or other invertebrates. Fauna Marin suggests about 2–5 µg/L in seawater is normal. Values up to roughly 10 µg/L might be okay if most copper is not harmful. But, readings above about 20 µg/L can harm invertebrates, so test often if you think there’s exposure.

    Field and sediment sampling follow strict protocols. Petite Ponar grabs are used to collect benthic sediment for invertebrate counts and metal analysis. Labs then measure total recoverable Cu in sediment (mg/kg DW) and compare it to PEC thresholds and probabilistic indices like PEQs.

    • Interpret sediment numbers: Cu >149 mg/kg DW or a ΣPEQs >1 flags likely adverse effects to benthic life.
    • Interpret water results in context: raw µg/L values depend on complexation, organic content, salinity and other trace elements.
    • When possible, request dissolved versus total copper and consider speciation tests to assess bioavailability.

    For copper monitoring in aquaculture, pair chemical data with biological surveys. Measure benthic taxa and zooplankton density alongside laboratory metal analysis. This approach mirrors long-term environmental studies and gives a clearer picture than chemistry alone.

    Set monitoring frequency to match risk. Test after suspected contamination events or product additions. In sensitive hobby systems, check monthly. In commercial aquaculture and environmental programs, perform periodic water and sediment sampling with lab analyses plus biological checks.

    Consider limits of detection and bioassays. Use biotic indicators such as shrimp or mollusks to complement chemical data when practical. This layered strategy improves confidence in shrimp and copper safety and helps you track copper levels in seafood pathways over time.

    Safe Copper Levels for Aquatic Life

    It’s important to keep copper levels low to protect sensitive aquatic life. Seawater naturally has up to 3 µg/L of copper. Many aquarium experts suggest keeping levels between 2–5 µg/L.

    Be cautious if copper levels go above 10 µg/L. Copper can bind with organic matter, making it harder to measure. Levels over 20 µg/L can harm corals and kill mollusks and shrimps, so act fast.

    • Use sensitive test kits or labs to verify levels when you manage reefs or shrimp culture.
    • Target the lower end of recommended ranges when you keep highly vulnerable taxa like benthic copepods or ornamental shrimp.

    Sediment is also a concern because copper can accumulate there. The common Probable Effects Concentration (PEC) for Cu in sediment is about 149 mg/kg dry weight. Risk assessments show harm likely when values exceed 1.

    Field studies, like those on Lake Superior beaches, show copper in sediment can harm benthic life. This is why it’s important to keep copper levels low, even more so in systems with sensitive species.

    How copper affects different species varies. Benthic invertebrates and small crustaceans are very sensitive. So, it’s best to keep copper levels low in systems with these creatures.

    Bioavailability also plays a role in safe copper levels. Factors like organic matter, pH, and other metals can change how toxic copper is. Keeping a balanced mix of trace elements can help reduce risks.

    When buying or harvesting shrimp, remember that copper levels in seafood are regulated. Commercial producers follow guidelines to keep copper within safe limits. If you suspect contamination, follow public health advice and have products tested.

    Reducing Copper Levels in Your Aquarium

    If you find high copper levels, act quickly. Start by changing some water with low-copper water or RO/DI water. Stop using any copper-based meds or supplements until copper levels are safe for shrimp.

    Take out any items that might be adding copper, like decorations or liquid additives. Clean decorations and gently stir the substrate to release trapped copper. This might take some time, but it’s worth it.

    • Use activated carbon to adsorb dissolved organics and some metals.
    • Add zeolite to capture certain ions and reduce acute copper exposure.
    • Consider specialized metal adsorbers and iron- or aluminum-based media for targeted aquarium copper removal.

    Brands like Seachem and Eheim make good filtration media. Fauna Marin and other reef suppliers suggest using both mechanical filtration and metal adsorbers for the best results in reef or shrimp tanks.

    Use reverse osmosis water for water changes and top-offs to avoid adding copper. Test supplements, pellet foods, and live feeds before adding them to your tank to avoid contamination.

    After fixing the copper issue, keep testing water often. Adjust how much you add to the tank and avoid adding too many trace elements. In reef systems, keep the element ratios balanced to avoid copper spikes that harm invertebrates.

    If copper keeps showing up without a clear source, send water and sediment samples to a lab for analysis. They can tell you about dissolved versus particulate copper and help you find a long-term solution.

    If you plan to eat shrimp from your tank, make sure to handle them safely to avoid copper contamination. Proper rinsing and knowing where your shrimp come from helps cook them safely while keeping your tank healthy.

    Choosing Copper-Free Alternatives

    To protect shrimp, choose copper-free options for medicines, food, and tools. Always check labels and safety sheets for copper. Look for products from brands like Fauna Marin that have low copper or are labeled copper-free.

    For treating diseases, pick treatments that are safe for shrimp. Options include hydrogen peroxide dips and certain formalin-based treatments. Always test any new treatment to make sure it’s safe for fish and shrimp.

    • Inspect feed and supplement labels for copper content.
    • Choose formulations labeled copper-free or with documented low Cu content.
    • Use reputable brands that publish ingredient analyses.

    Replace copper plumbing and fittings with non-copper ones to stop copper from leaking into your system. Use RO/DI filtration to remove copper from tap water before it reaches your tanks and ponds. These steps help keep shrimp safe in both hobby setups and small farms.

    In aquaculture and wild-harvest operations, use practices that lower exposure to contaminated areas. Monitor copper levels in intake water and check feed quality regularly. This protects both the stock and buyers.

    When switching to copper-free treatments or products, watch water and organism health closely. Regular testing and slow changes help avoid introducing other harmful substances. This keeps shrimp safe and your systems stable.

    Best Practices for Shrimp Care

    Start with stable water quality. Keep the temperature, salinity, and pH steady. Use RO/DI water or tested low-copper municipal water for changes and top-offs.

    Test your water regularly for copper in µg/L and other key parameters. Watch shrimp for early signs of stress like changes in behavior or reduced feeding. Regular observation helps you act fast.

    Feed a varied, natural diet and choose feeds with clear elemental profiles. Avoid over-supplementing trace elements. Proper nutrition boosts shrimp health and reduces vulnerability to toxins.

    Manage substrate and décor to limit metal reservoirs. If you suspect sediment-bound copper, clean or replace the substrate. Use inert substrates and rinse decorations thoroughly before adding them.

    Quarantine new arrivals and use shrimp-safe treatment methods. Never treat a tank with copper-based medications when invertebrates are present. Following quarantine protocols protects the entire system.

    • Use sensitive invertebrates and benthic checks as biological indicators.
    • Monitor benthic taxa and zooplankton where applicable to detect contamination impacts.
    • Keep records of test results and observations to spot trends early.

    If you raise shrimp for eating, follow seafood safety rules and testing protocols. Adhere to shrimp consumption guidelines and confirm copper and other metals stay within allowable limits before harvest or sale.

    The Future of Copper Regulations

    Expect stricter rules and better monitoring as regulators focus on both seafood safety and protecting the environment. They use sediment PEC/PEQ frameworks and water quality guidelines to check risks. These tools help set limits on harvesting and test metals in seafood, but there’s more to it.

    Science is moving toward a more complete approach. It combines chemical tests with biological surveys. For example, studies in Lake Superior link sediment copper levels to impacts on benthic invertebrates and zooplankton. This method helps spot copper problems in shrimp and other invertebrates early, allowing for timely action.

    There will be a push for better predictive models. These models should show how reducing stamp sands or source inputs helps the environment. Current models are not always reliable, so scientists and regulators need better tools to predict outcomes and set priorities for cleanup.

    On the industry side, expect more use of copper-free products and source-water treatment. Routine copper monitoring in aquaculture will also become more common. These steps help meet seafood safety standards and protect fish from copper contamination. As a consumer or caretaker, look for transparent producers, follow advisories, and use best practices to lower metal exposure in your tanks and coastal areas.

    FAQ

    What is the relationship between shrimp and copper safety?

    Shrimp are important in the ocean’s food web. They provide food for humans and are a good source of omega-3s. Copper is good for us but can be harmful in certain forms.

    When copper mixes with water or settles in sediments, it can harm shrimp and other sea creatures. This can affect their numbers, how they reproduce, and their behavior. It also builds up in the environment, posing a risk to the health of our oceans and the safety of seafood.

    How do shrimp contribute to aquatic ecosystems and fisheries?

    Shrimp help clean the ocean floor and serve as food for fish and birds. Young fish and birds rely on shrimp and other small sea creatures for survival. Healthy shrimp populations are key to the success of fish and fishing industries.

    When shrimp numbers drop due to copper pollution, it can have a ripple effect. This can lead to fewer fish and lower earnings for fishermen.

    How does copper become toxic to shrimp and other invertebrates?

    Copper is toxic when it’s in its free form, known as Cu2+. In the ocean, copper often binds with other substances, making it less harmful. But, certain forms of copper can harm sea creatures.

    Even small amounts of copper can cause problems. It can affect how shrimp reproduce and behave. High levels can even kill corals and other sea creatures.

    What does field evidence from Lake Superior tell us about copper impacts?

    Research near the Keweenaw Peninsula shows that copper mining has polluted the area. The pollution has made the beach less diverse and reduced the number of sea creatures.

    The study found that copper in the sediment was more closely linked to the decline in sea life than the amount of mining waste. This highlights the direct harm copper can cause to the environment.

    What sediment and water thresholds indicate concern for aquatic life?

    A key benchmark for sediment is 149 mg Cu/kg dry weight. Values above this suggest harm to sea life. In water, levels above 20 µg/L can harm corals and invertebrates.

    What are the primary human and natural sources of copper contamination?

    Copper pollution comes from old and new mines, industrial waste, and urban runoff. It also comes from antifouling paints, corroded plumbing, and some farming practices. Aquarium and aquaculture products can also contribute to pollution.

    How can you test your aquarium or local water for copper?

    Use home test kits to check for dissolved copper in µg/L. For accurate results, send samples to a lab for total recoverable Cu in sediments. Biological monitoring can also help assess the impact of copper.

    What practical steps reduce copper in aquaria?

    Start by changing some of the water with low-copper water and remove any suspect decorations or supplements. Use activated carbon and zeolite to lower copper levels. Clean decorations and substrate to remove copper from surfaces.

    How do you choose copper‑free alternatives for treatment and supplements?

    Look for products with no copper content. Use copper-free medications for treating fish in invertebrate tanks. Choose trace element mixes or feeds that have low or no copper. Always test products if you’re unsure.

    What monitoring strategies should aquaculture operators use to protect shrimp?

    Regularly test the water and sediments for copper. Check the metal content in feed and supplements. Use reverse osmosis/desalination (RO/DI) water treatment when possible. Combine chemical tests with biological surveys to monitor the health of your shrimp.

    How does sediment‑bound copper affect long‑term habitat health?

    Sediments can act as long-term reservoirs for copper, releasing it during storms or erosion. This can harm habitats for years after pollution. Even small amounts of copper in sediments can pose a significant risk to the environment.

    Which shrimp and invertebrates are most sensitive to copper?

    Some sea creatures are more sensitive to copper than others. Field data show that small invertebrates and benthic copepods are very vulnerable. It’s best to be cautious and aim for low copper levels in sensitive ecosystems.

    How do other elements and organics influence copper toxicity?

    Copper toxicity is affected by other elements and organic matter. High levels of organic matter can reduce copper toxicity. But, the wrong mix of elements can increase stress on sea creatures. Keeping a balanced mix of trace elements is important.

    When should you send samples to a laboratory for analysis?

    Send samples to a lab for analysis if you suspect copper pollution or need data for regulations. Labs can provide detailed information on copper levels in sediments and water. This helps understand the impact of copper on the environment.

    What human‑consumption guidance applies if shrimp may be contaminated?

    Commercial producers follow seafood safety guidelines to keep copper and other metals low. If you raise shrimp for food and suspect contamination, follow health advisories. Have your harvest tested and follow local guidelines until it’s safe to eat.

    What long‑term policy and remediation actions help reduce copper impacts?

    Focus on cleaning up old mine sites and protecting coastal areas from pollution. Increase monitoring of both chemicals and sea life. Improve models to predict copper pollution. Promote the use of copper-free products and better water treatment in aquaculture and aquariums.

  • How to Select One Main “Star” Fish for Your Nano Aquascape

    How to Select One Main “Star” Fish for Your Nano Aquascape

    Choosing a centerpiece fish for your nano aquascape is key. You want one fish that catches the eye and fits your tank well. This guide helps you pick a fish that looks great, behaves well, and is easy to care for.

    Nano tanks are special because they show every little change. The small water volume means temperature, chemistry, and waste can change fast. A big or messy fish can stress others, harm the water, and upset the whole tank.

    You don’t have to choose a fish for a centerpiece. Invertebrates like brittle stars or small starfish can also be the main attraction. For example, some starfish like the double star Iconaster longimanus and the sand-sifting Astropecten polycanthus are small and might fit in a nano reef tank. Brittle and serpent stars can also work in small tanks if fed weekly. But, bigger species like Linckia, Fromia, and Chocolate Chip starfish need bigger tanks or special diets.

    Always choose captive-bred fish and invertebrates if you can. They usually adapt better, eat prepared foods easily, and are calmer. These traits are important when picking a standout centerpiece fish.

    This article will guide you on why a centerpiece is important, what to consider, popular choices, and how to pick the right one for your nano tank. Use this guide to make a smart choice for your nano aquascape.

    Importance of Choosing a Centerpiece Fish

    A vibrant aquarium scene featuring a stunning centerpiece fish, such as a majestic Betta or an elegant Discus, gracefully swimming amidst lush aquatic plants. In the foreground, the centerpiece fish is showcased with its vivid colors and intricate fin patterns, illuminated by soft, natural lighting that enhances its features. The middle ground includes various compatible smaller fish peacefully cohabiting, emphasizing the importance of choosing compatible species. The background reveals a well-designed aquascape with rocks, driftwood, and a variety of green plants, creating a harmonious underwater habitat. The overall mood is serene and inviting, showcasing the beauty of a balanced nano aquascape, captured from a slight angle to highlight the depth and details of the environment.

    Your centerpiece fish is the heart of your nano aquascape. It’s the first thing people notice and shapes the tank’s look. Choosing the right fish means finding one that matches in color, movement, and size.

    The centerpiece fish also affects how other fish behave. Active fish can change the tank’s dynamics. For example, some fish might start hiding more or eating at different times.

    Choosing the right fish is key in small tanks. They help keep the tank clean by eating leftovers. Some fish even help move sand and clean the bottom of the tank.

    But, small tanks can be tricky. If a fish dies, it can quickly make the water dirty. Some fish are also very sensitive to changes in their environment.

    It’s important to pick fish that are easy to care for. This helps keep the tank healthy and looking good. Look at different fish options before making a decision.

    Factors to Consider When Selecting a Fish

    A serene aquascape featuring a beautifully designed aquarium with a variety of vibrant, healthy fish swimming gracefully. In the foreground, a large, colorful centerpiece fish, resembling a Betta or a dwarf angelfish, stands out amidst lush aquatic plants, rocks, and subtle decorations. Surrounding the centerpiece fish, smaller species are also present, demonstrating compatibility. The lighting is soft and natural, creating a calm and inviting atmosphere, with reflections dancing on the water's surface. The background showcases a well-structured aquascape, emphasizing factors like plant growth and fish behavior. Capture the image from a slight angle to add depth, highlighting the tranquility and beauty of selecting the perfect fish for an aquascape. Ensure no text or logos are included in the composition.

    Start by checking the tank size. Many fish need a certain volume to thrive. For example, Ocellaris Clownfish need at least 10 gallons. Blue-Green Chromis and Yellow Coris Wrasse need more space due to their size and activity.

    Next, look at the fish’s diet and how often it needs to eat. Some fish, like Blue-Green Chromis, need to eat often. Others, like Lawnmower and Starry Blennies, eat algae. Make sure you can feed them what they need.

    • Temperament and tankmates: peaceful, semi-aggressive, or aggressive labels guide compatibility.
    • Temperament and tankmates: peaceful, semi-aggressive, or aggressive labels guide compatibility.
    • Maroon Clownfish can be aggressive and grow up to six inches, so plan for their size.

    Consider any special needs the fish might have. Some need deep sand to burrow. Others need hiding places. Make sure your tank can provide what they need.

    Think about how sensitive the fish is. Some, like echinoderms, are very sensitive. They need stable water and gentle care.

    Choose captive-bred fish if you can. They usually adapt better to life in a tank. They also eat prepared foods more easily.

    Think about how big the fish will get. Don’t buy fish that will outgrow your tank. Some fish, like starfish, get very big and need a lot of food.

    1. Follow retailer minimums and aim to exceed them when possible.
    2. Match feeding regimes to the fish’s natural diet and activity level.
    3. Ensure your tank supplies ecological resources—microfauna, algae films, detritus—if a species depends on them.

    Use this guide to help you choose the right fish. Remember to consider how well different fish will get along. This will keep your tank balanced and healthy.

    Popular Centerpiece Fish Options for Nano Aquariums

    For a standout fish in a small tank, pick from small, peaceful species. These fish are perfect for tanks as small as 10 gallons. They add beauty without taking over the space.

    • Clown Goby (Citron or regular) — Reaches about 2 inches, peaceful and reef-compatible. It perches on corals and rockwork, making it one of the top centerpiece fish options for pico and nano tanks.
    • Sharknose Goby and Blue Neon Goby — Tiny cleaner gobies that stay under 2 inches and show natural cleaning behavior. Captive-bred specimens are available, making them reliable choices among the best centerpiece fish for aquarium setups.
    • Court Jester / Rainford’s Goby — About 3 inches at most, omnivorous and sand-sifting. It grazes rocks and helps keep substrates active, so it ranks high among top centerpiece fish options for small reef or mixed nano systems.
    • Ocellaris Clownfish — Iconic, hardy and often captive-bred. They adapt to 10-gallon homes and act as striking focal fish in planted and reef-style nanos, qualifying as one of the best centerpiece fish for aquarium hobbyists.
    • Chalk Bass / Basslet — Vivid color with a compact form. Many basslets do best in larger nano cabinets and a minimum 30 gallons is recommended for some species, but small basslets can serve as dramatic focal points when conditions allow.

    Pair small basslets or a clown goby with lush plants or coral frags for contrast. These combos highlight the fish without overcrowding.

    Think about invertebrates as centerpiece alternatives. Brittle and serpent stars clean up and thrive in 10–15 gallon systems with weekly feeding. You can find them in tiger, leopard, and red colors.

    • Double star (Iconaster longimanus) and small sand-sifting stars (Astropecten polycanthus) — Smaller, hardy starfish that can function in well-established nano reefs with proper algae and sand-bed conditions.

    Be careful with starfish choices. Avoid fragile or large species like Linckia, which need 75–100+ gallon tanks and are sensitive to transport stress. Sand-sifting stars commonly demand deep sand beds and very mature systems; they often fail in smaller setups.

    Avoid feather stars and sea lilies for hobby tanks. They need constant plankton feeding and don’t adapt well to closed aquaria. Choosing a vetted, practical option ensures the success of your aquarium project.

    Assessing Your Aquarium Environment

    First, check your tank’s size and water stability. Make sure your nano aquarium is big enough for the fish you want. A bigger tank helps keep water stable, avoiding sudden changes in ammonia or nitrate.

    Next, look at the substrate depth and type. Sand-sifters and gobies need 2 to 6 inches of live sand. Many starfish need deep, biodiverse beds and well-cycled systems.

    Then, evaluate your live rock and refugia. Fish that eat bacterial films or tiny invertebrates need established live rock and a refugium. Running a refugium or growing copepods is key for these feeders.

    Match your lighting and flow to your fish’s needs. Shy fish like dimmer caves and gentle flow. Feather stars need constant plankton and steady flow, but hobby lighting and flow might not be enough.

    Check your clean-up crew and population. Think if your snails and gobies will work with your main fish. Nassarius and Cerith snails are good alternatives to starfish for cleaning the sand.

    Plan for water quality. Regular testing and care are vital. A good maintenance plan is key for a small tank’s success.

    Take steps before buying a fish. Make sure your sand depth and organic load match the fish’s needs. Choose species that don’t need constant plankton if you can’t keep a refugium. Use the checklist to help choose the right centerpiece fish for your tank.

    Evaluating Your Personal Preferences

    First, think about what you want in a centerpiece fish. Consider their color, how they behave, and how active they are. For example, a Royal Gramma or neon goby can add bright colors. A clownfish can make your tank lively with its antics.

    Think about how you want to interact with your fish. Do you like watching them swim, or do you prefer fish that interact with you? Maybe you want a fish that’s active during the day or one that’s more active at night.

    Also, think about how much time you have to care for your fish. Some fish need to be fed often and require a lot of attention. For example, Chromis need to be fed regularly and need space to swim together. Clownfish, on the other hand, are easy to care for and can thrive in a variety of conditions.

    Consider how comfortable you are with caring for fish with special needs. Some fish, like Linckia or sand-sifting stars, need very specific conditions to thrive. If you prefer less stress, choose fish that are easy to care for and can adapt well to their new home.

    • Blue-Green Chromis: striking schooling behavior, need larger tanks and frequent feedings.
    • Clownfish: hardy, small, often captive-bred; good balance of looks and care.
    • Brittle stars: interesting nocturnal behavior and clean-up benefits if you can target-feed them.

    Think about the environment you can provide for your fish. Some fish need deep sand beds, a special area for them to hide, or specific feeding times. If you don’t want to change your tank setup often, choose fish that do well in standard conditions.

    Use these tips to help you choose the right centerpiece fish. Consider how your choice will fit your tank, your schedule, and your comfort level with caring for fish. This way, you can pick a fish that will be the star of your tank and fit your lifestyle.

    Recommended Centerpiece Fish for Beginners

    Start with species that fit a small setup and your skill level. The list below focuses on hardy, small fish that are easy to find in pet stores. These fish are great for nano or pico setups.

    1. Ocellaris Clownfish — Minimum 10 gallons. Omnivore and widely captive-bred, this fish is hardy and iconic. It makes a strong, colorful focal point and often does well as a pair, which gives your tank a lively center without complex needs.

    2. Clown Goby — Tiny, maxing near 2 inches, and suitable for 10-gallon tanks. Peaceful and reef-compatible, the clown goby perches on rocks and becomes a charming perching centerpiece in pico and nano aquascapes.

    3. Sharknose / Blue Neon Goby — Minimum 10 gallons. These small cleaner gobies stand out as a single showpiece. Captive-bred options reduce acclimation stress and make them among the best centerpiece fish for aquarium setups with limited space.

    4. Watchman Goby + Pistol Shrimp — Often recommended for a pair focal point. Many guides suggest 30 gallons, yet some small setups with proper sand depth can host smaller goby species. This duo offers unique symbiotic behavior that becomes a living centerpiece.

    5. Brittle Stars (appropriate species) — Can be kept in 10–15+ gallon tanks when target-fed weekly and when you choose hardy species. They provide a subtle, nocturnal focal point that appeals to hobbyists who prefer low-visibility centerpieces.

    These choices match common beginner needs: captive-bred supply, small adult size, straightforward feeding, and lower sensitivity to shipping and acclimation. When choosing a centerpiece fish, always verify the species’ exact minimum tank size and create the proper microhabitat.

    Plan your aquascape so the centerpiece has hiding spots, perches, or substrate depth it requires. That setup reduces stress and keeps the fish active and visible. Use these recommended centerpiece fish for beginners to narrow your options and build confidence as you learn aquarium care.

    Advanced Tips for Choosing Your Star Fish

    When picking a centerpiece fish, look beyond how it looks. Make sure you know what species it is and where it came from. Ask the seller to show you the underside of the Linckia and check if the limbs are firm and move well.

    Shipping and getting the fish to acclimate to your tank is key. Linckia stars often get stressed during shipping. Try to buy in person and do a slow drip acclimation for 2–3 hours to help them adjust.

    Know how your fish will eat in the long run. Linckia stars might eat bacteria, algae, sponges, and leftover food. But, feather stars need to eat plankton all the time. They’re better suited for big public aquariums or research places, not home tanks.

    Be careful with sand-sifting stars in small tanks. They can clean out the sand too fast, leaving no food for them. For smaller tanks, consider using Nassarius snails, Cerith snails, gobies, or Fighting Conchs instead.

    If you have a nano tank with brittle or serpent stars, you’ll need to feed them often. Watch out for aggressive green brittle stars. They can grow big and might hurt your other fish.

    • Source captive-bred specimens when available.
    • Inspect animals in person for sluggish limbs or discoloration.
    • Plan feeding strategies and acclimation before introduction.

    Keep a close eye on your tank after adding a star. Some stars need a tank that’s been around for a while and has lots of life. Others prefer a clean, captive-bred environment.

    Protect your investment by following tested advice. Make sure you know the species, where it came from, and what care it needs. This will help your star fish thrive.

    Common Mistakes to Avoid

    Knowing common mistakes can help you choose the right centerpiece fish for your nano aquascape.

    One mistake is picking species that grow too big or are too sensitive. Some Linckia and sand-sifters need more space, special food, and stable water. In a small tank, they might starve slowly or die suddenly, causing ammonia spikes.

    • Ignoring the needs of sand beds and microfauna can lead to slow starvation for sand sifters. They need deep, biodiverse sand beds and larger systems to thrive.
    • Not checking the fish before buying is risky. Look for color uniformity, limb stiffness, and watch for activity. Linckia may hide in bright light or seem inactive when stressed.
    • Buying shipping-sensitive species online increases the risk of early failure. Shipping shock is a common cause of death for delicate animals.
    • Not planning for feeding frequency and diet needs can lead to failure. Some fish and invertebrates need to be fed multiple times a day or constantly. Typical hobby feeding may not be enough.
    • Not planning for removing dead animals is dangerous in a nano tank. A single dead animal can pollute the water quickly. Be ready with emergency water changes and testing gear.

    Use these tips to avoid common mistakes when choosing a centerpiece fish. Ask about diet, tank history, and captive-bred alternatives at your local fish store. Inspect the fish before buying and choose species that fit your tank size and maintenance routine.

    When picking a centerpiece fish, prepare for targeted feeding or refugium support if needed. Verify species suitability, confirm long-term care needs, and have a plan for quick removal and recovery if mortality occurs.

    By following practical steps and asking informed questions, you can reduce risks and improve your success with a main star in a nano aquascape.

    Finalizing Your Choice

    When picking the perfect centerpiece fish, make a checklist to confirm your choice. First, check if your tank’s size and conditions match the fish’s needs. Make sure there’s extra space for waste.

    Next, match the fish’s eating habits to your schedule. Some fish eat often, while others eat less but more frequently. Also, consider the fish’s habitat needs, like substrate and live rock.

    Prefer fish that were bred in captivity. If you buy invertebrates, check them for health and color. Plan how to slowly introduce them to your tank.

    Have a plan for emergencies. Keep water-change supplies ready and know how to quickly remove a dead fish. Start with easy-to-care-for fish like Ocellaris Clownfish or Blue Neon Goby.

    Balance your desire for a beautiful tank with what you can handle. Choose a centerpiece that fits your tank and your care level. Avoid risky choices like certain starfish or sand-sifting fish for small tanks.

    Keep learning about your fish’s needs. Ask experts at local fish stores or experienced hobbyists for advice. This will help you pick the best centerpiece fish.

    FAQ

    What is the goal when choosing a single centerpiece for a nano aquascape?

    The goal is to pick one standout fish or invertebrate. It should be the “star” of your nano aquascape. It must fit your tank size and equipment well.

    This centerpiece should show color and activity. But it should not overwhelm the system or outgrow its habitat.

    Why do nano aquascapes demand extra care when selecting a centerpiece?

    Small tanks are more sensitive to changes. A wrong centerpiece can stress other fish or invertebrates. It can also deplete food or cause water quality issues if it dies.

    Nano systems need species that match their limited ecological capacity. Size, diet, and tolerance are key.

    Can invertebrates be used as centerpieces, or should I only consider fish?

    You can choose fish or invertebrates. But each must meet species-specific needs and tank size requirements. Some starfish and brittle/serpent stars can work in small reef nanos.

    Others, like feather stars and many Linckia, are poor choices for home tanks.

    Which starfish species are sometimes suitable for nano reef tanks?

    Some small starfish, like the double star Iconaster longimanus, can work in nano reef setups. They need the right diet and sand/food resources.

    Brittle and serpent stars are generally better options. They need weekly target-feeding and choosing hardy varieties.

    What are the main roles a centerpiece should play in my tank?

    A centerpiece should be a visual focal point. It should also influence tank dynamics with its activity level. It should have an ecological role, like grazing algae or sifting sand.

    Choose a species whose ecological role matches your tank’s resources and maintenance plan.

    How important is choosing a captive-bred specimen?

    Choosing a captive-bred specimen is very important. They usually acclimate better, accept prepared foods, and have milder temperaments. Captive-bred availability reduces shipping stress and long-term problems.

    What minimum tank sizes should I watch for when selecting a centerpiece?

    Follow species-specific minimums. Ocellaris Clownfish need at least 10 gallons. Blue-Green Chromis need roughly 30 gallons. Yellow Coris Wrasse and other larger, active species need 50+ gallons.

    Always exceed retailer minimums when possible. This gives a safety buffer in nanos.

    How do diet and feeding frequency affect my choice?

    Match feeding needs to your routine. Planktivores and active swimmers need frequent feedings. Herbivores like Lawnmower Blennies need constant algae or dried seaweed.

    Many starfish and brittle stars require target-feeding or abundant microfauna. If your tank lacks natural microfauna, avoid species that depend on it.

    Which peaceful small centerpiece fish work well in nanos?

    Good nano-friendly choices include Clown Gobies (Citron/regular, ~2″, 10 gallons), Sharknose or Blue Neon Gobies (cleaner behavior, ~2″, 10 gallons), Court Jester/Rainford’s Goby (~3″, 10 gallons), and Ocellaris Clownfish (iconic, hardy, 10 gallons). These species are small, often captive-bred, and reef-compatible.

    Are brittle stars a good centerpiece choice for a nano tank?

    Yes—certain brittle and serpent stars can make subtle nocturnal centerpieces and useful clean-up crew members in 10–15+ gallon tanks if you target-feed weekly and choose hardy species. They reach into crevices with flexible arms and help consume detritus, but they require careful monitoring.

    Which starfish and invertebrates should I avoid for nano tanks?

    Avoid feather stars and many common Linckia and Fromia sold online; they often have specialized diets, grow larger than advertised, or suffer shipping stress. Sand-sifting starfish generally require deep, biodiverse sand beds and larger tanks—often 100+ gallons—to remain healthy long-term.

    What substrate and habitat requirements matter most?

    Sand-sifters need deep live sand (2–6″+ depending on species) and abundant microfauna. Grazers and cleaners need established live rock and refugia rich in copepods. Provide hiding spaces and dimmer microhabitats for shy species. Match the physical environment to the species’ natural niche before purchase.

    How should I acclimate sensitive species like Linckia?

    Plan slow, extended acclimation—Linckia and similar stars often require a 2–3 hour drip acclimation and are best purchased in person to reduce shipping stress. Monitor limb firmness and behavior post-introduction for early signs of distress.

    What are the most common mistakes hobbyists make when choosing a centerpiece?

    Common errors include buying species that outgrow the tank or need specialized diets (Linckia, Chocolate Chip, sand-sifters), ignoring sand-bed and microfauna requirements, relying on unchecked store claims, and purchasing shipping-sensitive invertebrates online. These mistakes often lead to slow declines or sudden tank crashes.

    How can I reduce the risk of a centerpiece causing a tank crash?

    Select species that fit your tank’s size and ecology, prefer captive-bred specimens, ensure adequate substrate and live rock, set up a refugium or cultivate copepods if needed, plan targeted feeding, and have emergency water-change supplies and a removal plan for any mortality.

    What decision checklist should I follow before buying a centerpiece?

    Confirm tank volume and parameter stability; match diet and feeding frequency to your routine; verify substrate, live rock, refugium, and microfauna availability; choose captive-bred individuals when possible; inspect invertebrates in person; plan slow acclimation for sensitive species; and prepare contingency supplies for rapid response.

    Which centerpiece choices are best for beginners in nano aquascapes?

    Beginner-friendly picks include Ocellaris Clownfish (10 gallons min., hardy, captive-bred), Clown Goby (~2″, 10 gallons, reef-safe), Sharknose/Blue Neon Goby (cleaner, 10 gallons), prudent brittle star species (10–15+ gallons if target-fed), and watchman goby + pistol shrimp only in setups with appropriate sand depth and space. These options balance hardiness, manageable diets, and small adult size.

    How do I balance visual goals with husbandry realities?

    Decide whether you prioritize color, activity, interaction, or low maintenance. For example, a clownfish offers iconic looks with low effort; neon gobies provide cleaner behavior and delicate color; brittle stars add nocturnal interest and clean-up benefit. Choose species whose care needs you can consistently meet.

    Where should I get more species-specific information before buying?

    Consult reputable local fish stores, experienced hobbyists, and trusted reference sources. Ask about provenance, captive-bred status, dietary history, and tank compatibility. Inspect specimens in person and confirm seller guarantees for sensitive invertebrates.

  • How Water Temperature Affects the Activity and Health of Your Fish

    How Water Temperature Affects the Activity and Health of Your Fish

    Keeping your fish active and healthy depends on a stable aquarium temperature. Fish, being ectothermic, rely on water temperature to regulate their metabolism. Tropical fish thrive between 75°F and 80°F, while cold-water fish like goldfish prefer below 70°F. Temperate species fall in between.

    Temperature affects fish metabolism in your tank. Warmer water means fish eat and move more. Cooler water slows them down. This change impacts oxygen needs, feeding, growth, color, and breeding.

    Outside your tank, environmental changes like heat waves affect water bodies and fish survival. For example, warmer water in places like the San Francisco Estuary can increase swimming speed and predation risk. Similar effects happen at home: wrong temperatures can stunt growth, reduce spawning, and make fish more prone to disease.

    Remember this aquarium temperature guide: match species needs, avoid sudden changes, and watch your tank’s conditions. Temperature controls physiology, behavior, and ecosystem interactions. Controlling it is key to protecting your fish.

    Understanding Metabolism in Fish

    A detailed cross-section of a tranquil aquarium scene, illustrating the impact of water temperature on fish metabolism. In the foreground, vibrant tropical fish, such as neon tetras and guppies, swim gracefully, showcasing varied activity levels, with some darting energetically and others gliding leisurely. The middle ground features an aquatic plant garden, lush and well-lit, emphasizing healthy growth. In the background, a thermometer subtly indicates warmer water temperatures, with sunbeams filtering through the water, creating shimmering patterns. Use soft, natural lighting to enhance the serene atmosphere, with a slightly blurred background for depth. The viewpoint should be from an aquarium's side, providing a clear focus on the fish's behavior relative to their environment. The mood is enlightening and educational, reflecting the relationship between temperature and metabolic activity.

    Fish are ectotherms, meaning their body temperature is set by their environment. Changes in the aquarium’s temperature affect their metabolism. This, in turn, influences their activity, appetite, growth, and immune system.

    In colder water, fish move slower and eat less. Their immune system also weakens. On the other hand, warmer water speeds up their metabolism and oxygen needs. This can increase stress levels.

    Metabolic rate is how fast energy is used in fish. It affects their feeding, digestion, growth, and reproduction. Each fish species has a best temperature range for its metabolism.

    • When temperatures are off, stress hormones like cortisol rise. Energy shifts to coping with stress instead of growth and immunity.
    • Behavior changes when fish need to adjust to temperature changes. They might use thermogenesis or cooling strategies.
    • It’s important to match tankmates by their thermal needs. What’s good for one species might harm another.

    To keep your fish healthy, adjust their diet and tank conditions to their metabolic rate and thermal preferences. Knowing how temperature affects metabolism helps reduce chronic stress. This improves their long-term health.

    The Role of Temperature in Fish Metabolism

    A vibrant underwater scene depicting the impact of temperature on fish metabolism. In the foreground, various fish species are shown swimming energetically in warmer waters, showcasing active gills and bright colors. In the middle, a gradual gradient of water temperature is illustrated with subtle changes in lighting, transitioning from warm hues of orange and yellow to cooler blues and greens. The background features aquatic plants swaying gently, reflecting the metabolic effects of temperature changes. Soft, dappled sunlight filters through the water surface, creating a serene yet dynamic atmosphere. The overall mood is lively and educational, emphasizing the importance of temperature on fish health. The image is shot with a wide-angle lens to capture the depth and beauty of the underwater environment, ensuring clarity and vividness in all details.

    Water temperature controls how fast your fish’s body works. Warmer water makes fish move and eat more. On the other hand, colder water slows them down.

    Big changes in temperature can be hard for fish to handle. Slow changes let them adjust better. But sudden changes can be too much for them.

    Studies on fish like delta smelt show how temperature affects them. At 21°C, they swim faster and react more to alarm cues. This can lead to exhaustion and more chances of being eaten.

    Temperature affects how fish digest food, keep the right balance of salts, and get oxygen. Fish can adjust to some temperature changes, but big or sudden changes can cause stress.

    • Watch small changes: even a few degrees alter metabolic rate and oxygen needs.
    • Match feeding to temperature-driven energy budgets to avoid malnutrition or waste.
    • Improve aeration when you raise temperature to offset lower dissolved oxygen.

    When you take care of your aquarium, think about how temperature works with other factors. Light, how many fish you have, and water quality all play a part. Balancing these helps keep your fish healthy and their metabolism stable. The right temperature is key to good care and happy fish.

    Effects of High Temperatures on Fish

    When water gets warmer, fish breathe harder and their bodies work faster. Warmer water has less oxygen, so fish need more but get less. This can make them gasp at the surface or move their gills quickly, showing they’re stressed.

    High temperatures also make fish more likely to get sick. Heat raises stress hormones, weakens their immune system, and slows healing. In aquariums, bacteria that keep water clean die at temperatures over 90°F. This can lead to dangerous spikes in ammonia and nitrite levels, harming fish even more.

    Studies show that warm water changes how fish behave. Delta smelt and others swim faster, break away from groups, and don’t calm down after being scared. These changes make them more vulnerable to predators like largemouth bass. They also have a harder time surviving in the wild when it’s too hot.

    Heat also affects how fish reproduce and grow. Warmer temperatures can make embryos grow too fast, change when they spawn, and make it hard for larvae to find food. This can lead to a shift in the types of fish that live in an area, favoring fast-growing species that prefer warmer water.

    • Watch for signs of heat stress: faded color, lethargy, rapid breathing, or surface gasping.
    • In tanks, avoid placing setups near vents, windows, or heaters that raise temperature.
    • Use quality heaters, thermometer probes, fans, or chillers for sensitive species when needed.

    To help fish in natural systems, create cool spots for them to escape the heat. Restoring wetlands, protecting deep pools, and managing water releases can provide these safe areas. They help keep oxygen levels high, supporting fish health and metabolism.

    Effects of Low Temperatures on Fish

    Cold water slows down a fish’s metabolism and activity. They might eat less, show dull colors, and stop showing usual behaviors. This happens when the water gets too cold for them.

    When fish eat less, they grow slower. Young ones might not grow right, and adults might not breed well. Some trout need cold water to spawn, but very cold water can mess with their development.

    Low water makes fish focus on basic survival. Their immune system gets weaker, making them more prone to diseases like Ich. They also recover slower from stress and can’t avoid predators as well.

    Even though cold water has more oxygen, it’s hard for fish to digest food. Slowly changing the water temperature helps fish adjust. But, staying in cold water for too long can make them less able to handle changes.

    • Match replacement water temperature during changes to avoid sudden cold exposure.
    • Keep true cold-water species, like goldfish, in their recommended ranges (often under 70°F).
    • Provide seasonal cues if breeding is a goal, balancing natural cold needs with safe limits.

    Knowing how temperature affects fish helps you take better care of your tank. Making small changes and keeping the water stable can help your fish stay healthy and active.

    Importance of Temperature Stability

    In nature, fish adjust to temperature changes by moving. But in your aquarium, changes happen quickly. This can stress fish a lot.

    Small changes can cause big stress. This stress can weaken their immune system. You might see slower growth and more sickness.

    Stable water is key for fish health. It helps their metabolism and keeps good bacteria. But sudden changes can harm these bacteria and fish.

    Studies show that temperature changes affect fish behavior. They can impact schooling and survival. This is why keeping a steady temperature is critical.

    • Use a reliable heater sized for your tank.
    • Consider multiple heaters in large tanks to avoid total failure.
    • Ensure good circulation so heat distributes evenly.
    • Match temperatures during water changes to prevent shock.
    • Avoid placing tanks near vents, drafts, or sunny windows.

    Keeping the temperature stable is vital. It helps fish stay healthy and reduces stress. Stable conditions also protect them from diseases.

    How to Monitor Water Temperature

    Put accurate thermometers in your aquarium and check them regularly. Digital probe thermometers offer precise readings. Stick-on strip thermometers are good for quick checks but might not always show the real temperature.

    Place sensors where they accurately reflect the tank’s temperature. Avoid areas like windows, exterior doors, heating vents, fireplaces, and drafty spots. These can give false readings. Also, keep probes away from direct heater exhaust to avoid high readings.

    In bigger tanks, use more than one thermometer. The Aqueon Heater Guide and other manufacturer advice can help you choose the right size heaters. Using two smaller heaters can provide better redundancy and even heating than one big unit.

    • Calibrate thermometers often to keep them accurate.
    • Make sure there’s good water flow around heaters for accurate readings.
    • Match the temperature of replacement water to avoid shocking fish.

    For outdoor or complex setups, use data loggers or integrated controllers. These devices record temperature over time. They help track daily and seasonal changes linked to air temperature and climate.

    Regular monitoring lets you react to changes in your tank’s environment. Watch for trends to spot temperature changes that could stress your fish.

    Adjust your care routine when temperatures change. As water temperature affects your fish’s metabolism, you might need to change feeding, aeration, or filtration rates.

    • Think about using alarm systems for sensitive species.
    • Have backup heaters or chillers ready.

    Adjusting Water Temperature Safely

    When you change the water temperature in your aquarium, do it slowly. This helps your fish adjust without getting stressed. Try to change the temperature by just a few degrees each day.

    Use a heater that’s the right size for your tank. Look for brands like Aqueon that offer guides for heater wattage. Place the heater so the warm water circulates well, avoiding hot spots.

    To cool your tank, start with evaporative cooling. Open the lid a bit and use a fan to cool the surface. For cold-water fish, consider a chiller made for aquariums.

    When mixing fish with different temperature needs, plan your changes carefully. Set the heater to a middle range and watch your fish closely. Make sure they have enough oxygen as their metabolism changes.

    • Match replacement water temperature during water changes to avoid shocks.
    • Use dual-heater setups for redundancy and quicker recovery from failures.
    • Have emergency plans for power outages, such as battery-powered air pumps and insulating blankets for tanks.

    In bigger systems and wild places, managers use cool-water releases and restored wetlands. These help fish find cooler spots and reduce stress from heat.

    Be careful of chemical changes when you adjust the temperature. Higher temperatures can harm good bacteria and cause ammonia and nitrite spikes. Test your water often after changes and be ready to do partial exchanges if needed.

    1. Make changes slowly: a few degrees per day maximum.
    2. Ensure circulation and oxygenation as metabolic regulation shifts.
    3. Observe fish for stress signs and adjust strategy if needed.

    Think about where you place your tank long term. Avoid direct sunlight and heat sources. Room temperature and sunlight can undo your careful adjustments and stress your fish.

    The Impact of Temperature on Fish Behavior

    Temperature changes how fish behave, whether at home or in nature. Cold water makes them move slower, eat less, and show less interest in breeding. On the other hand, warm water makes them swim faster, want to eat more, and can even harm their health.

    When the temperature drops suddenly, fish may act differently. They might swim less, look duller, and stop schooling together. These signs can mean they’re stressed and might even get sick.

    Studies on fish like the delta smelt show how temperature affects them. Warmer water makes them swim faster, spread out more, and stay scared longer. This can make them more vulnerable to predators and change how they live together.

    Temperature also controls when fish have babies and migrate. Changes in temperature can mess up when they spawn, affect who eats whom, and make it hard for baby fish to grow. This can change how entire ecosystems work.

    • Look for erratic swimming, gasping at the surface, or sudden aggression.
    • Note changes in schooling tightness and feed response.
    • Check oxygen, ammonia, and nitrite when behavior looks abnormal.

    Wild fish adjust their behavior to stay comfortable. In tanks, you have to help keep things stable. Small changes can help fish avoid stress and keep their metabolism healthy.

    Watch for changes in how fish eat, move, and interact. Catching these signs early helps you fix the problem. This way, you can keep fish healthy and their metabolism in check.

    Temperature Considerations for Different Species

    Match tankmates by their preferred temperature ranges. Tropical fish like it around 75–80°F. Goldfish and cold-water species prefer it under 70°F. Temperate species fall in between.

    When two species’ temperature ranges overlap, neither might do well at a compromise temperature. Plan heaters to keep the middle of a shared range. Choose tankmates with similar needs.

    Check the temperature needs of each species before buying. This simple step helps avoid chronic stress. Stress can change how they eat and their metabolism.

    Wild species often adjust to small warming by changing where they live and how well they survive. For example, delta smelt in estuaries are very sensitive to temperature changes. This is because air and water interact and affect their food and home.

    • Note thermal optima and tolerance limits for each species.
    • Consider reproductive cues: trout need cold water for spawning.
    • Account for temperature-dependent sex determination in some species.

    For breeding or aquaculture, slowly change the temperature to mimic seasons. Sudden changes can mess with their metabolism and reduce chances of successful breeding. Slow changes help fish adjust and keep their metabolism stable.

    Remember, oxygen demand goes up with temperature. Warm-water tanks might need chillers or more aeration to keep oxygen safe. Plan your equipment to meet the needs of your species.

    Research the thermal needs of your species, avoid mixing incompatible ones, and monitor the environment. These steps help keep the right temperature ranges and reduce risks from temperature changes.

    Conclusion: Keeping Your Fish Healthy Through Temperature Management

    Keeping your aquarium or pond water stable is key. It helps your fish stay healthy. This means managing the temperature right.

    Place your tanks away from drafts and direct sun. Use the right size heaters, and match the water-change temperature. This avoids sudden changes that can harm your fish.

    Use accurate thermometers and data loggers to monitor the water. Make slow changes to protect your fish from shock. Have backup heaters and fans ready for emergencies.

    Good water flow and regular water changes also help. This keeps the water healthy for your fish.

    Remember, the environment outside your tank matters too. Rising water temperatures can harm fish and change ecosystems. Choose fish that like the temperature you can keep.

    Watch for signs that your fish are stressed. Have a plan ready to help them. This way, you can keep your fish healthy and happy.

    Here’s a checklist to help you: check the temperature needs of your fish, use reliable monitoring tools, ensure good water flow and oxygen, make water changes that match the temperature, and have backup plans. With these steps, you can keep your fish healthy, even when the environment changes.

    FAQ

    How does water temperature affect the activity and health of my fish?

    Water temperature affects your fish’s metabolism. Warmer water makes them more active and hungry. But, cold water slows them down.

    If the water is too warm, your fish might breathe faster. They need more oxygen, but the water can’t provide it. This can stress them out and make them sick.

    On the other hand, cold water can make them less hungry and slow their growth. It can also weaken their immune system.

    In aquariums, temperature changes quickly. Long-term or frequent changes can harm your fish. It can stunt their growth, dull their colors, and shorten their lives.

    What does “understanding metabolism in fish” mean for how I care for my tank?

    Metabolism is how fast fish use energy. Temperature controls this rate. So, you need to match feeding, oxygen, and temperature to what your fish need.

    Feeding should match their appetite and digestion speed. The right temperature keeps their hormones stable. It also helps them fight off diseases better.

    How does temperature regulate fish metabolism?

    Temperature controls how fast enzymes work and how much oxygen fish need. In the right temperature range, fish are healthy. But, outside that range, they get stressed.

    Acclimation helps fish adjust to new temperatures. But, sudden or extreme changes can harm them. It can affect their digestion and how they get oxygen.

    What are the main risks of high temperatures in an aquarium?

    High temperatures make fish breathe faster and need more oxygen. But, the water can’t provide enough. This is stressful for them.

    They might show signs like rapid breathing, gasping, or aggression. High temperatures can also kill good bacteria. This can lead to ammonia and nitrite spikes.

    Chronic heat stress can weaken their immune system. It can also cause organ damage or suffocation if not fixed.

    How does cold water affect my fish?

    Cold water slows down fish. It reduces their activity, appetite, and immune defenses. This makes them more likely to get sick.

    It can also stunt their growth and coloration. Breeding may stop. Cold water holds more oxygen, but it slows down their digestion and enzyme function.

    Why is temperature stability important in a tank?

    Stable temperature is key for your fish’s health. It keeps their metabolism in check. It also helps beneficial bacteria to thrive.

    Changes in temperature can stress fish. It can weaken their immune system. Stable temperatures also help with reproduction and prevent sudden outbreaks of disease.

    How should I monitor water temperature effectively?

    Use accurate thermometers to check the temperature. Digital probes, stick-on strips, or integrated controllers work well. Check them often.

    For critical setups, use data loggers to track temperature changes. Place sensors away from heaters to avoid false readings. Large tanks might need multiple sensors and loggers.

    What are safe methods to adjust water temperature?

    Gradually change the temperature to let fish adjust. Aim for a few degrees per day. Use a quality heater for heating and evaporative cooling or a chiller for cooling.

    Match the temperature of replacement water during changes. Increase aeration as metabolism changes.

    How does temperature influence fish behavior I might notice?

    Temperature affects how fish behave. Warmer water makes them swim faster and more spread out. It can also make them more aggressive.

    Cold water makes them less active and hungry. Look out for signs like erratic swimming, aggression, or loss of group cohesion. These are signs of thermal stress.

    How do I choose species and tankmates based on temperature?

    Choose fish whose temperature preferences overlap. Tropical fish like 75–80°F, while goldfish prefer below 70°F. Temperate species fall in between.

    Set heaters to the midpoint of the shared range. Avoid mixing species with different temperature preferences. Research each species’ needs before stocking.

    What emergency or long-term measures protect fish when temperatures spike due to weather or equipment failure?

    Move tanks away from windows and vents during heat waves. Increase surface circulation and aeration. Use fans or chillers as needed.

    Have backup power solutions like battery-powered air pumps and dual heaters. In wild systems, use cold-water releases and tidal-wetland restoration to protect vulnerable species.

    What practical checklist should I follow to manage temperature and metabolic health?

    Check the temperature preferences of your fish before stocking. Set the heater to the middle of their preferred range. Use accurate thermometers and consider a data logger.

    Ensure good circulation and oxygenation. Match water-change temperatures. Use fans or chillers when necessary. Watch for signs of stress and have backups for emergencies.

    Regular monitoring helps adjust feeding and aeration to match metabolic needs.

  • Breeding Nano Rasboras: An Informative Guide

    Breeding Nano Rasboras: An Informative Guide

    You’re about to get practical tips on breeding nano rasboras in a 10-gallon tank. These small, schooling fish are loved for their beauty in small aquariums. Breeding them well needs a well-set tank, stable water, good food, and watching them closely.

    Before you add fish, make sure the tank is fully cycled. Fishless cycling is best to avoid stress and loss. Regular water changes, like once a week, keep the water clean and help the fry grow.

    A 10-gallon tank is great because it’s small and easy to manage. You can have a colony just for breeding or a peaceful community. Use good heaters and filters, and affordable gadgets for lights and CO2 to help plants grow.

    Remember, breeding nano rasboras in a 10-gallon is possible but needs careful planning. Focus on the details, choose the right fish, and provide plenty of plants or a special spawning area. This guide will help you learn how to breed nano rasboras with confidence.

    Understanding Nano Rasboras and Their Habitat

    A beautifully arranged aquatic scene featuring a vibrant nano rasbora in a lush, planted 10-gallon tank. In the foreground, show the delicate, colorful nano rasboras swimming gracefully among fine-leaved aquatic plants like Java moss and Anubias. The middle ground includes scattered pebbles and sand, enhancing the natural habitat look, while hints of driftwood provide hiding spots. In the background, soft ambient lighting filters through the water, creating a serene atmosphere with gentle reflections dancing on the tank’s glass. Capture the essence of a thriving underwater ecosystem, emphasizing tranquility and the small size of these fish in their ideal environment, shot from a slightly elevated angle to highlight both the fish and the lush habitat.

    Nano rasboras like the Chili Rasbora, Microrasbora kubotai, and the exclamation point rasbora grow up to one inch. They love to school together and are very calm. This makes them perfect for small, peaceful tanks with lots of plants.

    In the wild, nano rasboras live in shallow, slow-moving waters. Their homes are filled with soft, acidic water, leaf litter, and lots of plants. Creating a similar environment in your tank can help them feel at home and encourage them to breed.

    When breeding nano rasboras, it’s important to get their water right. They prefer soft water with low mineral levels. The pH should be between 5.0 and 7.0, and the temperature should be between 72–80°F. Make sure to match these conditions to the specific species you’re breeding.

    Watching nano rasboras breed is fascinating. They lay their eggs on plants or special spawning mops. But, adults might eat the eggs or fry if they’re left together. So, it’s best to move the eggs to a separate tank for them to grow safely.

    Choosing the right tankmates is also important. Nano rasboras are small and peaceful, so they do well with calm fish. Keeping them with aggressive fish can stress them out. It’s best to keep them in a species-only tank for breeding.

    • Typical species: Boraras brigittae, Microrasbora kubotai, exclamation point rasbora
    • Natural habitat: blackwater streams, leaf litter, driftwood, dense plants
    • Water: soft, low GH/KH, pH 5.0–7.0, 72–80°F
    • Breeding: egg scatterers, use fine-leaved plants or spawning mops
    • Tankmates: peaceful or species-only for best breeding techniques for nano rasboras

    The Basics of Breeding Nano Rasboras

    A close-up scene showcasing the delicate breeding process of nano rasboras in a well-maintained 10-gallon aquarium. In the foreground, several tiny, colorful nano rasboras gracefully swim amidst lush aquatic plants and fine-gravel substrate. The middle-ground features spawning behavior, with a pair of rasboras entangled among green moss and floating plants, capturing the essence of their natural breeding ritual. The background displays soft, filtered light streaming through the water, creating a serene and inviting atmosphere. Use a macro lens effect to highlight the vibrant colors and intricate details of the fish and plants, emphasizing the tranquility of this underwater setting. The mood should evoke a sense of calm and harmony in a thriving micro-ecosystem.

    Most nano rasboras show clear differences between males and females. Males are brighter and more active, trying to attract females. They either scatter eggs or lay them on plants like Java moss.

    Eggs hatch in 24–72 hours, depending on the water temperature. After hatching, the fry need tiny food like infusoria or liquid fry foods. This is because they grow fast.

    Feeding them right is key. Start with very small foods, then move to tiny brine shrimp and crushed foods. Feed them often but in small amounts to keep the water clean.

    To breed nano rasboras well, manage their numbers and sex ratio. Keep small groups with more females than males. This helps reduce aggression and encourages more spawns.

    • Provide dense fine-leaved plants or Java moss for egg deposition.
    • Offer spawning mops or peat for extra hiding places for eggs.
    • Consider a dedicated breeding tank to boost survival rates.

    To trigger spawning, make small changes to the water. Softer, slightly acidic water and a small temperature change can help. Also, increase live or frozen foods before spawning.

    Protecting eggs is important. You can leave dense plants in place for hiding. Or, remove adults to a separate tank after spawning.

    By following these basics, you can see better results. Good conditions, the right cover, balanced sex ratios, and tiny first foods are essential. They help you breed nano rasboras successfully and repeatedly.

    Setting Up Your 10-Gallon Tank for Breeding

    Begin with reliable, adjustable equipment. A small heater is key for a stable temperature. Choose a gentle sponge filter or a low-flow hang-on-back unit. These options protect fry and provide biological filtration and mild circulation.

    Opt for dimmable LED lighting to support plants without stressing fish. An aquarium lid helps reduce evaporation and drafts. Soft, steady light promotes plant growth and natural behavior in breeding nano rasboras.

    • Substrate options: fine-grain sand or bare bottom work well. Many breeders prefer a dark substrate to boost color.
    • Hardscape: use driftwood to lower pH with tannins and to create hiding spots.
    • Plants: include Java moss, Christmas moss, Java fern (Windelov), guppy grass, and floating Amazon frogbit for cover and spawning sites.

    Choose dense, fine-leaved plants and mosses for egg attachment. Spawning mops or a layer of peat and leaf litter mimic natural conditions. This meets the needs of nano rasbora breeding setups.

    Keep the flow low to moderate. A sponge filter provides oxygen and gentle current, keeping fry safe. Test oxygen levels and ensure currents don’t sweep eggs away.

    Cycle the tank fully before adding breeders. Use a fishless cycle and test pH, GH, KH, ammonia, nitrite, and nitrate. If your tap water is hard, mix reverse osmosis water with tap water or use peat-filtered water. This will help achieve softer, slightly acidic conditions that suit most nano rasbora breeding tank requirements.

    Stock the tank conservatively in a 10-gallon. For small species, plan 8–12 fish for a colony, or keep a pair or trio for focused breeding. Follow 10-gallon stocking guides and choose between community or species-only setups. This depends on aggression and fry survival when breeding nano rasboras.

    Creating the Perfect Environment for Spawning

    To meet nano rasbora breeding tank requirements, start with stable water chemistry. Use RO water or peat filtration to soften water and lower GH and KH. Aim for a pH in the 5.5–6.8 range for many species. Keep temperature steady near 74–78°F unless your species needs a different range. Test often so ammonia and nitrite stay at 0 ppm and nitrates remain low with routine partial changes.

    Tannins help trigger spawning. Add Indian almond leaves or driftwood to tint the water and mimic blackwater habitats. These additions lower pH slightly and reduce stress, which encourages natural breeding behavior. Light tannin levels also make eggs and fry less visible to predators.

    Light should be moderate and consistent. Use plant-friendly fixtures and keep a daily photoperiod of about 8–10 hours to promote growth and calm behavior. Avoid intense lighting that drives shy spawners into hiding. Floating plants such as Amazon frogbit diffuse light and create shaded zones for timid fish.

    Select plants that offer fine cover for eggs and fry. Java moss, Christmas moss, guppy grass, and pearl weed supply adhesive surfaces and protection. Dense mats and spawning mops give parents places to deposit eggs. If adults are known to eat eggs, plan to remove adults or collect the eggs promptly.

    Conditioning and small temperature shifts can prompt spawning. Raise the tank temperature by 1–2°F for a short period or perform a slightly cooler water change depending on natural cues for your species. Feed frequent, protein-rich meals like daphnia, brine shrimp, or microworms for one to two weeks before breeding.

    Lay out a clear nano rasbora breeding setup with hiding places and gentle flow. Use fine-leaved plants and cavities to protect eggs. If you prefer to collect eggs, include a spawning mop or a slatted separator to keep eggs safe from adults. Thoughtful layout reduces egg predation and improves fry survival.

    Review breeding techniques for nano rasboras by observing behavior and adjusting variables incrementally. Keep records of water parameters, feed types, and any temperature changes. Careful notes help you refine your approach and repeat successful cycles in the future.

    Introducing Breeding Pairs

    Start by picking healthy fish for breeding nano rasboras. Look for active fish with bright colors. Females should have rounded bellies. Males often show more vivid colors.

    Avoid thin or pale fish to reduce disease risk. Buy from a reputable local fish store or a trusted breeder. They should document their captive-bred lines.

    Quarantine new arrivals for at least two weeks in a separate tank. Watch for parasites and signs of illness. Treat problems with targeted medications only when safe for future fry.

    Acclimate slowly to your tank’s water. Use drip acclimation or gradual mixing of water to prevent shock. This is vital if your water is soft and tannin-rich.

    Think about group dynamics and sex ratios when planning. Introduce a small group of six to twelve fish. A ratio of one male to two or three females reduces male harassment.

    Condition your chosen fish for spawning over several weeks. Feed a varied diet of micro pellets, frozen daphnia, mosquito larvae, and live or frozen brine shrimp. Keep up regular water quality maintenance during conditioning to support health.

    Place breeders in the prepared 10-gallon only after the tank is fully cycled and well planted. Provide ample cover with plants and fine-leaved moss so fish feel secure. Observe interactions closely for signs of chronic stress or aggression.

    If you see excessive chasing or hiding, adjust stocking levels or add more cover. Small tweaks at this stage follow nano rasbora breeding tips that increase the chance of successful spawning. Careful observation during introduction helps you learn how to breed nano rasboras with steady results.

    Monitoring the Breeding Process

    Watch how males and females interact. Males will show off their bright colors and chase the females. They might also bump into plants. By recording these moments, you can guess when they’ll spawn.

    Look for eggs stuck to leaves or hidden in moss. Spawning can happen in batches over a few days. Keep the water clean to prevent egg loss. Small water changes help keep the environment stable.

    • If adults eat eggs, move adults to another tank or use a breeder net.
    • Some keepers remove moss or spawning mops into a dedicated fry tank for safer incubation.
    • Remove cloudy or fungus-infected eggs promptly to protect healthy ones.

    Check the eggs after 24–48 hours. Healthy eggs are clear and show a tiny embryo. Cloudy eggs might have fungus. In a separate tank, use methylene blue to treat fungus, but do it carefully.

    Keep the environment stable. Avoid big changes in temperature and water movement. These can harm the eggs and fry. A stable environment helps them grow and survive.

    1. Log water parameters daily: pH, temperature, ammonia, nitrite, and nitrate.
    2. Record feeding routines and any spawning triggers you used.
    3. Note fry counts and survival to refine future attempts.

    Use your notes to improve your breeding techniques. Try small changes in temperature or add tannins. Keeping detailed records will help you find the best way to breed nano rasboras in your tank.

    Feeding and Care for Fry

    Start with infusoria or commercial fry foods for the first few days. These foods are the right size for fry and keep them active. This is a key step in a nano rasbora care guide for early survival.

    After three to seven days, introduce brine shrimp or microworms. Feed small amounts several times a day. Use micro pellets or finely crushed flake food as a supplement when fry grow bigger.

    Follow a gradual feeding schedule. Offer tiny portions often and increase amounts as fry get bigger. This helps fry grow without fouling the water.

    Keep the water pristine. Use a gentle sponge filter and do frequent small water changes of 10–20%. Rinse sponge filters in tank water to preserve beneficial bacteria.

    • Provide dense moss and plants for grazing and hiding.
    • Include floating plants to diffuse light and reduce stress.
    • Maintain low flow so fry can feed without being swept away.

    Expect fry to grow noticeably over weeks with good water quality and diet. Monitor growth and look for stunted individuals. If overcrowding occurs, move juveniles to a larger tank for healthy development.

    When fry accept larger foods, start weaning onto frozen daphnia and finely crushed pellets. Gradually transition to a varied adult diet while tracking growth rates. Good husbandry during this stage completes any solid nano rasbora care guide and secures long-term success for your school.

    Common Challenges in Breeding Nano Rasboras

    Egg and fry predation is a big challenge in breeding nano rasboras. Adults and bigger fish eat eggs and fry fast. Use a special breeding tank or move eggs to a separate incubator.

    Heavy moss, spawning mops, or dense plants help hide eggs and increase survival chances.

    Water quality issues are another big problem. Ammonia, nitrite spikes, high nitrates, and pH or hardness changes can kill eggs and fry. Keep the tank cycled, test water often, and do partial water changes. A sponge filter helps protect fry and filters the water.

    Diseases and fungus can quickly ruin a spawn. Fungal growth on eggs and parasites on adults need quick action. Quarantine new fish and treat sick adults before breeding. Remove fungus from eggs and use methylene blue in an incubation tank if needed.

    Algae and plant care also play a role. Too much algae can harm eggs or weaken plants. Control light and nutrients. Use nerite snails or small Amano shrimp for algae control if they fit your tank. Regular maintenance keeps plants healthy and reduces stress.

    • Stress and aggression can lower spawning rates. Overcrowding, poor sex ratios, or little cover increase tension among fish.
    • Adjust the number of fish and add plants for shelter and breeding sites.
    • Stable temperature and chemistry help keep fish calm and predictable.

    Equipment failures and outages are high-risk in small tanks. Power loss or heater failure can be deadly. Have a plan: use battery-powered air pumps, aquarium-safe backup heaters, or a neighbor for help. Modern hobbyists often use smart leak detectors and uninterruptible power supplies for peace of mind.

    Practical breeding techniques for nano rasboras can solve many problems. Use separate breeding vessels, keep low light and tannin-rich water for some species, and use slow, gentle filtration. These methods improve egg retention and fry health.

    Keep nano rasbora breeding tips handy and adapt as you learn each species’ quirks. Track water reports, note behavior changes, and refine your tank setup. Persistent observation and small, steady adjustments will increase your success rate over time.

    Ensuring Long-Term Success in Breeding

    Keep detailed records of your breeding efforts. Note down parentage, water conditions, feeding, spawn dates, hatch rates, and fry survival. These logs will show you the best breeding methods for your nano rasbora setup. Short, regular notes are more helpful than long, sporadic ones.

    Focus on breeding healthy, vigorous fish. Aim for natural colors and strong fry. Avoid close inbreeding by introducing new, unrelated fish. This keeps your breeding program diverse and successful.

    Plan carefully for the future of your fry. Rehome them through local stores, aquarium societies, or hobbyist groups. Never release fish into the wild. Regularly clean your setup, rotate plants, and check filters. Take breaks between breeding cycles to prevent disease.

    Stay updated with the latest in breeding. Use tools like water test kits, smart timers, and automation. Choose sustainable or captive-bred fish. Use eco-friendly equipment to care for your aquarium responsibly.

    FAQ

    What species of nano rasboras are best suited for breeding in a 10‑gallon tank?

    Many hobbyists breed Boraras brigittae, Microrasbora kubotai, and small Exclamation Point Rasbora relatives in a 10‑gallon. Choose species under an inch long with peaceful, schooling behavior. Match your setup to the species’ specific water preferences—some prefer very soft, acidic blackwater while others tolerate slightly higher pH. A species‑only colony often yields the best breeding results.

    Do I need to cycle the tank before introducing breeders?

    Yes. Fishless cycling is strongly recommended to fully establish beneficial bacteria and eliminate ammonia and nitrite spikes. A fully cycled tank with stable parameters (ammonia and nitrite at 0 ppm, low nitrates) protects eggs and fry and reduces stress on breeders.

    What are ideal water parameters for breeding nano rasboras?

    Aim for soft water (low GH and KH) and species-appropriate pH—many nano rasboras prefer 5.0–7.0, commonly 5.5–6.8 for breeding. Temperature usually sits between 72–80°F; many breeders use 74–78°F. Keep ammonia and nitrite at 0 ppm and keep nitrates low with frequent partial water changes.

    How should I stock a 10‑gallon for successful breeding?

    A 10‑gallon suits a small colony of 8–12 nano rasboras depending on species, or a focused trio/pair for breeders. Use a higher female:male ratio (about 2–3 females per male) to reduce male harassment. Avoid overcrowding and choose peaceful tankmates or run a species‑only tank.

    What tank setup and equipment do I need?

    Use a reliable adjustable heater and stable temperature control, a gentle sponge filter or low‑flow hang‑on‑back filter to protect fry, dimmable LED lighting for plants, and an aquarium lid. Consider RO water or peat filtration to soften water and driftwood or Indian almond leaves to add tannins for blackwater cues.

    Which plants and substrates encourage spawning?

    Dense, fine‑leaved plants and mosses like Java moss, Christmas moss, Windelov Java fern, guppy grass, and carpeting plants help. Floating plants such as Amazon frogbit diffuse light. Dark, fine‑grain substrate can enhance colors, while leaf litter or peat mimics natural spawning beds. Spawning mops are a practical alternative.

    How do I trigger spawning in nano rasboras?

    Common triggers include slightly softer, acidic water, a small temperature change (±1–2°F), and conditioning with high‑quality live or frozen foods (daphnia, brine shrimp, microworms) for 1–2 weeks. Adding tannins (almond leaves, driftwood) and providing dense moss or spawning mops also encourages egg laying.

    Should I remove adults after spawning to protect eggs?

    If adults are known to eat eggs, remove them or move the spawning substrate (moss or mop) to a fry tank. Or, provide very dense hiding places like thick Java moss so eggs can survive. Using a breeder net or dedicated breeding tank increases egg/fry survival.

    How long until eggs hatch and fry become free‑swimming?

    Eggs usually hatch in 24–72 hours depending on temperature. Fry often become free‑swimming several days after hatching. Timelines vary by species and water temperature—warmer speeds development within safe limits.

    What should I feed newly hatched fry?

    Begin with infusoria or commercial liquid fry foods until fry can take larger prey. After a few days to a week, introduce newly hatched brine shrimp (Artemia nauplii), microworms, and finely crushed micro pellets or flake. Feed small, frequent portions several times daily to promote steady growth.

    How do I maintain water quality with fry present?

    Perform small, frequent water changes (10–20%) with temperature‑ and parameter‑matched conditioned water. Use sponge filters rinsed in tank water to preserve bacteria. Test ammonia, nitrite, and nitrate regularly, and keep ammonia/nitrite at 0 ppm and nitrates low.

    Can I use RO water to breed nano rasboras if my tap water is hard?

    Yes. Mixing RO water with conditioned tap water or using peat-filtered water helps achieve low GH/KH and desired pH. Test and adjust slowly to match species requirements and avoid shock during acclimation and water changes.

    How do I prevent fungal infection on eggs?

    Remove unfertilized or cloudy eggs promptly. Good water quality and stable conditions reduce fungus risk. Some breeders incubate eggs in a separate tank and use methylene blue sparingly in that isolation tank, but avoid medications in the main breeding tank unless necessary.

    What are common causes of breeding failure and how do I fix them?

    Common causes include uncycled tanks, poor water quality, incorrect parameters (hardness or pH), inadequate cover or spawning sites, skewed sex ratios, and stress from aggressive tankmates or bright light. Corrective steps: ensure a fully cycled tank, soften water if needed, add dense plants/moss, adjust sex ratios, and minimize disturbances.

    Is selective breeding recommended for nano rasboras?

    Selective breeding can improve color and behavior, but prioritize health and avoid inbreeding. Maintain records of parentage, introduce unrelated stock periodically, and focus on vigor and natural coloration.

    How many fry can I reasonably raise in a 10‑gallon tank?

    A 10‑gallon can raise a moderate number of fry if filtration, food, and maintenance are excellent. Avoid overcrowding to ensure healthy growth. Consider moving large clutches to grow‑out tanks or sharing surplus with local hobbyists.

    What quarantine steps should I take before introducing new breeders?

    Quarantine new fish for at least two weeks in a separate tank to observe for parasites and disease. Treat visible illnesses in quarantine; avoid broad‑spectrum medications that could harm future fry. Observe feeding, activity, and body condition before introducing to the breeding tank.

    Which tankmates are safe with breeding nano rasboras?

    If you want to breed successfully, species‑only tanks are safest. If you include tankmates, choose tiny, peaceful species that won’t prey on eggs or fry—small snails like nerites or small shrimp (if compatible) may work. Avoid larger or aggressive fish that will eat eggs and fry.

    What recordkeeping helps improve breeding success?

    Keep a log of water parameters, feeding regimens, spawn dates, hatch rates, and fry survival. Note triggers used (temperature shifts, tannins, feeding schedules). Records help identify patterns that lead to successful spawns and inform iterative improvements.

    How should I acclimate breeders to my tank’s water?

    Use slow acclimation—drip acclimation or gradual mixing of bag water with tank water over 30–60 minutes—to minimize shock. This is essential when moving fish into softened, tannin‑rich water that differs from the seller’s conditions.

    What emergency preparations should I have for a small breeding tank?

    Plan for power outages and heater failures with a battery‑powered air pump, spare aquarium heater, or neighbor support. Consider smart outlets or UPS systems for critical equipment. Quick contingency actions protect eggs and fry during outages.

  • Common Nano Fish Ailments and How to Treat Them Safely

    Common Nano Fish Ailments and How to Treat Them Safely

    You love keeping a nano tank because of its compact size and delicate species like ember tetras or cherry shrimp. But, tanks under 10 gallons can quickly show changes in water chemistry. This makes fish diseases in nano setups appear and spread fast.

    Many issues you see are signs, not single diagnoses. Ammonia burns, nitrite stress, dropsy, and swim bladder problems often look similar at first. To diagnose correctly, you need to test your water first.

    Poor water quality, overcrowding, and sudden temperature drops are common causes of illness. Shipping stress or aggressive tankmates also weaken fish and invite infections. It’s key to address the cause to prevent diseases from coming back.

    Your first step should be practical: quarantine sick fish, test and stabilize water, and use medicines only when needed. Supportive measures like salt baths, better nutrition, and small water changes can help fish recover faster.

    Vets and experienced aquarists suggest keeping water quality high, cycling tanks fully before adding fish, and managing filter media carefully. If over-the-counter treatments don’t work, medicated food or professional care might be needed for effective treatment.

    Understanding Nano Fish and Their Vulnerabilities

    A serene underwater scene showcasing a variety of nano fish species displaying bright colors and intricate patterns, swimming among lush aquatic plants and vibrant corals. In the foreground, a school of tiny, delicate fish, like the neon tetra and guppy, exhibit signs of minor ailments through subtle postures, emphasizing their vulnerabilities. The middle ground features a soft focus on a hidden cave and gentle flow of water, enhancing the sense of depth. The background gradually fades into a soft blue light, symbolizing a calming underwater environment. Illuminate the scene with gentle, diffused lighting that highlights the textures of the fish and plants, creating a tranquil, educational atmosphere, perfect for illustrating the nuances of fish health and the impacts of ailments in nano aquariums.

    A nano aquarium is usually under 10 gallons. In such a small space, changes in temperature, pH, and other factors happen quickly. It’s important to monitor these closely because small changes can stress fish and make them more vulnerable.

    The nitrogen cycle is key to keeping water stable. Good bacteria convert harmful ammonia into safer compounds. But, new or poorly cycled tanks often have ammonia spikes. This can poison fish, so it’s vital to cycle the tank before adding fish.

    Stressors like temperature drops and waste buildup are more severe in nano tanks. Even a little overfeeding can cause big problems. To avoid this, feed sparingly and keep the tank clean.

    • Temperature swings from small heaters or room drafts
    • Oxygen fluctuations at night or in crowded tanks
    • Waste accumulation in gravel and on plants
    • Higher sensitivity to overfeeding and medications

    Many nano fish, like bettas and small tetras, are sensitive to their environment. They can’t handle big changes in salinity or chemicals well. When using treatments, it’s critical to follow the instructions carefully to avoid harming the fish.

    To manage diseases in nano tanks, cycle the tank first, do small water changes weekly, and avoid changing filter media and water at the same time. These steps help keep the environment stable and protect the fish.

    Understanding the risks in nano tanks and how to manage them can help prevent diseases. By keeping the tank cycled and monitoring parameters closely, you can ensure better health for your nano fish.

    Identifying Symptoms of Illness in Nano Fish

    A close-up view of a nano aquarium featuring several small tropical fish showing symptoms of illness, such as faded colors and frayed fins. In the foreground, focus on a sick fish, with a slightly blurred effect to emphasize distress. The middle ground includes a vibrant aquatic environment with plants and rocks, while the background shows the tank's water features softly illuminated by natural lighting, creating a serene atmosphere. The lighting should be warm and inviting, highlighting the fish's details while casting gentle shadows. The overall mood conveys concern and a sense of urgency, reflecting the importance of identifying nano fish ailments.

    Spotting illness in nano fish starts with regular checks. Look for behavior and appearance changes during feedings. A simple checklist can help you catch issues early.

    • Lethargy or hiding more than usual
    • Loss of appetite or refusing food
    • Clamped fins or frayed fin edges
    • Abnormal swimming: spinning, floating, or sinking
    • Gasping at the surface or rapid breathing
    • Flashing or rubbing against decor
    • White spots, cloudy patches, or cotton-like growths
    • Swollen abdomen, protruding scales (dropsy), or bulging eyes
    • Red streaks, inflamed gills, ulcers, or visible parasites
    • Raspberry-like growths (lymphocystis)

    Understanding these signs is key. White spots often mean ich. A yellow sheen suggests velvet. Cotton-like growths are fungal.

    Frayed fins with color changes usually mean fin rot or bacteria. Rapid breathing and red gills are signs of ammonia poisoning or gill flukes.

    When you see symptoms, test the water fast. Check ammonia, nitrite, nitrate, pH, temperature, and dissolved oxygen. Many symptoms come from bad water quality, not infections.

    Act quickly. Isolate sick fish in a separate tank if you can. Do partial water changes and test again until levels are good. Keep a log of symptoms and when they happen to help choose treatments.

    If symptoms are severe—like severe lethargy, bloating, or hemorrhage—get vet help. Some viral and internal bacterial issues need special care beyond basic treatments.

    For everyday care, learn about common nano tank diseases. Regular monitoring and early isolation help keep your fish healthy and reduce stress.

    The Most Common Nano Fish Diseases

    It’s important to know about common fish diseases in nano tanks. This way, you can react fast. Small tanks can make problems worse because of poor water quality, sudden temperature changes, and too many fish.

    • Ammonia Poisoning: not an infection but very common in new or uncycled tanks. Look for labored breathing, gasping at the surface, loss of appetite, lethargy, red streaks, inflamed gills, and bottom-dwelling behavior.
    • Ich (White Spot Disease): Ichthyophthirius multifiliis shows as tiny white cysts, flashing, lethargy, and reduced feeding. It spreads quickly among stressed fish.
    • Velvet (Gold Dust Disease): caused by Piscinoodinium or Amyloodinium. You’ll see a dusty yellow sheen, sudden flashing, lethargy, and appetite loss.
    • Columnaris (Cotton Mouth): a bacterial issue that produces cottony growths, raised patches, pale gills, and trouble swimming.
    • Fin Rot: frayed or rotting fins with inflammation at the base. Often follows poor water quality or fin nipping.

    Keep reading the list to spot less common but serious threats.

    • Bacterial Infections (Aeromonas and others): symptoms include swollen eyes, ulcers, hemorrhagic lesions, and ragged fins. These infections often follow injury or stress.
    • Dropsy: abdominal swelling with pineconing scales. This signals systemic bacterial infection or organ failure and needs urgent attention.
    • Flukes and Parasites: gill or skin flukes cause red spots, increased mucus, flashing, and labored breathing.
    • Fungal Infections: white, wool-like patches on body, mouth, or gills. They usually affect weakened fish.
    • Swim Bladder Disorder: buoyancy problems from constipation, infection, or organ issues that make swimming erratic.

    External parasites can be visible and dramatic.

    • Anchor Worms and Visible External Parasites: raised ulcers and attached crustaceans. Manual removal plus antiseptic care is needed.
    • Lymphocystis and Viral Conditions: raspberry-like growths that are often self-limiting but may need surgical removal when severe.
    • Hemorrhagic Septicemia and Severe Systemic Infections: bleeding, bulging eyes, and severe abdominal bloating. These bacterial infections respond to targeted antibacterial therapy when caught early.

    Use nano fish disease control strategies to reduce risk. Regular testing, partial water changes, sensible stocking levels, and prompt quarantine of new arrivals cut down on nano aquarium fish illness.

    When you spot symptoms, act quickly. Early diagnosis and correct treatment raise recovery chances in confined nano tanks.

    Treatment Options for Nano Fish Diseases

    When you see illness in a nano tank, act fast and stay calm. Start by improving water quality. Do partial water changes, clean the substrate, check the temperature, and add oxygen with an air stone. For ammonia spikes, change the water often and make sure the tank is ready for new fish.

    Use a quarantine tank to keep sick fish separate. This stops the disease from spreading and lets you treat the fish safely. A small hospital tank helps target the treatment and keeps the main tank healthy.

    • Antibacterials and antibiotics: vets often recommend injectable or medicated food like erythromycin or kanamycin. These are better than water treatments for nano tanks. Always follow the vet’s advice on how much to use and for how long.
    • Antiparasitics: formalin, malachite green, copper sulfate, praziquantel, chloroquine for velvet, and potassium permanganate fight different parasites. Each needs careful measurement. In nano tanks, the risk of toxicity and oxygen loss is higher.
    • Antifungals: use targeted antifungal meds, do a big water change (30–50%), remove carbon from filters, and keep sick fish separate.

    Metronidazole works well for Hexamita and some protozoa. You can mix it into food or add it to the water if fish won’t eat. For small tanks, use less than in bigger tanks, and check dosing charts or ask a vet.

    Supportive care is key. Aquarium salt baths, better food, gentle temperature changes, and more oxygen can help. But be careful: changing the temperature or adding formalin can lower oxygen levels, so increase aeration.

    Manual removal is good for visible pests like anchor worms. Use fine forceps to remove parasites, then treat the wound with a safe antiseptic. This combines physical removal with medical treatment in many cases.

    1. Measure carefully and change medications slowly. Small tanks can make chemicals more concentrated, making overdosing easy.
    2. If over-the-counter treatments don’t work, or if a fish shows serious signs like severe lethargy, bloody lesions, or loss of appetite, see a fish vet. Complex bacterial infections and cases needing medicated food often need professional help.
    3. Keep records of treatments, doses, and water parameters. This helps refine treatment plans and supports managing fish diseases in nano tanks.

    Quick action and careful dosing are key to stopping an outbreak. Use quarantine, targeted medications, and strong supportive care in a well-planned strategy for nano fish disease control.

    Preventative Measures for Healthy Nano Fish

    To keep your nano tank healthy, follow a simple checklist. First, cycle the tank before adding fish. Use fishless cycling or live nitrifying bacteria products from brands like Seachem or API. Don’t count on hardy fish to cycle the tank.

    Test your water often for ammonia, nitrite, nitrate, pH, and temperature. Use a good aquarium test kit and keep records. Small, regular water changes are better than big, infrequent ones.

    • Perform modest water changes; avoid changing more than 50% at once.
    • Do not change filter media on the same day as a water change to preserve beneficial bacteria.
    • Siphon substrate regularly to remove trapped organic waste.

    Avoid overfeeding. Feed the right amount for your fish and remove uneaten food quickly. Overfeeding leads to organic buildup, ammonia spikes, and poor fish health in nano tanks.

    Plan your stocking levels for when your fish are adults. Overcrowding increases stress and disease spread. Quarantine new fish for two to three weeks in a separate tank to treat infections before they reach your main tank.

    Choose the right filtration and oxygenation for your small tank. Make sure filters don’t create too much flow for calm-water species. Use reliable heaters and thermometers to keep the temperature stable and prevent sudden drops that stress fish.

    Feed high-quality, species-appropriate foods to boost your fish’s immune system. Remove sick or dead fish quickly. Use targeted nano fish disease management techniques when needed to limit disease spread.

    1. Cycle the tank first; use fishless methods or live bacteria products.
    2. Test water often; track ammonia, nitrite, nitrate, pH, temperature.
    3. Maintain small regular water changes; protect beneficial bacteria.
    4. Avoid overfeeding; match portions to species needs.
    5. Stock for adult size; quarantine newcomers 2–3 weeks.
    6. Use appropriate filtration and stable heaters; control flow.
    7. Feed quality diets; remove sick or dead fish quickly.

    By following these steps, you can prevent diseases in your nano tank. Regular care and practical disease management techniques will protect your fish. Simple, consistent habits lead to the best fish health in nano systems.

    The Role of Tank Mates in Fish Health

    Your choice of tank mates affects stress and disease in a nano aquarium. Aggressive or fin-nipping species can harm your fish’s fins. This makes them more likely to get sick with fin rot. Choose peaceful species that fit your nano fish’s size and temperament.

    Too many fish in the tank can lead to poor water quality. This makes it harder to keep fish healthy and increases disease risk. Always consider the mature size of fish when stocking your tank.

    New fish may bring parasites or diseases. Quarantine them for at least two weeks to prevent these issues. This is a key part of keeping your tank disease-free.

    Invertebrates like shrimp and snails react differently to treatments. Copper and malachite green can harm them. Use a separate tank for treatments to protect your sensitive tank mates.

    Social fish like rasboras and tetras need friends to feel safe. Solitary fish, like bettas, prefer to be alone. Mixing incompatible species can stress them out and make them sick. Match their social needs when setting up your tank.

    Here are some practical tips to keep your fish healthy:

    • Research compatibility before you buy. Know adult sizes and temperaments.
    • Watch for bullying and fin-nipping. Intervene early with a divider or separate tank.
    • Quarantine new fish and observe for signs of parasites.
    • Consider treatment impacts on snails and shrimp before medicating the display.

    By following these steps, you can reduce stress and keep your fish healthy. Your careful choice of tank mates and attention to their needs will help manage diseases in your nano tank.

    The Importance of Regular Tank Maintenance

    Keeping fish healthy in nano tanks is simple with a regular maintenance routine. Regular checks and small upkeep keep water chemistry stable. This reduces stress and lowers disease risks, supporting long-term health in nano setups.

    Follow a weekly checklist to catch problems early:

    • Test ammonia, nitrite, nitrate, pH, and temperature.
    • Do a 10–25% water change depending on your bioload.
    • Siphon substrate to remove detritus and uneaten food.
    • Trim and remove dead plant material promptly.

    On a monthly basis, inspect equipment and refresh media carefully:

    • Clean external filter parts and rinse filter media in tank water to save beneficial bacteria.
    • Check heater, air pump, and thermometer for steady operation.
    • Replace activated carbon only when not treating disease; during medication remove carbon so drugs remain effective.

    Avoid over-cleaning biological media and avoid pairing a large water change with media cleaning. Sudden loss of nitrifying bacteria can spike ammonia and trigger illness.

    When you face a disease outbreak, step up your routine:

    • Increase test frequency and water changes in a hospital tank.
    • Keep oxygen levels high and temperature stable during treatment.
    • Separate sick fish to limit spread while you treat and monitor water quality closely.

    Consistent maintenance is the most effective nano fish disease prevention you can do. Stable water chemistry cuts opportunities for pathogens and makes managing fish diseases in nano tanks easier and faster.

    Nutrition and Its Impact on Fish Health

    Your nano tank diet is key to your fish’s health. Choose high-quality flakes or pellets that match your fish’s needs. Bad food can make them sick, so pick the right stuff.

    Give your fish a mix of foods to keep them healthy. Add frozen or live foods like brine shrimp and bloodworms. This keeps their diet interesting and helps them get all the nutrients they need.

    When your fish get sick, try medicated food. It’s gentler than other treatments. This way, your fish stay healthy without getting stressed.

    Constipation and swim bladder problems can be fixed with diet changes. Try fasting your fish for a day or two. Then, give them a thawed, skinned pea to help them go back to normal.

    Be careful not to overfeed your fish. Too much food can make the water dirty. This messes up your fish’s health and makes it hard to keep them well.

    If your fish have ongoing health issues, talk to a vet. They might suggest special foods or supplements. These can help your fish stay healthy for a long time.

    • Feed species-formulated pellets or flakes.
    • Rotate in frozen or live foods for variety.
    • Use medicated food for treatable infections when appropriate.
    • Fast and offer peas for constipation-related issues.
    • Practice strict portion control to protect water quality.

    Stress Reduction Techniques for Nano Fish

    Small changes in your tank routine can help reduce stress and lower the risk of illness in nano aquarium fish. Start by arranging decor that’s right for the species. Provide hiding spots, live or silk plants, and a soft substrate to mimic their natural habitat.

    Keeping water parameters steady is key to supporting immune function. Use reliable heaters and a good thermometer. Check the temperature daily and do partial water changes on a set schedule. Sudden changes can trigger illness and undermine disease prevention efforts.

    • Match flow to species needs; some prefer gentle currents while others enjoy stronger movement.
    • Avoid overcrowding; respect the social needs of schooling species by providing shoal mates when required.
    • Limit bright or flashy lighting and reduce external disturbances around the tank.

    Quarantine new arrivals in a separate tank for at least two weeks. This reduces shipping and retail stress. Quarantine also helps prevent the introduction of pathogens to your display.

    Minimize handling and use careful transfer methods during maintenance. Move fish with soft nets, dim lights, and gradual water mixing to prevent shock. These habits support fish health in nano setups.

    1. Provide stable diet and frequent small feedings to keep fish well-nourished.
    2. Use gentle filtration and routine filter checks to maintain water clarity without strong suction stress.
    3. Create a predictable maintenance routine so fish are not routinely exposed to abrupt changes.

    Address retail or shipping stress by giving new fish a restful quarantine. Optimal water, quiet surroundings, and quality food improve recovery and strengthen resistance to disease.

    Follow these measures to reduce stress, protect immune systems, and support long-term fish health in nano aquariums. This helps prevent nano aquarium fish illness through good disease prevention practices.

    Breeding Nano Fish: Considerations for Health

    Begin by quarantining any fish you think might breed for 2–3 weeks. This ensures they are healthy and don’t have parasites or bacterial infections. Quarantine helps you treat any internal issues before they spread to the breeding tank.

    Ensure the water quality is top-notch during spawning. Do small water changes and clean the substrate gently. This keeps the pathogen load low for the eggs and fry. Good hygiene is key to preventing diseases and helping fry survive their early days.

    Avoid overcrowding the fry. Too many fish can stress them out and spread diseases quickly. Use separate containers or dividers if you have a lot of fry.

    Feed the fry the right foods, like infusoria or rotifers. This supports their immune system and prevents malnutrition-related illnesses. Proper nutrition is essential for preventing diseases and keeping the fry healthy.

    • Watch for pathogens passed from the parents to the fry.
    • Quickly isolate any sick parents to stop the disease from spreading.
    • Use medicated feed for internal parasites like Hexamita, but talk to a vet first.

    Be careful with chemical treatments around eggs and fry. Formalin, malachite green, and copper can harm them. Treat the parents in quarantine instead to protect the fry and make disease management easier.

    Keep track of how well your fry are doing and adjust your care routine as needed. Small, consistent changes in water care and feeding can help more than using strong drugs. By using careful disease management, you can improve your breeding success and keep your fish healthy.

    Understanding the Lifecycle of Nano Fish

    Knowing about the lifecycle stages of nano fish helps in preventing and treating diseases. Many parasites go through free-swimming and attached phases. Knowing which stage is active is key to choosing the right treatment.

    Freshwater ich and marine ich have a free-swimming tomont and a feeding trophont stage. By controlling the temperature, you can speed up the lifecycle. This makes treatments more effective when applied for the full lifecycle period.

    Protozoans like velvet and ich detach from the host to reproduce. Treatments targeting free-swimming stages work best when applied for 7–10 days. This ensures the parasite is fully affected.

    Bacterial and fungal problems are different. They often exploit wounds or stress. Early treatment and clean water are essential. Keeping nitrates low also helps.

    Quarantine and cleaning the substrate interrupt parasite cycles. Removing breeding grounds and replacing or vacuuming the substrate lowers reinfection risk. This simple step makes treatment more reliable.

    Plan treatments based on lifecycle knowledge. Choose the right medication and duration for the parasite stage. Matching timing with method makes treatments more effective and less disruptive.

    • Identify the likely parasite stage before treating.
    • Use quarantine to stop spread between tanks.
    • Maintain treatments for the full lifecycle period, usually 7–10 days.
    • Address wounds and stressors early to prevent bacterial and fungal growth.

    Following these steps improves your chances of success. Lifecycle-based decisions are the foundation of effective nano fish disease management. They help protect the delicate communities in your aquarium.

    Resources for Further Assistance and Learning

    If you need more help with nano fish disease control strategies, start by documenting what you see. Record symptoms, water-test results, and any treatments you try. This makes it easier when you consult an aquatic veterinarian, who can prescribe medicated food or perform injections for complex or systemic illnesses that tank treatments cannot fix.

    Use authoritative references for diagnosis and dosing. The Merck Veterinary Manual is a solid source for fish disease information. Practical guides from Modern Aquarium and Interpet cover water chemistry, medication dosing, and identification tips. For product options, look for trusted formulations such as kanamycin-based KanaPlex, Bactocide preparations, and metronidazole for protozoal infections—always follow label directions and remove carbon during treatment.

    Build local and online support. Established aquarium forums, local fish clubs, and knowledgeable retailers offer species-specific advice and shared experience you can apply. Invest in reliable test kits, accurate thermometers, and appropriately sized filters and heaters for your nano tank. These tools, along with quarantine practices, routine maintenance, and balanced feeding, are the cornerstone of long-term fish health in nano setups and effective nano fish disease management techniques.

    FAQ

    What defines a nano aquarium and why are nano fish more vulnerable to disease?

    Nano aquariums are small, usually under 10 gallons. Their tiny size means water changes and quality issues can quickly affect the fish. This makes the fish more likely to get sick from poor water, too many fish, or stress.

    Many symptoms look similar. How do I know if my fish has an infection or a water-quality problem?

    In small tanks, many signs can mean different things. First, test the water for ammonia, nitrite, nitrate, pH, and temperature. Look for signs like rapid breathing or lethargy. White spots usually mean ich, while a yellow sheen suggests velvet.

    Use these signs along with water test results to figure out what’s wrong. Then, isolate the sick fish and start treating it.

    What immediate steps should I take when I spot an ill fish in a nano tank?

    Move the sick fish to a separate tank if you can. Test the water in both tanks. Do small water changes if needed.

    Also, clean the substrate and make sure the water is the right temperature and oxygen level. Keep track of the symptoms and how long they’ve been there. Then, choose the right treatment and follow the instructions carefully.

    Which diseases are most common in nano tanks and what are their key signs?

    Common diseases include ammonia poisoning, ich, velvet, columnaris, fin rot, dropsy, and gill or skin flukes. Look for signs like labored breathing, white spots, or frayed fins.

    These diseases can be caused by poor water quality and stress. Keeping the tank clean and stable can help prevent them.

    How do nitrification and the nitrogen cycle affect fish health in nano aquaria?

    Nitrifying bacteria help keep the water safe by breaking down ammonia. But small tanks can’t handle much waste. This means ammonia can build up quickly, harming the fish.

    It’s important to cycle the tank properly before adding fish. This helps prevent ammonia poisoning.

    What treatment categories work best for nano fish, and what dosing cautions apply?

    Treatments include fixing water quality, using a quarantine tank, and choosing the right medications. Antibiotics and antiparasitics are often used, but they must be used carefully.

    Medicines can be given in food or as injections. Always follow the instructions and talk to a vet if needed. Be careful not to overdose the fish.

    Are there medications I should avoid in nano tanks because of small volume or inhabitants?

    Yes, some medicines can harm shrimp, snails, and certain fish. Copper, malachite green, formalin, and potassium permanganate are examples. Always consider the safety of your tank’s inhabitants.

    Remove invertebrates and treat the sick fish in a separate tank. Also, take out activated carbon from filters during treatment.

    How do I use medicated food or injections practically in a nano setup?

    Use medicated food for internal infections when fish are eating. It delivers the medicine directly. For severe cases, a vet can prescribe injections or special diets.

    Avoid using water-based antibiotics for serious illnesses when other options are available.

    What preventive measures are most important for disease control in nano tanks?

    Prevent disease by fully cycling the tank, quarantining new fish, and testing water often. Do small water changes and avoid overfeeding.

    Keep the tank clean and the temperature stable. Don’t change filter media and do big water changes on different days.

    How do tankmates affect disease risk in nano aquaria?

    Aggressive fish can hurt others, leading to infections. Overcrowding increases waste and disease risk. Some fish carry parasites without showing symptoms.

    Snails and shrimp are sensitive to many treatments. Social fish need friends, while solitary ones may get stressed by others. Research compatibility and use dividers if needed.

    What regular maintenance should I follow for a healthy nano aquarium?

    Test water weekly and do small water changes. Clean the substrate and remove uneaten food. Monthly, clean the filter and check the heater and air equipment.

    Replace activated carbon only when not treating disease. Avoid big changes in water and media at the same time.

    How does diet influence disease resistance in nano fish?

    Poor diet weakens the fish’s immune system, making them more prone to disease. Feed high-quality food and add supplements like frozen or live foods.

    Use vitamin-enriched foods when recommended. Avoid overfeeding to prevent waste and ammonia buildup. For internal parasites, medicated food is often better than baths.

    What are simple stress-reduction strategies that lower disease risk?

    Provide hiding spots and plants. Use gentle filtration and maintain stable water parameters. Avoid overcrowding and sudden changes.

    Minimize handling and disturbances. Quarantine new fish and stressed ones in a separate tank with good water quality.

    How should I approach breeding nano species with health in mind?

    Quarantine parent fish for 2–3 weeks before breeding. Keep water quality high and do frequent small water changes during breeding and fry care.

    Feed fry foods like infusoria and rotifers to prevent malnutrition. Avoid overcrowding and be cautious with medications around eggs and larvae.

    Why does knowing parasite and pathogen lifecycles matter for treatment?

    Understanding lifecycles helps choose the right treatment and duration. For example, ich and velvet need treatments that cover their full lifecycle.

    Early treatment and water-quality control are key for preventing systemic infections. Quarantine and clean the substrate to break life cycles.

    When should I consult an aquatic veterinarian?

    See a vet for severe symptoms like dropsy, hemorrhage, or neurological issues. Vets can prescribe treatments and provide guidance.

    They can also diagnose internal infections and recommend targeted antibiotic therapy.

    What testing equipment and products are recommended for nano tanks?

    Use reliable test kits for ammonia, nitrite, nitrate, pH, and a good thermometer. Choose the right filtration and heaters for your tank size.

    Trusted medications include kanamycin-based products and metronidazole for protozoans. Always follow the instructions and remove carbon during treatment. Consult the Merck Veterinary Manual and aquarium resources for guidance.

    How can I document illness to get better help from forums or professionals?

    Record symptoms, when they started, water test results, recent tank maintenance, and stocking list. Take clear photos or videos of the fish.

    Share tank size, filtration type, temperature, and if you have invertebrates. This information helps experts diagnose the problem faster.

  • Introducing New Fish to Your Nano Tank

    Introducing New Fish to Your Nano Tank

    When you add new fish to your nano tank, it’s important to do it carefully. Fish and invertebrates come from bags with different water conditions than your tank. This can stress them out or even be deadly.

    This guide will show you safe ways to introduce new fish. You’ll learn about the drip method and why it’s good to quarantine them first. Quarantine them in a separate tank for about two weeks. This lets you check for any health issues before adding them to your main tank.

    Follow the steps used by big retailers and hobby experts. Slowly match the water temperature, and make sure the chemistry is the same. Don’t move the fish too fast. After moving them, turn off the tank lights for at least four hours. This helps them adjust and reduces stress.

    Learning how to add new fish to your tank is worth it. By following these steps, you can keep your small tank community healthy and happy.

    Understanding the Nano Tank Environment

    A vibrant nano tank environment showcasing a thriving miniature ecosystem. In the foreground, delicate aquatic plants like Java moss and Dwarf Hairgrass flourish, providing a lush green backdrop. Tiny, colorful shrimp and miniature fish dart among the plants, adding life and movement. The middle ground features a well-placed nano filter and soft substrate, while small decorative rocks create a natural habitat. The background elements include a faint glimpse of filtration tubes and soft lighting enhancing the scene's tranquility. Bright, diffused light mimics sunlight filtering through water, creating a serene ambiance. Capture the scene from an eye-level angle that immerses the viewer into the nano tank's underwater world. The overall mood should be peaceful and inviting, highlighting the beauty of a balanced aquatic ecosystem.

    Your nano tank is different from big ones because it’s smaller. Small changes can make a big difference. Keeping the water’s temperature, pH, and chemistry stable is key when adding new fish.

    Invertebrates and some fish are more sensitive to changes. Marine snails, shrimp, and plants need specific conditions. They can’t handle big changes like bigger tanks do.

    Before adding new fish, test the water with a good kit. Check for ammonia, nitrite, nitrate, pH, and temperature. If you have saltwater, use a refractometer or hydrometer to check specific gravity.

    Make sure your tank is fully cycled. A cycled tank has good bacteria that break down fish waste. Without it, adding new fish can stress them and harm the tank.

    Choosing the right fish is important for your nano tank. Don’t overcrowd or add aggressive fish. Pick small, peaceful species and introduce them slowly.

    • Keep parameter checks frequent during the first two weeks after introducing fish tank mates.
    • Limit new additions to one or two small fish at a time to let biological filtration adjust.
    • Monitor behavior and appetite as key signs that acclimation is proceeding well.

    By following these tips, your nano tank will be a healthy home for your fish. Use careful testing, slow introductions, and the best care tips to keep your tank balanced.

    The Drip Method Explained

    A close-up perspective of a clear glass nano aquarium displaying the drip method for acclimating fish. In the foreground, the aquarium is filled with vibrant aquatic plants and small, colorful fish swimming peacefully. The middle ground features a clear tubing connected to a container on a table, demonstrating the drip method in action, with water droplets cascading slowly into the tank. The background includes a softly blurred indoor setting with warm ambient lighting, enhancing the cozy atmosphere of a home aquarium setup. The scene showcases a sense of tranquility and focus, reflecting the meticulous nature of the drip acclimation process, with no text or distractions in the image.

    The drip method is a slow way to add water from your tank to a new container. It helps match the temperature, pH, and salt levels. This makes it easier for new fish or invertebrates to adjust.

    Use this method for sensitive species like shrimp, corals, or certain fish. It’s key when the water from shipping is different from your tank’s. It helps avoid shocking them with sudden changes.

    Before starting, get the right tools. You’ll need a clean 3–5 gallon bucket, airline tubing, and a way to control the flow. You might also want drip chambers or kits from places like Doctors Foster and Smith.

    Set up the siphon to drip slowly into the container. Aim for a rate that doubles the bucket’s volume in one to two hours. Watch the flow and adjust as needed during the acclimation.

    • Use one bucket only for aquarium work to avoid contamination.
    • Have separate airline tubing for each bucket to prevent contamination.
    • Keep acclimation kits ready for small or uncertain animals.

    Watching the process is important. The drip method is more complex than quick dips. You need to keep an eye on the flow and how the animals react. Stop if you see signs of stress like gasping or color loss.

    Experts and guides recommend this method for safe fish introduction. By following these steps, you can make adding new fish safer for your tank’s sensitive creatures.

    Preparing Your Aquarium for New Fish

    Begin by dimming or turning off the aquarium lights before bringing home new fish. Keep the lights off for at least four hours after adding them. This low light helps fish settle and prevents aggressive behavior that can harm new arrivals.

    Next, check and stabilize your tank’s parameters. Make sure ammonia and nitrite levels are zero. Keep nitrates low. Also, confirm pH and temperature levels are steady and suitable for the fish you have or plan to add.

    If you have room, set up a quarantine tank. This tank is for new fish for about two weeks. It helps you watch for disease and see if they eat. Quarantining also protects your existing fish and gives you time to treat any illnesses before adding them to the main tank.

    Get your acclimation supplies ready. You’ll need clean buckets, airline tubing, and a control valve or other flow-control materials for a drip. Have a net or specimen bag ready. Also, keep dechlorinator on hand if you use tap water. Make sure your test kits are fresh and you know the current readings.

    • Never add shipping water directly into your display tank.
    • Discard shipping water after acclimation to prevent contamination.
    • Avoid touching fleshy parts of corals or delicate invertebrates while handling.

    Plan a simple handling protocol and share it with anyone helping. Use the drip or float-acclimation method that fits your setup. Label buckets and keep tools clean to avoid cross-contamination. Clear procedures help you follow best practices for introducing fish and reduce mistakes.

    When you’re ready to add new fish, review the steps carefully. Move slowly, keep movements calm, and watch behavior closely in the first hours. Proper preparation and careful handling are key to a smooth transition for your new fish.

    Selecting the Right Fish for Your Nano Tank

    When picking fish for a nano tank, choose species that fit the tank’s size and filter power. Small tanks work best with fish under two inches. They should also handle modest water flow well. Stay away from big or very territorial fish that will outgrow the space.

    Think about the fish’s temperament and how well they get along before adding tank mates. Pick peaceful fish to avoid chasing and stress. If you want to mix different species, learn about their behaviors first. This way, you can prevent fights.

    Here are some good choices for nano tanks:

    • Freshwater: small tetras like neon or ember, rasboras such as chili or harlequin, and one male betta when planned carefully.
    • Dwarf options: small gobies, pygmy corydoras, and dwarf shrimp like Caridina and Neocaridina with the right snails.
    • Marine nanos: cleaner shrimps, small gobies, and hardy blennies that fit the tank’s salt level and flow.

    Make sure there are hiding spots and a buddy system for easier introductions. Add caves, plants, or live rock for fish to hide. These spots help reduce aggression and stress.

    Be ready to separate aggressive fish quickly. Keep a floating basket or divider ready to separate bullies for a few hours. This helps when tensions rise.

    Follow good care tips for new fish in the first days. Quarantine them when you can, acclimate them slowly, and check water often. Small, frequent checks help them adjust better.

    Match tankmates based on diet, activity level, and water needs. Pair species with similar needs to avoid competition and bad matches. Choosing the right fish makes adding tank mates easier and keeps your tank healthy.

    The Benefits of the Drip Method

    The drip method slowly changes temperature, pH, and salinity. This slow change reduces shock when adding new fish or invertebrates to your tank.

    By following this guide, your fish and invertebrates will live longer and healthier. They will get used to their new home faster. This means less sickness and quicker feeding.

    This method is perfect for sensitive creatures like shrimp and corals. It’s a safe way to introduce them to your tank.

    It’s a controlled way to mix water. You start with a bucket of tank water, then add more. This process takes about an hour. It helps avoid sudden changes when adding new fish.

    Don’t add the water from shipping directly to your tank. The drip method helps mix it in slowly. This way, you can get rid of harmful chemicals from the shipping water.

    • Gradual equalization protects sensitive animals.
    • Lower stress leads to better feeding and immunity.
    • Measured dilution reduces contaminants from shipping water.
    • Recommended as a core practice in any fish introduction guide.

    Use the drip method with consistent tubing and a slow drip rate. This careful pace is key to the drip method’s benefits for your nano tank.

    Step-By-Step Guide to the Drip Method

    Adding new fish to your tank should be calm and safe. First, get your supplies ready: a clean bucket, airline tubing, a control valve or plan for knots, a net, test kits, and dim the room lights. Turn off the aquarium light to reduce stress.

    1. Temperature match: keep the sealed shipping bag afloat in your aquarium for about 15 minutes. Do not open the bag. Let temperatures equalize before proceeding.

    2. Transfer to bucket: open the bag and gently pour its contents, water included, into the designated bucket. Keep animals submerged. Tilt the bucket if needed to keep specimens fully underwater.

    3. Start siphon: attach airline tubing between the aquarium and bucket. Begin the siphon by pump or mouth. Adjust flow to roughly 2–4 drips per second using a control valve or knots. This is a core part of the drip acclimation steps.

    4. Dilution routine: let the drip run until the bucket’s volume doubles. Discard half the bucket water. Restart the drip and let the volume double again. This staged dilution is central to the fish acclimation process and usually takes about one hour.

    5. Transfer specimens: use a net or scoop to move fish into the aquarium. For sponges, clams, and gorgonias, never expose them to air. Submerge the shipping bag, remove the specimen underwater, then seal and discard the bag underwater.

    6. Final checks: do not add shipping water to your tank. Monitor new arrivals closely and keep lights off for at least four hours. For marine invertebrates test specific gravity with a hydrometer or refractometer.

    The full drip method timeline commonly runs about one hour, though shrimp may need longer time. Watch behavior during each stage so you can adjust pace. These practical steps protect animals and give you a steady, reliable acclimation routine.

    Monitoring Fish Behavior After Introduction

    Watch closely for signs of stress in new fish. Look for rapid breathing, erratic movements, loss of color, or gasping at the surface. These signs mean the fish are stressed or the water isn’t right.

    If the resident fish start chasing the new one, use a floating basket or a perforated plastic grid. This reduces the tank’s width and gives the new fish space. It’s a key part of any fish introduction guide.

    • Keep lights off for at least four hours to reduce stress, then bring lighting back slowly while you continue monitoring fish behavior.
    • Offer food and note whether the new fish accepts it within a few days; refusal to eat can signal stress or illness.
    • Check for disease signs—white spots, frayed fins, or lesions—during quarantine and the first week in the display tank.

    Follow new fish care tips like short, frequent checks. Quick visual inspections cause less disruption. They help you spot subtle changes in activity or appetite.

    1. Observe breathing rate and responsiveness twice daily for the first week.
    2. Note any harassment and apply temporary barriers if chasing continues.
    3. Record feeding responses and physical signs to spot patterns early.

    This period is key to your fish introduction guide. Careful monitoring and following new fish care tips help the newcomer settle. It also lowers the risk of problems in your nano tank.

    Common Mistakes to Avoid

    You want your new fish to thrive. Start by respecting the fish acclimation process. Rushing acclimation can stress and kill your fish. Take your time with the drip method and follow best practices for introducing fish.

    Don’t add shipping water to your aquarium. Pouring bag water into the display can introduce contaminants and sudden changes. After acclimation, dispose of shipping water and only add the fish once they have adjusted.

    Never add an airstone or oxygen source to the shipping bag. Oxygenation can raise pH and increase toxic ammonia exposure. Let the bag sit in the tank and equalize by slow drip instead of oxygenating the shipment.

    Sensitive invertebrates need handling under water. Sponges, clams, and many corals can be damaged by brief air exposure. Keep them submerged during transfer and follow specific steps in the fish acclimation process for these species.

    • Skip quarantine at your peril. Quarantine reduces the risk of introducing disease or parasites to your main tank.
    • Test parameters before and after introduction. Ignoring salinity for marine invertebrates or failing to check ammonia and nitrite invites avoidable losses.
    • Introduce a single species at a time when possible. Mixing many new arrivals raises stress and makes diagnosis harder if problems appear.

    When you plan how to add new fish to aquarium, write a checklist. Include quarantine steps, target specific gravity (1.023–1.025 for many marine invertebrates), and monitor ammonia and nitrite for several days. Following these best practices for introducing fish will lower mortality and improve long-term health.

    Use this outline of common mistakes to avoid as a quick reference. Slow acclimation, no shipping water, careful handling of invertebrates, quarantine, and thorough testing form the core of a safe fish acclimation process and a smoother way to add new fish to aquarium.

    Long-Term Care for New Fish

    After your fish get used to their new home, keep watching them for two weeks. This lets you catch any hidden sicknesses early. It also shows if they’re eating well before they meet other fish.

    Make a regular feeding schedule with the right food for your fish. Pay attention if a fish doesn’t want to eat at first. These steps help your fish feel less stressed and grow strong.

    Check the water often for ammonia, nitrite, nitrate, pH, temperature, and specific gravity in saltwater tanks. Do partial water changes to keep everything safe. Keeping the water stable is key for your fish’s long-term health.

    Deal with any aggression or territory problems right away. Change the tank’s layout or add places for fish to hide. Use dividers or separate areas for fish that bully others.

    • Avoid overstocking; match your tank’s biological load to filtration capacity and volume.
    • Monitor invertebrates closely; many are more sensitive and need steady salinity and water quality.
    • Record parameters and behavior; regular notes help you detect subtle shifts early.

    When introducing new fish, do it slowly. This helps the filter and lowers the chance of disease.

    Remember, caring for your fish is an ongoing process. Regular upkeep, watching your fish closely, and following these tips will keep your tank healthy and happy.

    Creating a Community Tank

    Start by planning the compatibility and stocking of your tank. Choose species that match in temperament, size, and water needs. This keeps your nano tank balanced.

    Introduce fish mates in stages to protect your tank’s balance. Add one or two fish at a time. Wait a week or more before adding more. This lets nitrifying bacteria and territory charts settle.

    Make sure your tank has hiding spots. Use plants, caves, and décor to provide cover. This reduces stress and gives shy or new fish a safe place to hide.

    • Acclimate every new arrival using a drip method and quarantine each specimen for observation.
    • Follow a fish introduction guide: slow acclimation, visual checks, and gradual mixing help prevent disease and shock.
    • Keep tools on hand for brief separation, such as floating baskets or perforated dividers, in case aggression flares.

    Manage aggression proactively. Watch feeding times and social interactions. Make sure no fish is bullied or starved. Be ready to rehome overly aggressive fish if issues persist.

    Monitor tank dynamics after each addition. Record behavior, appetite, and water values for several days. This helps spot stress or illness quickly.

    Use these best practices for introducing fish to build a resilient community. Slow, careful steps protect your inhabitants. This way, you can enjoy a thriving, peaceful nano tank.

    Conclusion: A Happy, Healthy Nano Tank

    The drip method is a safe way to introduce new fish and invertebrates to your tank. It helps them adjust to the tank’s conditions slowly. This method is all about gradual changes, not rushing.

    To add new fish, start by preparing your equipment. Float the shipping bags to match the tank’s temperature. Then, move the fish to a clean bucket and set up a drip system. Aim for 2–4 drops per second.

    Use the double-and-discard method for about an hour. Never mix shipping water with your tank’s water. Also, keep the tank lights off for at least four hours. These steps help reduce risks and make it easier for new fish to settle in.

    Be patient and watch your fish closely. If possible, quarantine new fish. Look out for signs of stress or disease. Keeping the water stable is key for long-term success.

    Keep learning from trusted sources. Use tools like refractometers and hydrometers. Aquarium retailers and hobbyist videos can also help improve your routine. By following these steps, you’ll see your fish thrive in a happy, healthy nano tank.

    FAQ

    What is the best way to introduce new fish or invertebrates to a nano tank?

    Use the drip method. Float the sealed shipping bag in the tank to match temperatures. Then, transfer the inhabitants and shipping water into a clean bucket. Start a siphon from the tank to the bucket at about 2–4 drips per second.

    Double the bucket volume, discard half, and repeat until the animal has acclimated—typically about one hour. Never pour shipping water into your display tank. Keep tank lights off for at least four hours after introduction to reduce stress.

    Why does careful acclimation matter for nano tanks?

    Fish and invertebrates arrive in packaging with different temperatures, pH, and salinity than your tank. Sudden changes can cause stress, shock, or death. Nano tanks have smaller volumes and less biological buffering, so parameter swings happen faster.

    Slow equalization reduces risk and protects your time and money spent on setup and livestock.

    When should I use the drip method instead of a quick transfer?

    The drip method is recommended for sensitive species—dwarf shrimp, delicate invertebrates, corals, clams, and many marine animals—as well as when shipping water differs significantly in salinity or chemistry from your tank. It’s also the preferred approach when you want to minimize stress and improve the newcomer’s chances of accepting food and staying healthy.

    What equipment do I need for drip acclimation?

    Gather a clean 3–5 gallon bucket reserved for aquarium use, airline tubing (one per bucket), and a flow control method (knots in the tubing or an airline control valve). Optional items include a drip chamber or commercial acclimation kit such as those sold by major aquarium retailers. Also have test kits, a refractometer or hydrometer (for saltwater), a net, and dechlorinator if you’ll use tap water at any point.

    How do I perform the drip method step-by-step?

    Step 1: Turn off or dim aquarium lights and assemble supplies. Step 2: Float the sealed bag in the tank for ~15 minutes to match temperature. Step 3: Open the bag and pour contents into the bucket. Step 4: Start a siphon from the tank to the bucket with airline tubing and adjust to ~2–4 drips per second. Step 5: Let the bucket double in volume, discard half, then repeat until dilution and acclimation are complete (about one hour). Step 6: Transfer the animals to the tank using a net; never add shipping water to your aquarium. Step 7: Monitor closely and keep lights off for at least four hours.

    How long should I quarantine new fish or invertebrates?

    Quarantine new arrivals in a separate tank for about two weeks when possible. Use this time to monitor feeding behavior, check for parasites or disease, and ensure the animal is healthy before introducing it to your display tank. Quarantine reduces the risk of introducing pathogens to your established system.

    What water parameters should I check before introducing new animals?

    Verify ammonia and nitrite are zero, nitrates are low, and pH and temperature are stable. For marine systems, confirm specific gravity with a refractometer or hydrometer—many marine invertebrates prefer 1.023–1.025. Ensure the aquarium is fully cycled and can handle the additional bioload.

    How do nano tanks differ from larger aquariums when adding new fish?

    Nano tanks have much smaller water volumes, so temperature, pH, and chemistry can change rapidly, and biological buffering is limited. That makes careful acclimation, species selection, and gradual introductions more critical than in larger systems. Overstocking or adding territorial species in a nano tank often leads to harassment and water-quality issues.

    Which species are generally suitable for a freshwater nano tank?

    Nano-friendly freshwater choices often include small tetras, rasboras, certain dwarf rasboras, carefully planned bettas (only one male), small gobies where appropriate, and dwarf shrimp and snails. Always verify adult size, temperament, and water-parameter needs before purchasing.

    Which marine species work well in nanos and require special acclimation?

    Suitable marine nano candidates include small gobies, blennies, tiny hardy shrimps (like cleaner shrimp varieties where tank size and rockwork permit), and select corals and anemones known for hardiness. Many marine invertebrates are sensitive to salinity; target specific gravity 1.023–1.025 and use a gentle drip acclimation process.

    What are common signs of stress or poor acclimation to watch for?

    Watch for rapid or labored breathing, gasping at the surface, erratic swimming, faded color, frayed fins, mucus production, or refusal to eat. Immediate post-introduction harassment by tankmates is another concern. If you see severe signs, separate the animal and test water parameters right away.

    Can I speed up the acclimation if I’m in a hurry?

    Do not rush acclimation. Speeding up the drip process or skipping steps increases fatalities. Sensitive species, such as invertebrates, may require longer acclimation. Follow the dilution routine and monitor behavior throughout the process.

    Is it ever okay to add shipping water to my tank?

    No. Never add shipping water to your display. Shipping water can contain contaminants, medications, or drastically different chemistry. Always discard shipping water after acclimation to reduce the risk of introducing pollutants or sudden parameter shifts.

    How should I handle delicate invertebrates and corals during transfer?

    Keep sponges, clams, corals, and gorgonians submerged when transferring. Remove specimens from their shipping bags under water to prevent air exposure. Avoid touching soft tissues. For clams and many corals, gentle handling and maintaining continuous submersion are essential to prevent damage.

    What should I do if resident fish harass the new addition after introduction?

    Provide immediate hiding places—caves, plants, or live rock—and consider temporary containment solutions like a floating perforated basket or a plastic grid divider. If harassment persists, separate the aggressor or rehome it. Rearranging décor can break established territories and reduce ongoing aggression.

    How do I know the drip rate is correct?

    Aim for roughly 2–4 drips per second. That rate provides gradual dilution of shipping water without shocking the animal. Adjust flow using knots in airline tubing or an inline control valve and supervise the process to maintain a steady drip.

    What are the risks of oxygenating the shipping bag or using an airstone?

    Adding air or oxygen to the shipping bag can raise pH and increase toxic un-ionized ammonia exposure, stressing the animal. Shipping bags are typically oxygenated appropriately by suppliers; avoid altering the bag’s gas environment yourself.

    How often should I test water after adding new fish?

    Test ammonia and nitrite daily for several days after introduction, and check nitrates and pH regularly. For marine tanks, monitor specific gravity. Continue monitoring for the quarantine period and after adding multiple animals to ensure biological filtration is keeping up.

    Are there tools or kits that simplify the drip acclimation process?

    Yes. Commercial drip acclimation kits and drip chambers are available from major aquarium retailers and manufacturers. These can simplify setup and flow control, but the basic airline tubing, bucket, and control-valve method is equally effective when done carefully.

    What long-term steps ensure the newcomer thrives after acclimation?

    Maintain stable water parameters, establish a consistent feeding routine with species-appropriate foods, keep nitrates low with regular partial water changes, and observe for disease during the quarantine period. Provide hiding spaces and monitor social dynamics to prevent bullying and starvation.

    How should I plan stocking and community building in a nano tank?

    Add livestock gradually to allow biological filtration to adjust. Choose species with compatible temperaments, sizes, and parameter needs. Provide ample hiding spots, avoid highly territorial or fast-growing species that outgrow the space, and be prepared to separate or rehome problem individuals to preserve tank harmony.

  • The Best Nano-Sized Algae Eaters for a Clean Planted Tank

    The Best Nano-Sized Algae Eaters for a Clean Planted Tank

    You dream of a planted tank that’s healthy and easy to care for. The right algae eaters can make this dream come true. Nano algae eaters are small fish and invertebrates that help control algae without taking up too much space.

    Experts like Joshua Wiegert say these animals make life easier but don’t replace good care. They’re tools for removing algae naturally, not a magic solution. Many popular algae eaters grow too big or need more room, so choose ones that stay small and handle tight spaces well.

    Good choices include Otocinclus catfish, Amano shrimp, and Nerite snails. Jessica McComb points out they eat diatoms and soft green algae and fit well in small tanks. Team Buce Plant and aquarists like Tammy (@aquarist_tl) also suggest pairing species and keeping up with manual tasks like scraping and trimming plants.

    This section sets the stage for the article. You’ll discover the best nano algae eaters, how they help with algae control, and why they’re essential for regular care. This way, your planted aquarium will stay balanced and beautiful.

    Understanding Algae Eating Species and Their Importance

    A vibrant underwater scene showcasing various nano-sized algae-eating species, such as tiny shrimp, snails, and fish, actively grazing on lush green algae on rocks and plants in a well-maintained planted tank. In the foreground, detailed close-ups of an entourage of colorful, miniature shrimp with intricate patterns can be seen feeding while delicate, spiraling snails glide alongside them. The middle ground features an assortment of aquatic plants, their leaves shimmering under soft, diffused lighting that simulates natural sunlight filtering through water. The background is an enticing blur of murky water, creating a serene, tranquil atmosphere. Use a macro lens angle to emphasize the textures and colors, with a gentle depth of field to draw attention to the algae eaters while maintaining an inviting, clean ambiance.

    Algae eating species can help cut down on daily chores. But, they don’t replace the need for basic tank care. Many of these grazers need extra food and can’t live on tank algae alone.

    Before adding beneficial algae eaters, make sure your tank is stable and cycled. The size of your tank, how well your fish get along, and if there’s enough food are key. These factors help decide which algae eaters will do well in your tank.

    Algae eaters help keep your tank clean. They make your plants and decorations look better by allowing more light to reach them. They’re part of a plan to keep your tank clean, not a complete solution.

    • Choose algae eaters based on the type of algae you have. Some are better at eating hair algae, while others prefer film, diatom, or green spot algae.
    • Introduce algae grazers slowly and watch for signs of stress, aggression, and if they need extra food.
    • Remember, controlling algae in ponds and tanks works the same way. You need to balance light, nutrients, and grazing pressure.

    Pairing the right algae eating species with good care creates a balanced tank. This balance helps prevent algae outbreaks and keeps your plants healthy. It also makes caring for your tank easier for you.

    Popular Nano-Sized Algae Eaters for Your Tank

    A serene planted aquarium scene showcasing popular nano-sized algae eaters. In the foreground, a group of vibrant neon tetra fish foraging among lush green aquatic plants, their iridescent colors reflecting the light. A small but lively amano shrimp is elegantly perched on a rock covered with soft green algae, highlighting its translucent body. In the middle, a gentle ripple of water flows, with visible bubbles rising to the surface, creating a feeling of calmness. The background features a subtle blur of submerged plants, adding depth and richness to the environment. Soft, natural lighting illuminates the entire scene, casting gentle reflections across the tank, evoking an atmosphere of tranquility and nature's harmony.

    You want to control algae without making your tank too crowded. Otocinclus, tiny catfish, are great at eating film algae and diatoms. They are gentle on plants but need stable water and regular food.

    Amano shrimp are a favorite among aquarists. Named after Takashi Amano, they eat hair and soft green algae well. They grow to 2–2.5 inches and do best in groups.

    Nerite snails are steady and easy to care for. They won’t breed in freshwater, so you don’t have to worry about too many snails. They clean glass and leaves and come in beautiful shell patterns.

    Bristlenose pleco is good for larger nano tanks and planted setups. This pleco grows to 5–6 inches and eats tough algae. It’s hardy and easy to find, making it a reliable choice.

    Siamese algae eater and freshwater gobies are good for bigger nano and small community tanks. Siamese algae eater grows bigger and prefers 30+ gallon tanks. Some gobies, like Stiphodon, eat well and can tackle cyanobacteria.

    • Amano shrimp — great for soft algae and hair algae control.
    • Otocinclus — ideal for diatoms and film algae in 10+ gallon tanks.
    • Nerite snails — durable grazers, decorative, no freshwater reproduction.
    • Bristlenose pleco — compact pleco for tougher algae in 20+ gallon tanks.
    • Siamese algae eater/gobies — better for larger nano or community setups.

    Think about tank size and oxygen needs when picking algae eaters for your indoor tank. Some pond algae eaters do well in planted tanks, but many need more flow or space. Choose species that fit your tank, add hiding spots, and give them extra food to keep them healthy and active.

    Comparing Different Algae Eaters

    When comparing algae eaters, consider diet, size, behavior, and tank needs. Otocinclus are great for soft film algae and are gentle on plants. They like to be in groups and need regular algae food.

    Bristlenose and rubberlip plecos have different grazing powers. Rubberlips are stronger but sensitive to oxygen. Bushynose plecos are hardier but can damage wood and produce more waste. Both prefer caves and moderate flow.

    Siamese algae eater eats tough algae like black beard algae. But it grows large and can harass smaller tankmates. Make sure you know what you’re getting to avoid aggressive species.

    Gobies can control cyanobacteria and add color. But finding the right species and knowing them can be tricky. Rosy barbs and some livebearers will graze algae but might not fit in nano setups.

    Shrimp and snails are good algae eating fish alternatives. Amano shrimp are always eating and need extra food. Cherry shrimp do well in groups. Nerite snails are reliable but won’t reproduce in freshwater and lay eggs that some find unsightly.

    Apple (mystery) snails may eat plants and sometimes carry pests or disease. Ramshorn and trumpet snails help with detritus but can multiply if tank management is poor. Snail health depends on hardness and water chemistry.

    • Tank size — small tanks rule out large grazers like mature Siamese algae eaters.
    • Flow and oxygen — rubberlip plecos and many plecos need well-oxygenated water.
    • Hiding places — Otocinclus and shrimp benefit from plants and gentle cover.
    • Feeding — most aquatic algae grazers need supplemental food to stay healthy.

    Use this outline to match algae control goals with species traits. Think about long-term care, your planted setup, and how each algae eating fish or invertebrate fits the tank you keep.

    Setting Up a Planted Tank with Algae Eaters

    Begin by finishing your tank cycling before introducing algae eaters. This step ensures stable water chemistry and beneficial bacteria. These conditions are vital for sensitive species like Otocinclus.

    A well-cycled tank provides a steady food source for grazers. It also offers predictable conditions for their health.

    Choose the right tank size and stocking for each grazer. Otos do well in small groups of three to six. Bristlenose plecos need tanks of 20 gallons or more, while Siamese algae eaters prefer 30-gallon setups.

    Add animals slowly to avoid sudden changes in bio-load. This helps maintain a healthy environment.

    Create diverse microhabitats with plants, driftwood, and smooth rocks. Driftwood is perfect for bristlenose plecos to graze on. Dense plants and caves provide safe spots for Amano shrimp to molt.

    Small shrimp need covered filter intakes to stay safe. This prevents them from getting sucked in.

    Use hard water or add calcium for nerite snails to keep their shells healthy. Nerites lay eggs on glass and décor that won’t hatch in freshwater. This prevents overpopulation. Amano shrimp do not breed in freshwater, making them a low-overpopulation choice.

    Feed supplemental algae wafers or blanched vegetables when algae is scarce. This helps fragile grazers. Balance feeding to avoid water quality issues. Regular, moderate maintenance is key to effective algae control.

    • Cycle the tank fully before adding grazers.
    • Add algae eaters gradually and in compatible groups.
    • Provide hiding spots, driftwood, and varied flow for species comfort.
    • Cover filter intakes and monitor calcium for shelled grazers.

    This approach supports algae grazers while protecting water quality and animal health. Thoughtful planning during tank cycling and stocking reduces stress. It also improves algae management results in the long run.

    Bio-load Considerations with Nano-Sized Algae Eaters

    Adding algae eaters increases your tank’s bio-load. Fish like bristlenose plecos and Siamese algae eaters produce a lot of waste. On the other hand, small invertebrates such as Amano and cherry shrimp produce much less.

    Think about the bio-load when planning how many fish to keep. The size of your tank matters too. Otocinclus and shrimp do well in tanks of 10+ gallons. But, bristlenose plecos and SAE need 20–30+ gallons for a stable environment.

    Don’t overcrowd your tank. This helps keep oxygen levels stable, which is important for fish like rubberlip plecos.

    Too many snails can mean your tank is not being maintained well. Ramshorn and trumpet snails can multiply quickly if there’s leftover food. Regular water changes and careful feeding can help prevent this.

    Feeding your algae eaters the right food is key to controlling algae. Give them algae wafers, blanched vegetables, or specialized shrimp food. But, don’t overfeed. This can increase the bio-load and make it harder to control algae.

    • Match species to tank volume to limit waste buildup.
    • Monitor snail counts and reduce feeding if populations spike.
    • Maintain consistent water changes and filter maintenance.
    • Provide supplemental food without creating nutrient surges.

    By balancing stocking, feeding, and maintenance, you can keep your algae eaters effective. Thoughtful bio-load considerations help control algae better. This supports long-term algae reduction in your planted tank.

    Selecting the Right Algae Eater for Your Needs

    Start by matching the size and behavior of algae eaters to your tank. Nano tanks need small species that fit well and eat algae. Otocinclus are great for many planted setups. Shrimp and nerite snails are good for mixed tanks.

    Choose algae eaters based on the type of algae and tank conditions. Otocinclus and nerite snails are good for diatoms and soft algae. Amano shrimp are better for hair and string algae. Siamese algae eaters are good for black beard algae, but only in large tanks.

    Think about compatibility and long-term needs. Avoid fish that grow too big for nano tanks, like common plecos. Flying fox and Chinese algae eaters can be aggressive and not control algae well. Learn to tell similar species apart before buying.

    • Tank size: choose species that stay small and school if needed, like Otocinclus.
    • Algae type: match eater to algae—Amano shrimp for hair algae, nerites for soft layers.
    • Water parameters: nerite snails prefer harder water, Otos like stable, oxygenated conditions.

    Consider lifestyle factors too. Pond algae eaters might be good for outdoor systems, but many grow too big for aquariums. If you have a backyard pond, pick pond algae eaters made for larger volumes and flow.

    Lastly, think about health and maintenance. Schooling species need friends, grazers need extra food when algae is low, and some need specific flow or oxygen. Choose algae eaters that fit your routine and tank’s needs for good algae control in ponds and aquariums.

    Common Algae Types and Their Impact on Your Tank

    In a planted tank, you’ll find many algae types. Film algae is a thin green layer on leaves and glass. Diatoms create a brown coating on substrate and driftwood.

    Hair or filament algae grows as strings that tangle plants and equipment. Cyanobacteria appears as slimy mats with a foul odor.

    Different algae need different control methods. Otocinclus and bristlenose plecos are great at eating film algae and diatoms. Amano shrimp are excellent at eating hair and string algae.

    Nerite snails are good for green spot algae that soft grazers can’t handle. Black Beard Algae (BBA) is very stubborn. In big tanks, Siamese algae eaters like Crossocheilus oblongus can tackle BBA.

    Using only grazers won’t solve all problems. Manual removal is key. Scraping glass, plucking hair algae with tweezers, and brushing décor removes bulk growth fast.

    Use algae reduction solutions like targeted grazing and maintenance to slow regrowth. This way, you keep your tank clean and healthy.

    • Identify the algae type before choosing a grazer.
    • Match aquarium lighting and nutrient balance to prevent recurrence.
    • Combine aquatic algae grazers with manual cleaning for steady algae control.

    Health and Care for Algae Eaters

    Many algae eaters come to your tank hungry. You should give them extra food, like algae-based foods or blanched veggies. Plecos and Amano shrimp also need wafers, pellets, and veggies to stay healthy.

    Keeping the water stable is key. Cycle the tank before adding algae eaters. This helps prevent stress. Otos and nerite snails don’t like sudden changes in pH or ammonia.

    Make sure they have the right homes and places to hide. Bristlenose plecos need driftwood for digestion and hiding spots. Amano shrimp need places to hide during molts. Shrimp also need filter intake guards for safety.

    Feed omnivores and herbivores the right mix. Plecos need both protein and plant matter. True herbivores eat algae and veggies. If there’s not enough algae, give them algae wafers, spirulina, and blanched zucchini.

    Watch for signs of disease and stress. Lethargy, loss of appetite, or damaged shells in nerite snails are warning signs. Quarantine new arrivals to lower disease risk. Quick treatment and better tank conditions help them recover faster.

    Know about their social and territorial needs. Some plecos become territorial as adults. Provide plenty of hiding spots or separate tanks. Amano shrimp and nerite snails usually get along with community fish, making them great for planted tanks.

    Sustainable Practices in Maintaining Algae Eaters

    Choosing captive-bred algae eaters helps protect wild populations. Some species, like rubberlip plecos, are better off in captivity. They are more likely to survive and thrive.

    Be careful with species that could harm the environment. Mystery snails, for example, can become invasive. Always keep your aquarium or pond secure to prevent animals from escaping.

    Choose algae eaters that don’t breed too much. Nerite snails, for instance, don’t reproduce in freshwater. This makes them a reliable choice for controlling algae.

    Get your algae eaters from trusted sources and quarantine them. This reduces the risk of disease. It also keeps your existing algae eaters healthy.

    • Buy captive-bred where possible to reduce pressure on wild stocks.
    • Avoid species known to be invasive in your region.
    • Quarantine new arrivals to prevent disease transmission.
    • Secure outdoor ponds to prevent escape of pond algae eaters.

    Keep your algae eaters healthy with simple care. Good water quality and a balanced diet are key. Healthy algae eaters control algae better and need less chemical treatment.

    Supporting ethical breeders helps the environment. Your choices can make a big difference. Sustainable algae eaters lead to healthier tanks and ecosystems.

    Troubleshooting Algae Problems in Your Tank

    If algae keeps coming back, start with the basics. Remove visible algae, do regular water changes, and clean the substrate. Algae eaters help but don’t replace manual cleaning.

    Look at how much you’re feeding and what nutrients are in the water. Too much food can lead to algae. Reduce food, remove uneaten bits, and test the water for imbalances.

    Next, check your lighting. Too much light can cause algae to grow. Shorten the light time and move lights away from plants. Watch for changes each week.

    Choose algae grazers wisely and only add them when your tank is stable. A mix of Otocinclus, Amano shrimp, and Nerite snails can tackle different algae types. Using several species helps control algae while you manually remove it.

    • Use grazers to complement, not replace, husbandry.
    • Avoid relying on cleaners as your primary strategy.
    • Watch for starving cleaners if algae disappears suddenly.

    If algae is severe, consider targeted treatments. Use products like Twinstar Nano Algae Inhibitor with caution. Always pair treatments with better maintenance for lasting results.

    Misidentifying algae species can worsen problems. For example, confusing a flying fox with a Siamese algae eater can lead to disappointment. Buy from trusted sources and confirm species before adding them.

    Pest snail outbreaks often come from too much food and nutrients. Cut back on feeding, clean up detritus, and do extra water changes. This helps lower snail numbers without harming plants or grazers.

    If algae persists, list any recent changes. Check for new fertilizers, bulbs, or fish that might upset the tank’s balance. Change one thing at a time to see what works.

    Keep a log of water tests, maintenance, and tank changes. A consistent routine helps you spot trends and apply the right solutions. Regular care gives algae grazers the best chance to control algae long-term.

    Integration of Algae Eaters in Community Tanks

    Adding algae eating fish and invertebrates can help control algae in community tanks. First, pair peaceful species like otocinclus, nerite snails, and Amano shrimp with calm tankmates. These algae eaters do best in low-aggression environments with little competition for food.

    Match the activity patterns of your fish and invertebrates to reduce conflict. Nocturnal grazers like bristlenose plecos feed at night and won’t bother day-active fish. Otos are shy and prefer to be in small groups. This keeps them safe and helps them avoid being outcompeted by faster feeders.

    Protect small inverts from predators and filter intakes. Use sponge pre-filters, gentle flow areas, and plenty of hiding spots. This lets algae grazers feed without stress. Spread out feeding stations and use algae wafers in corners to ensure even food distribution.

    • Choose complementary cleaners to cover varied algae types: snails handle tough diatoms, shrimps pick soft film, and small plecos tackle green spot algae.
    • Avoid mixing assertive chasers like mature Siamese algae eaters with tiny, easily stressed species.
    • Monitor bio-load and plant health to prevent overstocking while keeping beneficial algae eaters effective.

    Provide visual boundaries with plants, rocks, and driftwood to minimize territorial disputes. This reduces stress and lets algae eating fish establish safe foraging routes. When you balance activity levels, protection, and food access, community tanks algae control becomes manageable and reliable.

    Enhancing Your Aquarium’s Aesthetic with Algae Eaters

    Choose algae eating species to keep your aquarium clean between maintenance. Otocinclus catfish and Amano shrimp are gentle grazers. They remove film and hair algae without harming plants.

    Nerite snails add patterned shells and steady grazing. They give your display extra texture while helping with algae removal.

    Combine Otocinclus, nerite snails, and Amano shrimp for movement and balance. Each species targets different algae types. Together, they offer broad algae control in ponds and aquariums.

    Select sizes and behaviors that complement your plants and hardscape. This keeps your aquarium aesthetic cohesive and lively.

    Even with a hardworking algae crew, manual tools like scrapers and tweezers are essential for final polishing. Proper husbandry and sustainable sourcing keep your cleaners healthy. This reduces maintenance time and ensures your planted tank looks great for a long time.

    When you plan carefully, algae eaters become both functional team members and subtle design elements. They enhance your aquarium’s visual appeal.

    FAQ

    What are the best nano-sized algae eaters for a clean planted tank?

    For small tanks, Otocinclus catfish, Amano shrimp, Nerite snails, and small plecos like bristlenose are top picks. Otos and Amano shrimp are great for film, diatoms, and hair algae. Nerites clean glass and hardscape well without reproducing in freshwater. Bristlenose plecos are good for larger nanos with driftwood and hiding spots.

    Choose species that stay small and match your tank size. They should also complement each other for better algae control.

    How do algae eaters help with algae control—and what can they not do?

    Algae eaters help by eating film, diatoms, hair algae, and some green spot algae. They make maintenance easier but don’t replace good care. You need to do water changes, control nutrients and light, and remove algae manually.

    Many grazers need extra food; they can’t live on tank algae alone. Think of them as a tool to keep your tank tidy between maintenance.

    Which algae eaters are appropriate for nano tanks specially?

    For nano tanks, choose small, low-bio-load species like Otocinclus, Amano shrimp, Nerite snails, and cherry or crystal shrimp. Avoid larger species like Siamese algae eaters and common plecos. Make sure the species you choose fit your tank size and needs.

    How do I match algae eater species to the type of algae in my tank?

    Different grazers target different algae. Otocinclus and bristlenose plecos handle film algae and diatoms well. Amano shrimp are good for hair and string algae. Nerite snails remove green spot and soft algal films on glass.

    Some freshwater gobies may eat cyanobacteria. For stubborn Black Beard Algae (BBA) in larger tanks, Siamese algae eaters can help, but they’re not suitable for most nano systems.

    When should I add algae eaters to my aquarium?

    Add algae eaters after your tank is fully cycled and stable. Stable water parameters and an established algal food source reduce stress and mortality. Introduce cleaners gradually and in appropriate group sizes.

    Provide hiding places, appropriate flow, and cover filter intakes for small invertebrates before adding them.

    How much supplemental feeding do algae eaters need?

    Most algae eaters need supplemental food. Otocinclus often arrive underfed and require algae wafers and blanched vegetables. Amano shrimp eat a lot of algae but benefit from sinking pellets and biofilm supplements.

    Bristlenose plecos need driftwood and vegetable matter plus wafers. Nerite snails generally graze enough but may need calcium-rich foods in soft water. Feed sparingly to avoid excess nutrients and snail overpopulation.

    What tank sizes and conditions suit common nano algae eaters?

    Otocinclus and Amano shrimp do well in 10+ gallon tanks with stable parameters and planted cover. Nerite snails thrive with moderate hardness for shell health and do well in small tanks. Bristlenose plecos need 20+ gallons, caves, and driftwood.

    Siamese algae eaters require 30+ gallons when fully grown and are unsuitable for most nanos. Match species to tank volume, flow, oxygenation, and hiding-space needs.

    What are bio-load and waste considerations when adding algae eaters?

    Algae eaters add to the tank’s bio-load. Plecos produce notable waste and may increase maintenance needs. Shrimp add minimal load, while overstocked ramshorn or trumpet snails signal excess food and can explode in population.

    Balance grazer numbers with filtration capacity, perform regular water changes, and avoid overfeeding to keep nutrients—and algal growth—under control.

    How do I avoid buying the wrong or aggressive algae eater species?

    Misidentification is common—Siamese algae eater can be confused with aggressive flying fox or Chinese algae eater species. Learn identifying features (stripe patterns, presence of barbels) and buy from reputable local stores or breeders. Prefer captive-bred stock where possible.

    Read species-specific care needs to avoid adding wild-caught, oxygen-sensitive fish like rubberlip plecos unless you can meet their requirements.

    Are snails or shrimp better for planted tanks?

    Both have roles. Amano shrimp are tireless grazers for hair and string algae and safe with many plants. Nerite snails are dependable glass and hardscape grazers and won’t reproduce in freshwater. Cherry and crystal shrimp excel in high numbers grooming plants.

    Avoid apple (mystery) snails in planted tanks because they can eat live plants and carry pests. Choose based on algae type, tank mates, and water hardness.

    How do I protect small algae eaters from tankmates and equipment?

    Provide plenty of hiding spots (plants, driftwood, caves) and cover filter intakes to protect shrimp. Avoid housing tiny grazers with large or aggressive fish that will prey on them. Ensure food distribution so small grazers aren’t outcompeted.

    Place territorial species’ shelters to reduce harassment and maintain water flow appropriate to each species’ oxygen needs.

    What maintenance steps should I continue even with algae eaters present?

    Continue routine water changes, nutrient control, light management, and manual removal: scrape glass, pluck hair algae with tweezers, and brush décor. Monitor nutrient sources (overfeeding, fish load) and adjust lighting duration/intensity.

    Algae eaters reduce regrowth but won’t solve underlying imbalances that drive persistent blooms.

    How can I combine multiple algae eaters effectively?

    Combine complementary species to cover varied algae types—for example, Otocinclus for film/diatoms, Amano shrimp for hair algae, and Nerite snails for glass and green spot. Ensure the tank can support the combined bio-load, that species are compatible, and hiding places are abundant.

    Introduce them gradually, observe feeding competition, and adjust supplemental feeding so all grazers thrive.

    Are there sustainability or ecological concerns when keeping algae eaters?

    Yes. Prefer captive-bred animals to reduce pressure on wild populations. Avoid releasing aquarium species into local waterways—some snails and snails’ eggs can become invasive. Be cautious with wild-collected plecos and rubberlip species that are fragile and often die in transit.

    Quarantine new additions to prevent disease and choose reputable breeders and retailers.

    What should I do if algae persists despite having algae eaters?

    Reassess husbandry first: check for overfeeding, excess nutrients, and overly long or intense lighting. Increase manual removal—scrape, pluck, and brush—and consider pairing grazers to target specific algae. Use targeted products cautiously and only as a complement to corrections in husbandry.

    If you suspect misidentified livestock, confirm species and suitability for your tank size.

    Do algae eaters reproduce and create population problems?

    Some do and some don’t. Nerite snails and Amano shrimp do not breed effectively in freshwater, which limits population explosions. Ramshorn and Malaysian trumpet snails reproduce readily and can overrun a tank if excess food exists. Cherry shrimp breed in freshwater and can grow abundant populations when conditions are favorable.

    Manage feeding and nutrients to control unwanted reproduction.

    How do I care for Otocinclus specially in a nano planted tank?

    Otocinclus need groups of at least three to feel secure, stable water parameters, and plenty of biofilm/algae or supplemental algae wafers. They’re fragile and often arrive underfed, so quarantine and add algae-based foods. Keep them in well-cycled tanks (10+ gallons ideally), avoid sudden parameter swings, and provide plants and surfaces for grazing.

    What special care do Amano shrimp and Nerite snails require?

    Amano shrimp need hiding spots for molting, supplemental feed like sinking pellets and blanched veg, and stable water. They cannot breed in freshwater, reducing overpopulation risk. Nerite snails prefer harder water with calcium for healthy shells; they may lay nonviable eggs on glass.

    Both are excellent for planted tanks but monitor for calcium and provide safe molting refuges for shrimp.

    Can algae eaters damage live plants or the aquascape?

    Generally, the recommended nano grazers—Otocinclus, Amano shrimp, and Nerite snails—are gentle on plants and preserve the aquascape. Some plecos may rasp driftwood and produce more waste; rubberlip plecos can be delicate and demand higher oxygen. Avoid apple snails and large herbivores that will eat or uproot plants.

    Monitor behavior after introduction to ensure no unintended damage occurs.

    Where should I start if I want a low-maintenance algae control plan for my planted tank?

    Begin with proper husbandry: cycle the tank, control light and nutrients, and maintain regular water changes. Add a compatible grazing crew—consider Otocinclus, Amano shrimp, and Nerite snails tailored to your tank size and algae type. Provide hiding places, supplemental feeding, and quarantine new additions.

    Use manual removal for stubborn patches and adjust husbandry if algae persists.

  • Introducing Night-Active Inhabitants to Your Small Ecosystem

    Introducing Night-Active Inhabitants to Your Small Ecosystem

    Learn how to add night-active creatures to your terrarium, paludarium, micro-aquarium, or sealed biosphere. This guide explains what nocturnal nano species are and why they’re important for a balanced tiny ecosystem at night.

    Nocturnal nano species and nano organisms fill niches that daytime creatures don’t. They can reduce competition, help with nutrient cycling, and support predator-prey balance. This makes them valuable for hobbyists and researchers.

    Light regimes are key ecological cues. Research by the German Centre for Integrative Biodiversity Research (iDiv) shows artificial light at night (ALAN) is a stressor. Even low-level ALAN can change physiology and behavior, affect soil respiration, and alter invertebrate activity. This has big effects on food webs.

    This article will cover the benefits and risks, suitable environments, and species examples. It will also give tips on how to incorporate them, their care needs, and when to seek professional advice. These tips reflect growing U.S. interest in nano organisms and concerns about light pollution, ethics, and biodiversity trends.

    Understanding Nocturnal Nano Species

    A serene nocturnal scene showcasing luminous nano species in a small, vibrant ecosystem. In the foreground, a delicate arrangement of bioluminescent microorganisms emits a soft glow, revealing intricate, fractal-like patterns. The middle layer features a miniature landscape with mossy stones and tiny, glowing fungi, all bathed in ethereal blue and green light. In the background, hints of a dark, starry sky peek through translucent foliage, casting gentle shadows and creating a mystical ambiance. The entire composition is rendered with a soft focus lens, emphasizing the details of the nano species while maintaining a dreamlike quality. The mood is tranquil and enchanting, inviting viewers to explore the hidden wonders of the night.

    When you explore nocturnal nano species, you’ll discover a variety of tiny life forms. These organisms are active at night in small spaces. They include tiny animals and microbes that work together.

    The term “nano organisms” refers to very small creatures. They might seem small, but they play a big role in their ecosystems. Their activities are key to nutrient cycles and food webs in small spaces.

    Nocturnal creatures follow the day-night cycle and light. Many use natural light to plan their activities. Artificial light can mess with their schedules and interactions.

    Studies show that artificial light affects how species interact. Even a little light can change who meets when. This can lead to more species going extinct.

    Artificial light can also change how plants and animals live. It can make plants less diverse and affect how much biomass there is. This impacts how nutrients flow and how habitats are structured.

    • Knowing about nocturnal microorganisms helps design better small ecosystems.
    • Using sensors and AI lets you watch without disturbing them.
    • Nano technology research helps create tiny habitats and sensors for studies.

    New technologies in nocturnal nanotechnology help you study these tiny creatures. They let you observe and manage them without disrupting their natural behavior. This helps keep their ecosystems stable.

    Benefits of Introducing Night-Active Species

    A serene nocturnal ecosystem, showcasing a vibrant, lush habitat teeming with night-active nano species. In the foreground, bioluminescent insects gracefully flit through the air, their luminous bodies glowing softly under the moonlight. A small pool reflects the silvery light of the full moon, surrounded by moss-covered rocks and delicate ferns. The middle ground is filled with tiny creatures like geckos and nocturnal pollinators interacting harmoniously with flowering plants, emphasizing their role in the ecosystem. In the background, dense trees are partially illuminated, their leaves shimmering as they rustle gently in a night breeze. The atmosphere is tranquil yet lively, conveying the importance and benefits of biodiversity. Use a soft focus lens effect to create a dreamlike quality, highlighting the ethereal beauty of the night.

    Adding night-active species to your micro-environment offers big ecological benefits. They help break down organic matter at night, when others are sleeping. This makes nutrients available for plants and microbes faster.

    Nocturnal detritivores speed up decomposition, clearing leaf litter and biofilm. This results in cleaner substrates and fewer anaerobic hotspots. With these pathways working well, ecosystem services nano organisms provide improve.

    • Regulation of microbial communities through targeted grazing by night-active predators.
    • Reduced daytime competition because temporal niche partitioning spreads resource use across the 24-hour cycle.
    • Suppression of pest micro-organisms and larvae via nocturnal predation and foraging.

    These pest-control effects add stability to your system. Night foragers target larvae and slow-growing microbes, preventing their growth. This control helps maintain balance without needing chemicals.

    Introducing night-active species boosts biodiversity and network complexity. More species variety creates more interaction pathways. This makes your system more resilient, but be careful of artificial light’s effects.

    Research from iDiv shows how Artificial Light At Night (ALAN) affects night-active functions. Keeping natural darkness preserves the benefits of nocturnal microorganisms and the services they provide. Managing light carefully helps maintain these historical night regimes.

    Technological tools help manage night communities better. AI-driven image and activity recognition lets you monitor behaviors with precision. Advances in nocturnal nanotechnology and nano research tools make observing and optimizing nocturnal roles easier.

    1. Enhanced nutrient cycling at night improves resource turnover.
    2. Faster decomposition reduces detritus buildup and pathogen risk.
    3. Better regulation of microbes lowers pest outbreaks and stabilizes populations.
    4. Increased biodiversity raises resilience, conditional on stable night regimes.
    5. AI and nano tools enable precise monitoring and adaptive management.

    By introducing night-active species with careful attention to light, habitat, and monitoring, you maximize their benefits. This supports long-term ecosystem services nano organisms provide.

    Suitable Environments for Nocturnal Species

    Design your micro-ecosystem design around stable conditions. Keep temperature swings small and set humidity to match the species you plan to house. Many nematodes and rotifers prefer damp substrates.

    Add leaf litter, layered substrate, and small crevices to create micro-refugia. This allows nocturnal species to shelter and forage.

    Choose plants wisely for the nocturnal microorganisms habitat. Pick low-to-moderate biomass plants that don’t compete with soil microbes. Avoid high-lumen grow lights that promote fast plant growth and alter soil chemistry.

    Studies from iDiv show artificial light at night harms a healthy nano organisms environment. It changes plant traits and reduces diversity.

    Control artificial light management to preserve natural rhythms. Recreate clear day-night cycles and remove ambient night lighting. Use targeted red or infrared illumination for brief monitoring sessions.

    Even low-level light can change soil respiration and activity patterns. So, keep nighttime illumination minimal.

    Consider compartmentalization when your system has mixed needs. Researchers use EcoUnits and controlled chambers to maintain separate conditions. You can create secure micro-habitats within a larger set-up or use separate chambers for sensitive species.

    • Stable temperature and matched humidity for suitable environments nocturnal nano species.
    • Layered substrate and leaf litter to support nocturnal microorganisms habitat.
    • Low-biomass plants to protect soil microbes and maintain a balanced nano organisms environment.
    • Strict artificial light management to keep natural night conditions.

    When you set up these elements, you lower stress and keep activity times distinct. This reduces unwanted predator-prey overlap and helps maintain the diverse rhythms that make a micro-ecosystem design successful.

    Popular Nocturnal Nano Species to Consider

    You can pick from a list of small organisms that help break down waste and keep ecosystems balanced. Springtails are a favorite. They are tiny insects that eat fungi and help break down organic matter at night.

    Small isopods are great for leaf litter. They eat plant debris and help microbes digest it. Adding springtails and isopods together creates a good team for breaking down plant material.

    Nematodes are tiny worms that live in soil. They come in different types that are active at night. They help cycle nutrients in small ecosystems. Choosing the right nematodes can improve soil health.

    Rotifers and tiny crustaceans are good for water and damp areas. They eat biofilms and planktonic microbes. Many of them are active at night. Make sure to have a mix of organisms for both water and soil.

    Microbial consortia are important but often unseen. They work best at night to keep the environment stable. Get them from trusted sources to avoid contamination.

    • Springtails (Collembola) — nocturnally active detritivores
    • Small isopods — shredders for plant litter
    • Nematodes — bacterial, fungal, predatory types
    • Rotifers and micro-crustaceans — grazers for micro-aquaria
    • Microbial consortia — night-peaking functional microbes

    When setting up a terrarium, get your organisms from trusted suppliers or university collections. Make sure to check local laws before introducing any new species.

    Stay away from species that could harm local ecosystems. Always follow local regulations and quarantine practices to protect native species.

    How to Incorporate Nocturnal Species

    Start by understanding your tank’s day-night cycles, light, temperature, humidity, and who lives there. Use sensors or logs to track these things before you make any changes.

    Then, set up a quarantine area. Keep new nano organisms in a separate tank for a bit. This lets them get used to your water and environment.

    1. Start by adding a few new creatures to a small part of your tank. Watch how they do for a few nights. Then, you can add more slowly if they get along well.

    2. Make your tank more inviting for night creatures. Add special hiding spots and keep the lights off at night. Research shows even a little light can bother them.

    3. Use smart tools and cameras to watch your tank at night. These tools help you see what’s going on without disturbing the creatures. They also help you keep track of things like temperature and humidity.

    Keep a journal of what happens in your tank. Note changes in the population, when they’re active, and how plants do. This helps you catch any issues early.

    Always follow safe practices when adding new life to your tank. Keep everything contained and follow the law. This helps protect the environment and keeps you out of trouble.

    Think of adding nocturnal creatures as a journey. Use what you learn to make your tank better for them. With careful planning, you can create a happy home for your tank’s night dwellers.

    Care Requirements for Night-Active Species

    Creating a day-night cycle is key for nocturnal nano species. Use timers for lights and check the light level at night. This helps their behavior and reproduction.

    Check your micro-ecosystem daily. Look at humidity, temperature, and substrate moisture each evening. Night-active species like a bit more moisture after dark, so adjust misting times carefully.

    Feed them small, balanced meals to avoid problems. Give them organic matter or microbial food in small amounts. Remove any extra to keep things healthy.

    • Use low-light cameras or passive infrared sensors to observe activity without disturbing cycles.
    • Automate feeding and humidity with micro-sensors and micro-actuators to match nocturnal rhythms.
    • Keep quarantine protocols for new additions to limit disease spread.

    For long-term care, replace part of the substrate to avoid toxins. Do this slowly to keep the ecosystem stable. This helps the microorganisms thrive.

    Watch how plants grow and change. Artificial light can harm plant diversity and growth. Prune plants carefully to keep things balanced.

    Use specific treatments for diseases and pests. Choose biological methods over harsh chemicals to protect the microfauna. Regular checks and quarantines help catch problems early.

    Use advanced tools for monitoring without disturbing your creatures. AI and micro-sensors can send alerts and track trends. These tools help you adjust conditions without upsetting your nocturnal friends.

    Common Challenges When Introducing Nocturnal Species

    Adding night-active creatures to a small space brings both biological and management challenges. Light pollution can disrupt their natural behavior and timing. This makes it important to manage light to keep their activity cycles stable.

    Introducing predators at night can upset the balance of your system. They might eat too much prey, causing a ripple effect that destabilizes populations and changes how the system works.

    Microorganisms also pose risks. They can break down materials too quickly or grow too much, lowering oxygen levels and creating areas without oxygen in the substrate. This is a big risk you need to watch out for.

    • Source controls: contamination or invasive microbes from unreliable suppliers can introduce pathogens, increasing nano organisms problems in your system.
    • Stepwise introductions: add species slowly and monitor interactions to reduce the chance of unexpected collapse.
    • Lighting design: reduce stray illumination and use filtered night light where needed to support ALAN effects mitigation.

    To manage these issues, take practical steps. Use aeration and check the substrate regularly to avoid low oxygen levels. Also, track respiration and CO2 levels in denser setups. Quarantine new cultures and test them when you can to reduce risks.

    Keep records of population trends and oxygen levels. Documenting changes after each introduction helps you spot problems early. This way, you can adjust your plan before issues spread.

    Monitoring Your Nocturnal Species

    To keep your micro-ecosystem healthy, track key metrics. Look at when and how much activity happens, how many organisms there are, and how fast things break down. Also, check the oxygen and carbon dioxide levels, plant growth, and any signs of stress or disease.

    For a sneak peek, use low-light or infrared cameras. Place them to watch your nano organisms without disturbing them. Time-lapse videos can show changes in their nightly habits.

    Install small sensors to measure things like temperature, humidity, and light levels. Brands like Sensirion or Bosch make tiny sensors that fit in small spaces. These sensors can log data continuously, helping you keep a close eye on your ecosystem.

    Use AI to help monitor your microorganisms. Machine learning can spot patterns and alert you to any odd behavior. Train the AI with examples and set up alerts for important changes like oxygen levels or temperature.

    • Log nightly and diurnal cycles to spot activity overlap that signals stress.
    • Keep records of introductions, feedings, and interventions to link actions with outcomes.
    • Configure automated alerts for sudden CO2 rises or temperature changes for rapid response.

    For regular checks, count organisms weekly and measure biomass monthly. Use the same forms each time to keep your observations consistent. This way, you can spot any gradual changes early on.

    If you’re short on resources, focus on monitoring oxygen and carbon dioxide levels. Small analyzers and sensors can give you quick, useful data when you need it most.

    Keep a record of any unusual events with photos or videos. Link these to your notes on what you did. Over time, this will help your AI monitoring get better and guide your care decisions.

    When to Seek Professional Advice

    If you notice sudden, unexplained mass die-offs or drastic population declines, seek help right away. These signs often point to water quality issues, oxygen problems, or an outbreak that needs expert attention.

    Watch for signs like recurrent hypoxia, strong odors, or toxic buildup that won’t go away. These are clear warnings that you should consult experts to prevent further damage and stop the spread.

    If you see new or unusual disease symptoms in plants or animals, get veterinary help. Experts can run tests to find the cause and suggest safe treatments.

    For legal or biosafety concerns about introduced species or accidental release, seek a micro-ecosystem specialist. University experts, certified aquaculture professionals, and vivarium technicians can guide you on permits and containment.

    • Who to contact: entomology or microbiology experts at state extension offices and university labs.
    • Who to contact: certified aquaculture and vivarium professionals for closed systems.
    • Who to contact: microbiology culture collections for species ID and pathogen screening.
    • Who to contact: companies in nano technology research consultation and firms using AI-driven biosensors for advanced monitoring.

    Before reaching out, collect clear data logs, photos, recent actions, and sensor outputs. Good records help experts diagnose faster and offer better advice.

    Isolate the affected area to prevent further damage while waiting for help. This step protects your system and gives experts a clearer view of your situation.

    The Future of Biodiversity: Trends in Nocturnal Species

    Research will move from focusing on single species to studying entire ecosystems. This change will help us understand how artificial light affects soil, plants, insects, and food webs. It will also guide how we study future nocturnal nano species in both the wild and in captivity.

    Controlled EcoUnits and experimental chambers will be used to test the effects of night lighting on complex communities. These tools will help advance nocturnal nanotechnology, like miniaturized sensors that track humidity, temperature, and microactivity without disturbing the inhabitants.

    Research will focus more on automation and long-term monitoring. Small, durable devices will allow us to study tiny populations for months. This data will help machine learning improve care and habitat adjustments.

    Artificial intelligence will play a big role in studying nano species. It will help classify behavior in real time and predict stressors before they cause harm. AI will also reduce the need for manual checks and make alerts more accurate for temperature changes or light intrusions.

    Nocturnal microorganisms conservation is becoming more important as we realize darkness is a rare resource. Efforts to reduce light pollution will impact terraria, classroom EcoUnits, and larger conservation plans for microfauna and microbes.

    • Research: more integrative studies on ALAN effects and cascading ecological impacts.
    • Technology: smarter sensors, adaptive lighting, and automated habitat control.
    • Policy: tighter biosecurity, ethical sourcing, and regulatory oversight for hobbyists and labs.

    To stay updated, follow journals like Philosophical Transactions of the Royal Society B and teams at iDiv. Also, keep an eye on applied vendors and open-source projects that share their methods. This way, you can use proven tools safely and ethically.

    As these trends come together, plan for systems that meet both human and nocturnal needs. Embracing nocturnal nanotechnology advancements and artificial intelligence in nano species management will protect biodiversity at all scales.

    Conclusion: Embrace Nocturnal Nano Species in Your Ecosystem

    By welcoming nocturnal nano species, you add diversity and services to your small ecosystem. These night-active creatures help with nutrient cycling, pest control, and balance. But, they need the right light, climate, and care to flourish.

    Artificial light at night (ALAN) is a big risk. Studies from iDiv show it can alter ecosystems, plant traits, and soil respiration. It also increases the risk of extinction by causing more activity overlap. So, aim for natural darkness as you care for these microorganisms.

    Begin with simple steps: check your lighting and climate with sensors, get species from trusted sources, and introduce them slowly. Use tools like infrared cameras and AI for monitoring, and keep detailed records. If you’re unsure about biosecurity or face sudden issues, get professional advice.

    As nano tech and AI monitoring get better, so will your ability to care for your ecosystem. With careful planning and these new tools, you can build a balanced, strong miniature world. This is a key conclusion for caring for nocturnal nano species in the long run.

    FAQ

    What are nocturnal nano species and why should you consider them for a terrarium, paludarium, micro-aquarium, or sealed biosphere?

    Nocturnal nano species are tiny creatures that are active at night. They include small invertebrates, nematodes, rotifers, and micro-crustaceans. These tiny beings are great for small ecosystems because they help with decomposition and control pests.

    They also add complexity to the ecosystem. This makes the system more resilient. But, it’s important to keep the night-dark cycle realistic and control light pollution.

    How does artificial light at night (ALAN) affect night-active nano organisms in small systems?

    ALAN can disrupt the natural night cycle of these tiny creatures. Research shows it can change their behavior and physiology. It can also affect the ecosystem’s balance.

    In small systems, ALAN can make all creatures active at the same time. This can lead to more predation and less ecosystem services from nocturnal organisms.

    What practical benefits do nocturnal nano species provide in a micro-ecosystem?

    They help with nutrient cycling and decomposition at night. They also control pests and reduce competition during the day. This supports plant health and stabilizes the ecosystem.

    They can also help the system recover from disturbances when it’s dark.

    What are appropriate conditions to support night-active nano species?

    Provide stable temperatures and humidity for these tiny creatures. Keep their substrate damp. Offer hiding spots like leaf litter.

    Keep the day-night cycle intact and use low-impact monitoring tools. If needed, create separate areas for nocturnal species.

    Which specific night-active organisms are commonly used and what roles do they play?

    Springtails help with decomposition at night. Small isopods shred plant material. Nematodes cycle nutrients in the substrate.

    Rotifers and micro-crustaceans graze on microbes. Night-phased microbial consortia drive biochemical processes at low light.

    Where should you source nocturnal nano species and what biosecurity steps are essential?

    Get them from trusted suppliers or university collections. Always quarantine new species. Check for pathogens and follow legal rules.

    Never release them into the wild. Avoid invasive species.

    How should you introduce night-active species into an established system?

    Start by monitoring your system’s conditions. Quarantine and acclimate the new species. Introduce them slowly in a small area.

    Observe their behavior over several nights. Then, gradually increase their numbers. Adjust the environment to encourage their nocturnal habits.

    What daily and long-term care do night-active nano organisms need?

    Keep a stable day-night cycle and minimize artificial light. Monitor humidity, temperature, and substrate moisture. Provide organic matter or microbial food.

    For long-term care, renew the substrate periodically. Prune plants to prevent shading. Follow quarantine rules to prevent disease.

    What monitoring tools and metrics should you use to assess nocturnal activity and ecosystem health?

    Use low-light cameras, infrared sensors, and environmental sensors. AI can analyze behavior and detect issues. Track activity, population, decomposition, and gas levels.

    Also, monitor plant health and diversity. Look for signs of stress or disease.

    What are the main risks and common challenges when introducing nocturnal species?

    ALAN can disrupt their natural cycle. There’s a risk of trophic cascades and microbial blooms. These can lead to oxygen depletion.

    ALAN can also change soil respiration and plant traits. This increases extinction risk. Design carefully, introduce slowly, and monitor closely to avoid these risks.

    How do AI and nano-technology tools help manage nocturnal nano species?

    AI helps monitor their behavior and detect anomalies. Nano technology automates humidity, aeration, and feeding. This reduces intrusive monitoring and improves stability.

    When should you seek professional advice and who should you contact?

    Seek help for sudden die-offs, hypoxia, disease outbreaks, or legal issues. Contact university experts, certified professionals, or microbiology labs. They can help with identification and screening.

    Also, reach out to companies in nano technology and AI for advanced diagnostics.

    What immediate steps should you take before contacting an expert?

    Isolate the affected area and gather data logs, photos, and sensor outputs. Summarize recent trends. This helps experts diagnose faster.

    Keep the area contained to prevent further damage. Be ready to share detailed records of your observations.

    What ongoing research and trends should you follow related to nocturnal nano species?

    Follow studies on ALAN’s effects on ecosystems. Look at EcoUnit experiments and nano technology advancements. Expect better lighting and AI monitoring tools.

    Also, watch for increased biosecurity regulations and AI adoption in micro-habitats.

    How can you reduce light pollution impact in your micro-ecosystem while observing nocturnal behavior?

    Use timers and blackout covers to recreate darkness. Employ red or infrared illumination for observations. Position displays away from the ecosystem.

    Use low-light cameras or AI for image analysis. Studies show moonlight-level ALAN can disrupt ecosystems, so minimize stray light.

    What signs indicate the introduction of nocturnal species is improving system function?

    Look for increased decomposition rates without hypoxia. Check for stable microbial communities and reduced pest outbreaks. Balanced populations and healthy plants are good signs.

    Consistent nocturnal activity patterns also indicate success.

    What are actionable next steps to begin integrating night-active nano species into your setup?

    Assess your system’s lighting and microclimate. Source species from trusted suppliers and quarantine them. Introduce them slowly in a confined area.

    Use low-impact monitoring tools and keep detailed records. If you notice worrying trends, isolate the area and seek expert advice.