You’re looking for nano tank stand ideas that are both safe and stylish. This article will guide you in choosing the right small aquarium stand or compact aquarium stand. We’ll consider load capacity, placement, access, and upkeep.
Remember, 1 liter of water weighs about 1 kilogram. A 10–20 gallon tank, plus substrate, decor, and equipment, can add dozens to hundreds of pounds. So, it’s important to choose a stand that’s strong enough.
Where you place your stand is key. Avoid direct sunlight and vents or exterior doors to prevent algae and temperature changes. Choose a spot near an electrical outlet for your equipment.
Your stand should also allow for easy access to your tank. Plan for space for filters, heaters, CO2 systems, and for water changes and maintenance. Many people use a mix of store-bought stands, multi-functional furniture, and DIY builds to fit their budget and space.
The aim is to find nano tank stand ideas that are both safe and stylish. This way, your nano tank will look great and stay secure in your home.
Understanding the Importance of a Nano Tank Stand

You need a stand that can handle the full weight of your tank. Ten gallons of water weigh about 83 pounds (38 kg). Add substrate, rock, plants, and equipment, and the weight goes up fast. Look for nano tank stand ideas that list load capacity or use solid plywood or metal frames for safety.
Levelness is more important than you might think. An uneven surface can cause stress on glass and lead to cracks or leaks over time. Use a carpenter’s level and shims to make the base perfectly flat, whether you choose a small or compact aquarium stand.
Vibration and movement can shorten seal life. Placing your tank near doors, high-traffic zones, or HVAC vents can cause micro-movements. Choose stands with wider feet or rubber pads beneath legs to dampen vibration.
Think about maintenance access when picking a stand. A well-designed small aquarium stand offers shelving or removable panels for filters, spare parts, and easy water changes. This saves time during weekly tasks and reduces the risk of accidental spills.
Organize cords, heaters, and CO2 lines to keep environmental control steady. Stands with built-in routing or hidden compartments help maintain consistent temperature and reduce clutter that might lead to equipment failure. These features are common among smart nano tank stand ideas.
Your stand affects the health of plants and fish. Proper placement of filters, heaters, and lighting supports stable water parameters and strong aquascapes. Experts like Takashi Amano and George Farmer stress the importance of equipment layout when planning tanks. Choose a compact aquarium stand that supports your setup goals.
- Structural safety: confirm load ratings and use solid materials.
- Stability: level the stand and use shims on uneven floors.
- Vibration control: avoid high-traffic spots and add damping pads.
- Maintenance access: prefer stands with shelving or removable panels.
- Cable and equipment routing: keep heaters and CO2 lines organized.
Popular Materials for Nano Tank Stands

Wood is a top choice for a modern nano tank stand. It comes in solid and plywood forms, both sturdy and attractive. You can stain and trim it to match your home decor, like Sauder or IKEA pieces. To protect it, use marine-grade paint, epoxy, or polyurethane against spills and humidity.
MDF and particleboard are cheaper but need extra care. Untreated MDF can swell and fail if wet. If you pick engineered wood, ensure seams are sealed and it can hold your tank’s weight.
Metal frames offer a sleek look for a compact aquarium stand. Steel and powder-coated steel are strong and light. Aluminum is lighter and rust-resistant indoors. Add rubber feet or pads to prevent vibration and floor damage. Double-check the welds and fasteners for aquarium load safety.
Composite and prefabricated materials are great for a quick setup. Laminate, melamine, and resin cabinets are found in kits from big pet stores. They often have plumbing cutouts and storage shelves. But, watch out for thin laminates that can delaminate with moisture and make sure the load rating is suitable.
Concrete, stone, and custom masonry make a striking, durable stand. They offer near-indestructible support and a minimalist or industrial look. But, remember, these materials are very heavy and usually permanent. They need floors that can handle concentrated loads and aren’t good for most rentals.
- Pros of wood: customizable, attractive, widely available.
- Cons of MDF/particleboard: moisture risk without proper sealing.
- Pros of metal: slim, strong, durable under heavy loads.
- Cons of metal: can transfer temperature and needs floor protection.
- Pros of composites: budget-friendly, pre-cut features for plumbing.
- Cons of composites: possible delamination and lower load limits.
- Pros of masonry: ultra-stable and dramatic aesthetic.
- Cons of masonry: permanent, very heavy, floor limitations.
Always check the manufacturer’s weight ratings or calculate your tank’s full weight before buying or building. For DIY projects, add a 25–30% safety margin to prevent stress and failure.
DIY Nano Tank Stands: A Hands-On Approach
Before you start cutting wood, answer some important questions. Measure your tank and decide where to place it. Make sure you have access to water and electricity. Also, think about what fish you’ll have and how you’ll take care of them.
Choose materials that can handle moisture. Marine-grade plywood or a 2×4/2×6 frame with a plywood top is a good choice. Avoid MDF unless you seal it well. Use powder-coated hardware to prevent rust.
- Design the top to match the tank footprint with a 1–2 inch perimeter overhang for stability.
- Plan internal shelving for filters, spare media, and tools with at least 12–18 inches of depth for useful storage.
- Build a rigid box frame and add cross-bracing to prevent racking under load.
Secure joints with bolts or screws and wood glue. Add adjustable leveling feet for uneven floors. Include removable panels or doors for easy maintenance and to hide cords. Cutouts for filter hoses and power strips keep things tidy.
Finish and waterproof the stand to make it last longer. Use marine varnish, an epoxy coating, or several coats of polyurethane. Seal seams and edges with silicone to stop moisture.
- Follow step-by-step building videos or the best nano tank stand plans if you need a clear sequence. Use professional tutorials from reliable makers for guidance.
- Design a safety margin so the stand supports at least 30% more than the full-tank weight you calculate.
- Include vented panels for heat dissipation and a removable top shelf for quick tank removal when needed.
If you want a creative fish tank stand, repurpose sturdy furniture like a small dresser. Reinforce the top and seal it for moisture. This gives you a unique look while keeping strength and function.
For beginners, start with simple plans and checklists. Use quality tools and take small, steady steps. A well-built DIY nano tank stand makes your setup secure and enjoyable.
Store-Bought Nano Tank Stands: Pros and Cons
Buying a small aquarium stand from a store can save you time. Many places sell stands that fit common tank sizes. These kits usually come with everything you need, like a tank, filter, and lights.
Look for stands with features that make caring for your tank easier. Features like pre-cut holes for plumbing and built-in shelves help keep things organized. Brands like Fluval and Aqueon offer designs that match both modern and classic decor.
While store-bought stands are convenient, they might not be the best choice for everyone. Some stands are made of materials that can’t handle moisture well. This could lead to damage if your tank is in a humid area. Always check the materials and finish before you buy.
The weight capacity of a stand is very important. Cheap stands might not hold the weight of a fully loaded tank. Make sure the stand’s weight limit matches your tank’s full weight to avoid any issues.
Whether to buy or build your tank stand depends on your needs. Prebuilt stands might not have room for all your equipment. If you have a lot of gear, building a custom stand might be better.
- Buy from reputable brands and aquarium lines that list load capacity and materials.
- Favor metal or solid wood models for heavier planted tanks instead of thin laminate kits.
- Read customer reviews and view real photos to confirm stability and finish quality out of the box.
For those who value speed, looks, and a complete setup, a store-bought stand is a good choice. But if you want to customize or have a lot of equipment, consider the best nano tank stand plans. Most hobbyists find a reliable stand that fits their tank and needs to be a good balance.
Multi-Functional Furniture for Nano Tanks
You can turn everyday furniture into a smart base for a nano tank. A console table, credenza, or sturdy bookshelf can become a creative fish tank stand. Just make sure to reinforce and level it.
First, check if the furniture can hold the weight of a filled tank. If not, add a plywood or thin steel plate top to spread the load. Small dressers and nightstands often work for 5–10 gallon setups after you reinforce and waterproof them.
- Level top surface: use shims or adjustable feet to fix minor floor irregularities.
- Height and sightlines: aim for 30–36 inches for living-room viewing or choose a lower desk height for desktop displays.
- Storage and ventilation: keep supplies hidden while allowing airflow to prevent heat buildup from filters and lights.
IKEA-style shelving units are compatible when you add a solid plywood top and distribute weight across several supports. Nightstands make an excellent stylish small tank stand after you seal the top and reinforce corners.
Think about cord management and styling. Use cable organizers and matching baskets to keep equipment tidy. Coordinate finishes so the tank looks intentional and ties into your room decor.
If you rent, pick furniture that returns to its original use easily. Avoid permanent build-ins or masonry work. A compact aquarium stand can be temporary, practical, and renter-friendly when you keep changes reversible.
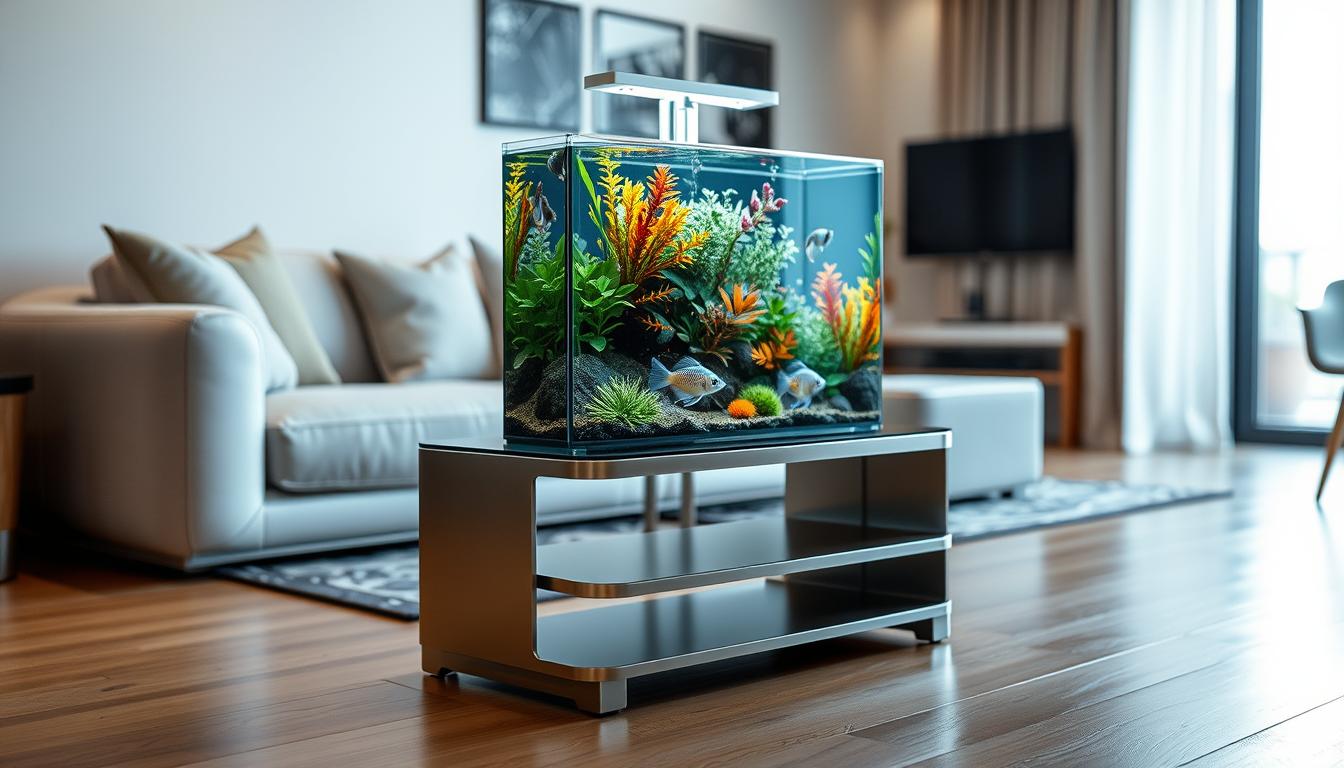
Aesthetic Considerations for Nano Tank Stands
Choose a stand that matches your tank’s scale and the room’s style. A modern nano tank stand with clean lines suits rimless tanks and minimal decor. Avoid oversized bases that make the aquarium look lost or tiny stands that appear fragile.
Match materials to your aquascape. Solid wood or teak complements planted, Nature Aquarium setups inspired by Takashi Amano. Concrete or raw steel fits industrial rooms and rock-heavy hardscapes. Metal frames and powder-coated finishes work well for modern, minimalist spaces.
Think about color and finish. Dark stands make bright plants and colorful fish pop. Light woods give an airy feel that helps a small room breathe. Coordinate the stand with room accents so the display feels intentional.
- Functional aesthetics: hidden storage and cable management keep the area tidy.
- Integrated lighting mounts or built-in LED strips add mood without clutter.
- Provide space for spare plants, tools, and filter supplies to streamline maintenance.
Adjust stand height for viewing. Use a midline sightline for tall stem plants. Lower stands work best for carpeted foregrounds so the layout reads well from a standing or seated position.
Explore unique nano tank stand designs when you want a focal piece. Floating wall-mounted shelving can suit very small desktop tanks if anchors and wall strength are verified. Recessed cabinetry creates an integrated look when structural support allows.
When you pick a stylish small tank stand, balance looks with function. Ensure storage, stability, and access match the aesthetic you choose. A thoughtful stand ties your aquarium to the room and enhances the aquascape you build.
Space Constraints: Choosing the Right Nano Tank Stand
Start by measuring your available footprint. Note floor space, door swing, walkway clearance, and distance to water and electrical outlets before you pick a stand. Knowing exact dimensions prevents surprises and helps you compare compact aquarium stand options that fit the room.
Think vertically when floor space is limited. Tall, narrow stands and plant stands pair well with slim or tall nano tanks to give a sense of depth without using much floor area. This approach opens up more nano tank stand ideas for tight corners and entryways.
Consider shelving systems when you want multiple tanks. Reinforced shelving with rated tops lets you stack small tanks safely. Check each shelf’s weight rating and your room’s floor loading before you commit to a tiered layout.
Wall-mounted and desktop setups work for very small installations. A floating shelf, desk, or console can host 1–5 gallon tanks, but confirm wall studs and anchors can bear the full wet weight. Desktop nano tanks suit offices or kitchens when you plan for daily access and spill protection.
Use multipurpose furniture to save space and hide gear. An entryway console, narrow dresser, or media cabinet can double as a stand while giving storage behind doors. Picking units with enclosed storage keeps supplies out of sight and maintains a tidy display.
Place your tank away from direct sun to limit algae and temperature swings. Account for room lighting when setting LED run times, with 8–10 hours usually recommended for planted setups. Proximity to a water source cuts down time spent on weekly partial changes and simplifies maintenance tasks.
- Measure your footprint and clearances first.
- Choose vertical stands or shelving for narrow spaces.
- Confirm weights and anchor ratings for wall mounts.
- Opt for furniture with doors to hide supplies.
Blend practicality with style by comparing compact aquarium stand models and exploring unique nano tank stand designs. With careful planning you can turn limited space into a striking aquatic display that fits your routine and your room.
Ensuring Proper Weight Distribution
First, figure out the full tank weight. Water weighs about 1 kilogram per liter or 8.34 pounds per US gallon. A 10-gallon tank holds about 83.4 pounds of water.
Add substrate, rocks, wood, and equipment to get the total weight. This will give you a realistic number.
Be conservative with hardscape weight. Substrate and decor can add 10 to 100+ pounds. Many use a rule of thumb: about 1 lb of gravel per gallon. Heavier soils like Fluval Stratum increase this number.
- Design a safety margin of at least 25–30% above the calculated full-tank weight.
- Factor in dynamic loads from maintenance, people leaning on the stand, and settling over time.
Leveling is key for stability and glass stress. Use a bubble or digital level on the stand top. Adjust until it’s perfectly flat.
Install adjustable leveling feet for sloped floors. These are common in older homes and apartments.
Check your floor’s load capacity for heavy setups or concrete bases. Upper stories need special attention. If unsure, consult a structural engineer or your building management.
Spread the load to avoid point stress. A sheet of plywood under the tank or a metal wear plate across the stand top will help. This prevents sag and extends your stand’s life.
Reinforce wide stands with center support beams or cross-bracing. These additions reduce deflection and maintain a flat surface over time. They pair well with the best nano tank stand plans when building your own.
Reduce vibration and point loading by placing closed-cell foam or rubber pads under the tank edges. This cushions the contact points and protects fragile aquascapes during maintenance.
- Measure tank dimensions and volume to compute water weight.
- Estimate substrate and hardscape weight; use conservative figures.
- Add equipment weight and a 25–30% safety margin.
- Confirm stand top is level and add adjustable feet if needed.
- Reinforce the stand with bracing and use a plywood base to spread the load.
When comparing nano tank stand ideas, prioritize plans that address load spreading and leveling. The best nano tank stand plans will include clear reinforcement details and mounting points for leveling feet. Choose a small aquarium stand that matches your calculated loads and allows access for maintenance without stressing the tank or stand.
Considerations for Maintenance and Accessibility
Start by thinking about how you’ll access your tank. Make sure your stand has front and rear panels or a removable back. This way, you can easily get to filters, heaters, and tubing without having to lift the tank.
Position storage at waist height. A stand with shelves or drawers near your working level makes water changes and media swaps easier. You won’t have to bend as much.
- Store spare filter media, water conditioners, nets, fertilizers, and siphons together.
- Label containers so you grab what you need and return items quickly.
Organize your equipment with maintenance in mind. Make sure there’s space for canister filters, CO2 reactors, and spare media. Add cutouts or grommets for hoses and cords to avoid pinch points and keep things tidy.
Protect the stand’s interior. A built-in drip tray or waterproof liner under equipment catches spills. This helps extend the life of wood or MDF stands.
Plan a maintenance workflow. For quick partial water changes, keep a siphon, bucket, and hose handy. Make sure there’s a clear path to a sink or drain. Having the stand near a water source makes the job quicker.
Consider lighting and controls. Place timers and light fixtures where you can reach them without moving the tank. For planted setups, make it easy to adjust lighting schedules for the 8–10 hour window.
Make room for quarantine and acclimation. A creative fish tank stand or a DIY nano tank stand can include a spare shelf or cleared surface. This is for temporary buckets or small quarantine tanks when new fish need observation or treatment.
Choose a design that supports routine care. Whether you buy a compact aquarium stand or build one, focus on access, storage, and protective features. This makes maintenance faster and safer.
Safety Features to Look For in a Nano Tank Stand
When choosing a nano tank stand, check the load rating. This tells you if it can hold your tank, sump, and decorations. Look for brands tested for aquarium use or sold by trusted names like Aqueon or Fluval.
Water protection is key. Look for waterproof coatings, sealed joints, and built-in drip trays. These features prevent wood rot and delamination. Rounded or sealed edges also help prevent water pooling and make cleaning easier.
- Anti-tip brackets and wall anchors add security in homes with kids or pets.
- A wide base and low center of gravity reduce the chance of toppling.
- Vented panels let heat escape from pumps, controllers, and transformers.
Electrical safety is vital. Look for stands with built-in cable management and an accessible power strip. These features keep cords organized and reduce splash risk. Try to keep power strips elevated and hidden behind panels when possible.
Choose non-toxic finishes and sealants for indoor use. Avoid paints and solvents that may off-gas. These choices protect your fish and keep the air quality safe in your home.
Plan for emergencies. Keep a spare towel, basic tools, and a quick way to shut off heaters and pumps. Placing a rubber mat or tray under the stand protects hardwood floors from leaks.
- Perform weekly checks of seals, hoses, and filter media.
- Inspect joints and fasteners for signs of wear or moisture.
- Verify vents remain clear and power management stays dry.
Use these tips when exploring nano tank stand ideas and unique designs. A safety nano tank stand can be stylish and practical. It gives you peace of mind while your display thrives.
Final Thoughts on Choosing Your Nano Tank Stand
Start by measuring your tank and figuring out its full weight. This includes water, substrate, decor, and equipment. This weight should guide all your decisions, from DIY builds to buying stands.
Choose materials and designs that fit your room, budget, and future plans. Options like sealed hardwood, metal frames, and multi-functional furniture are great. DIY projects let you create unique stands and often hold more weight. But, factory stands are convenient and stylish, just make sure they can handle your tank’s weight.
Next, measure, pick a material, and add extra weight capacity. Don’t forget to include leveling feet and moisture protection. Also, plan for easy maintenance and storage for weekly water changes and monthly filter checks. These details help your stand and tank last longer.
Remember, stability and ease of access are more important than looks. With the right choice, your Nature Aquarium or shrimp setup will thrive. It will also be a beautiful centerpiece in your home.
Leave a Reply