Gravel vacuuming is about using a siphon or gravel cleaner. It lifts debris, detritus, and fish waste from your substrate during water changes. This method removes loose particles on top without disturbing the roots or the whole bed.
Organic buildup, like decaying leaves and uneaten food, stresses plants and feeds algae. This is true for delicate plants like Dwarf Baby Tears and Glossostigma. They can “melt” if detritus sits on their leaves.
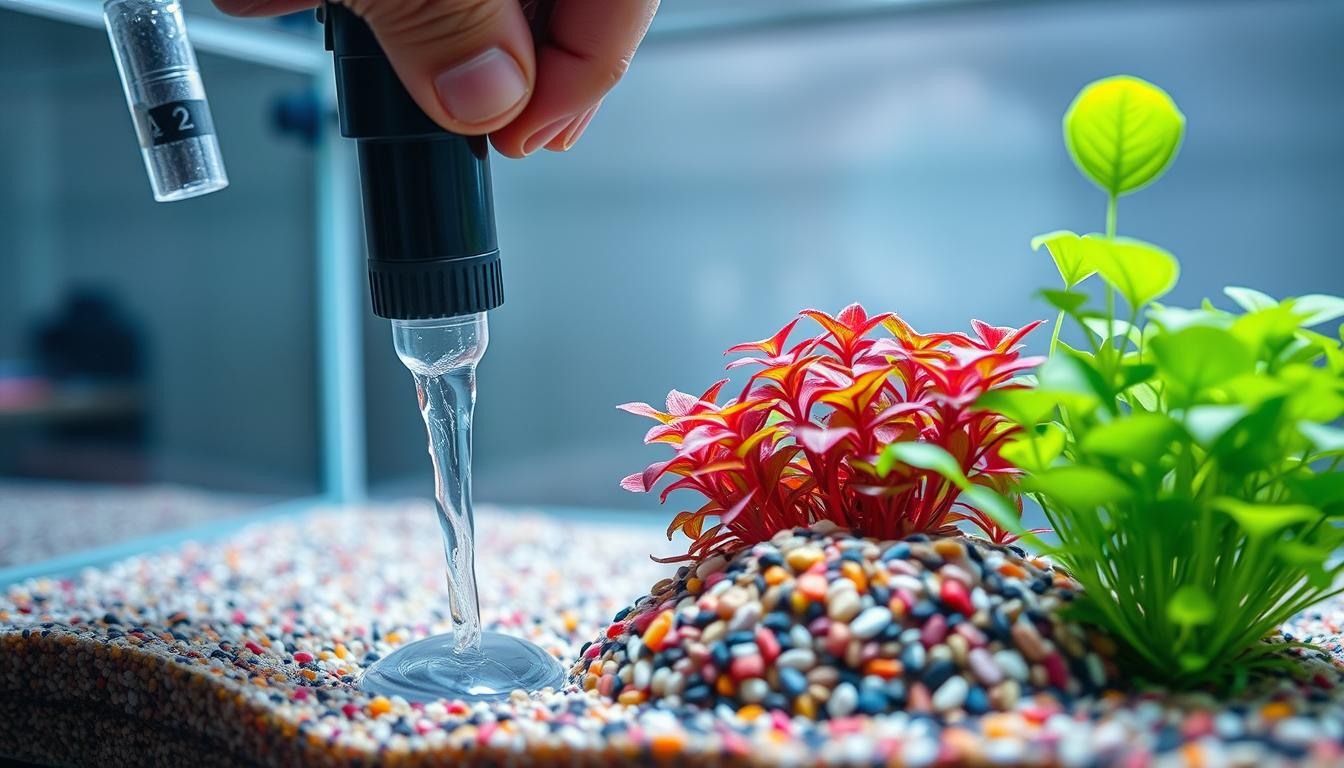
Aquasoils from brands like Mr Aqua and UP Aqua hold nutrients that fade over time. Vacuuming removes excess organics and helps keep nutrient levels balanced. This supports tissue-cultured plants and small carpets without stripping the substrate.
For beginners, gravel vacuuming is an easy skill to learn. Stick to surface work, about 1 cm deep, for weekly maintenance. Deeper cleaning can release ammonia, so save it for replanting and larger water changes.
Follow best practices for gravel vacuuming. Work slowly, target visible waste, and combine vacuuming with modest water replacement. Learning how to gravel vacuum properly reduces the need for tank tear-downs and keeps your aquarium stable and healthy.
Understanding Gravel Vacuuming Techniques

There are two main ways to vacuum gravel: surface vacuuming and deep vacuuming. Surface vacuuming is gentle. Hold a small siphon hose just above the substrate. Use a bulb-feeder, aquarium baster, or soft brush to loosen debris.
Then, siphon the suspended particles while disturbing only the top 1 cm of aquasoil. This method protects plant roots and keeps bound nutrients safe.
Deep vacuuming is for heavy buildup or aging aquasoil. You might need to uproot some plants or replant them later. Use a small spade or your fingers to agitate the substrate and free trapped detritus.
After stirring, siphon the material and do a large water change. This removes released ammonia and dissolved organics.
How often you vacuum depends on light, plant growth, and bio-load. High-light, fast-growth, or crowded tanks need weekly surface vacuuming. Slower tanks can go every two to four weeks.
Deep cleaning might be needed every few months or years, depending on the substrate’s age and buildup.
Managing risks is important. Stirring deep layers can release ammonia and organics. After deep work, do a big water change and consider adding fresh aquasoil or root tabs.
For aquasoils, add ammonium-rich substrate in small amounts every three to six months. This supports root-available nitrogen.
- Gravel vacuuming tips: keep flow low, work in short passes, and avoid uprooting established plants unless necessary.
- How to gravel vacuum: start at the outflow end, move toward the filter intake, and remove cloudy water promptly.
- Gravel vacuuming for beginners: practice surface technique first, use a clear hose to watch siphon action, and do conservative water changes after deep cleaning.
Equipment Needed for Gravel Vacuuming

Begin with a good siphon or gravel vacuum hose. Choose one that can adjust flow or has interchangeable nozzles. This lets you switch between a small nozzle for detailed work and a wide nozzle for removing more debris. Battery or hand-pumped siphons are great for beginners and for small tanks.
Make sure you have bulb feeders, basters, and a small spade or scoop ready. These tools help you clean specific areas without harming plants. Soft-bristle brushes are perfect for gently cleaning carpets. Use a glass scraper for tough algae on walls.
- Small-diameter hoses are best for nano tanks and carpet plants.
- Wide-nozzle options speed up large gravel cleaning sessions.
- Adjustable-flow siphons give you control over suction strength.
Have your support gear nearby. A water parameter test kit and deionized or top-off water are essential for matching temperature and chemistry after a water change. Trimming scissors are handy for keeping carpets in shape while you clean.
Choose cleanup crew members to help reduce detritus between cleanings. Nerite snails are good grazers and safe for plants, but they lay small white eggs. Ramshorn snails are good scavengers but can breed quickly. Amano shrimp are great at controlling algae but don’t breed in freshwater.
- Neocaridina (cherry) shrimp are colorful scavengers but are vulnerable to predators.
- Otocinclus handle soft algae well but require groups and steady water quality.
- Small loaches help stir up debris and eat leftover food.
Use these cleanup crew members as part of your best practices for gravel vacuuming. They help reduce detritus buildup, but they can’t replace regular gravel vacuuming.
Follow simple tips when you start gravel vacuuming. Work in short passes, avoid removing too much water at once, and match replacement water to tank parameters. This protects your plants and fish while keeping your substrate healthy.
Choosing the Right Time for Gravel Vacuuming
Match your gravel vacuuming with your water-change routine. For tanks with lots of plants or high bio-load, vacuum the surface weekly. For calm tanks, do it every two to four weeks. This helps avoid stressing your fish.
Check your tank daily and weekly. Look for debris, low flow, or dead leaves in the morning. Remove dead leaves quickly to avoid ammonia spikes. This is a key tip for stable water.
Consider plant and fertilization cycles when vacuuming. Don’t vacuum after big fertilizations or CO2 boosts. For plants like Dwarf Baby Tears, use low flow and vacuum in sections to avoid damage.
Do deep substrate work when planning long-term. Refresh the substrate every three to six months or when plants need more nutrients. This helps with big changes and keeps your tank stable.
Don’t vacuum during big water changes or right after adding new fish. Also, skip it if you can’t do water changes after stirring the substrate. These rules help keep your tank stress-free.
- Weekly surface vacuum during regular water changes for high-demand tanks.
- Every 2–4 weeks for low-demand setups.
- Inspect at feeding times and remove decayed leaves immediately.
- Avoid vacuuming after major fertilization or CO2 spikes.
- Divide carpeted areas into sections and use low flow for delicate plants.
- Plan deep substrate work every 3–6 months with replanting cycles.
- Skip vacuuming during water-parameter instability or right after adding sensitive livestock.
Preparing Your Aquarium for Gravel Vacuuming
Start by doing a quick check. Look at the flow rate and where dirt tends to collect. Also, mark areas with delicate plants that need care.
Find any leftover food or visible waste. This will help you focus on those spots during cleaning.
Get your tools ready and prepare some replacement water. Use dechlorinated water that’s the same temperature and has the right GH/pH as your tank. You’ll need a siphon with a wide nozzle, a baster, scissors, a soft brush, and test kits. This setup is key for a smooth cleaning process.
- Move or shelter small, fragile fish and invertebrates if you plan deep work.
- Trim carpet plants in sections to reduce drag from the siphon.
- Use a net to remove floating debris and decaying leaves first.
Adjust the flow before starting. Lower the filter outflow or change the current direction. This prevents the substrate from being disturbed. Use a wide-nozzle siphon and gentle suction to protect roots and avoid clouding. These steps are essential for effective cleaning.
Rinse your tools in tank water carefully. Avoid tapping to prevent chlorine or soap from getting in. Have containers ready for plants if you need to replant. These steps are helpful for both new and experienced aquarists, making the process safer and more efficient.
The Gravel Vacuuming Process Explained
Begin by starting the siphon with a hand pump, bulb, or manual method. Place the outflow into a clean bucket. This allows for a targeted water change while cleaning. It sets the flow needed for effective gravel vacuuming.
Next, use the surface vacuuming method. Hold the siphon mouth just above the substrate. Use a baster or gentle nozzle to lift debris into the flow. Let the suction carry away loosened particles.
For routine maintenance, disturb only about 1 cm of the top layer. This avoids releasing too much detritus.
Work the tank in small sections. This prevents a sudden cloud of waste and protects plant carpets. Move methodically from one area to the next. This ensures you cover the whole tank without over-disturbing any single spot.
When deeper cleaning is needed, switch to a deep vacuuming method. Temporarily remove or uproot plants during a replant cycle. Agitate deeper substrate gently with a small spade while siphoning to lift trapped organics.
After heavy stirring, stop and perform a larger immediate water change. This removes ammonia and organics that the disturbance releases.
After deep work, replant carefully. Add fresh aquasoil or root tabs if your substrate has aged. This step supports plant recovery and long-term substrate health.
Finish with final checks. Test water for ammonia, nitrite, nitrate, and pH. This ensures the tank is stable. Replace evaporative top-off water if needed. Make sure your filter and CO2 systems resume normal operation. These gravel vacuuming tips help maintain balance after cleaning.
- Use a hand pump or bulb to start the siphon.
- Keep vacuuming shallow for routine cleans; go deeper only when required.
- Work in sections to protect carpets and reduce clouding.
- Follow deep agitation with a large water change.
- Replant and add root nutrients if aquasoil is depleted.
Cleaning Different Types of Substrates
When you start with gravel vacuuming basics, remember each substrate is unique. Aquasoil brands like Mr Aqua, UP Aqua, and AquaLife have nutrients close to the surface. Only vacuum the top 1 cm during regular cleaning to keep these nutrients safe.
Deep vacuuming of aquasoil can release ammonia and harm the balance. To refresh nutrients, add a little fresh aquasoil every 3–6 months. Or, place root tabs near where plants have heavy roots.
Inert gravel is different. You can stir it more because nutrients don’t stick to the particles. Use gravel vacuuming tools to remove trapped dirt, but watch out for plants with shallow roots.
For sand and fine substrates, avoid strong suction. It can compact the bed or harm roots. Use gentle, wide-nozzle siphons or let rabbit snails burrow to prevent sand channels.
Carpet plants like Monte Carlo, Dwarf Baby Tears, Glossostigma, and Dwarf Hairgrass need gentle care. Use soft-bristle brushes and spot-clean with a small siphon or baster. Work in sections with low suction.
- Use a small siphon tip for spot work on carpets.
- Trim dense carpets gradually to reduce plant shock.
- Keep the siphon nozzle off the mat to avoid uprooting.
Follow the best practices for gravel vacuuming when changing techniques between substrates. Choose the right suction strength and tool size for each substrate. This protects plant roots and keeps beneficial bacteria.
Consider a partial substrate refresh if detritus, poor plant growth, or nutrient depletion persists. Schedule deep substrate replacement with replanting cycles to reduce stress on the tank.
Common Mistakes to Avoid
One big mistake is vacuuming too much. Taking out too much substrate or stirring too deep can harm plant roots and remove nutrients. Beginners should focus on surface cleaning and avoid deep agitation.
Another error is uprooting plants. This can happen if the flow is too strong or if you vacuum too big of an area at once. Use a wide-nozzle siphon, work in small sections, and keep the flow gentle. This helps protect carpets and delicate stems.
Timing is also important. Vacuuming too soon after fertilizing, CO2 adjustments, or when water parameters are unstable can stress fish and plants. Wait until conditions are stable before tackling tougher jobs.
Not changing water after deep cleaning can lead to ammonia and organic spikes. After vigorous agitation, do a targeted water change to avoid sudden spikes. This is a key step in any gravel vacuuming routine.
Ignoring daily or weekly checks lets detritus build up fast. Remove decaying leaves, clean glass, and check flow and filter performance. Regular small tasks help avoid the need for heavy vacuuming.
Relying too much on cleanup crew members like Nerite snails or Amano shrimp is risky. They help, but can’t replace proper vacuuming or good husbandry. Heavy algae or waste from overfeeding needs active maintenance, not just passive cleanup.
- Work in small sections to avoid uprooting plants.
- Use gentle siphon flow and wide nozzles for planted tanks.
- Schedule vacuuming away from fertilization and CO2 changes.
- Always pair deep agitation with an immediate water change.
- Keep routine checks to prevent detritus buildup.
By following these tips, you can improve your gravel vacuuming skills. Learning how to do it right will protect your plants and keep your aquarium water quality stable.
Post-Vacuum Maintenance Tips
After deep cleaning, test your water for ammonia, nitrite, nitrate, and pH. If ammonia or organics spike, do a bigger water change and check levels again. This step is key to keeping fish and invertebrates safe from sudden changes.
Trim carpet plants in small parts to reduce stress. Remove decayed leaves fast to stop new waste buildup. These tips help keep your gravel clean and prevent quick waste buildup.
If you moved fish out for cleaning, bring them back slowly. Match the water temperature and chemistry to your tank before adding them back. This careful step helps your fish recover well after vacuuming.
Start a daily routine: clean the glass, check flow rates, and skim debris every morning. Doing these small tasks daily helps avoid the need for deep cleaning often. It’s a best practice for keeping your gravel clean.
- Resume liquid dosing and CO2 schedules as planned.
- If your aquasoil is aged, add fresh aquasoil or root tabs to restore nutrients.
- Monitor nitrate and phosphate to keep plant growth balanced.
Watch your cleanup crew closely. Make sure nerite snails, Amano shrimp, Neocaridina shrimp, and Otocinclus are healthy. Give them extra food if algae is scarce to prevent starvation after vacuuming.
Keep a record of your readings and observations for a week after deep cleaning. Tracking these helps you apply the basics of gravel vacuuming. It also improves your maintenance cycles with practical tips and habits.
Keeping Your Nano Plants Safe During Cleaning
First, find out which plants are extra sensitive. Plants like Dwarf Baby Tears and Monte Carlo need extra care. Knowing which plants are delicate helps you clean without harming them.
Use tools that are easy on your plants’ roots and runners. Tools like small siphon tips and soft brushes are safer. Always keep the nozzle above the substrate to avoid damaging the carpet.
Clean in small sections to avoid stressing your plants. Focus on areas with visible debris. This method is great for keeping your carpeted plants healthy.
Gradually trim your carpet to avoid shocking your plants. Remove dead leaves to prevent algae and decay. Trimming in stages helps your plants grow back stronger.
Consider using a cleanup crew to help with maintenance. Small shrimp and snails can eat biofilm, reducing your work. For tough algae, use 3% hydrogen peroxide carefully, making sure it won’t harm your invertebrates.
If you need to move plants, keep them moist in the tank water. Replant them quickly and restore the tank’s balance. These steps help your plants recover and stay healthy.
- Identify sensitive species and mark their locations.
- Choose small siphon tips and soft tools for delicate areas.
- Vacuum one small section at a time; avoid full-carpet cleaning in one session.
- Trim in stages and remove dead leaves promptly.
- Use cleanup crew and careful chemical dips for local algae control.
- Keep uprooted plants moist and reintroduce CO2 and nutrients gently.
Troubleshooting Vacuuming Issues
If your water turns cloudy after vacuuming, wait a few minutes for sediment to settle. Do extra water changes and use mechanical filters until it clears. Check for ammonia and nitrite; if high, change water quickly to protect fish and shrimps.
Algae can grow back after cleaning if nutrients are released or plants are stressed. Clean less often and stagger your sessions. This helps avoid shocking the system. Also, check CO2 and fertilizer levels, return to a steady light schedule, and add cleanup crew like Amano shrimp or nerite snails.
If plants decline after vacuuming, check the substrate. Old aquasoil can lose nutrients and build up organics. Add root tabs or fresh aquasoil where needed. A deep clean with replanting can help. Good circulation is also key for nutrient uptake.
When carpet plants get uprooted, replant runners and trimmed pieces right away. Reduce strong current near the substrate. Secure loose bits with tweezers or tools. Replace damaged patches with tissue-culture plugs or trimmed runners to speed recovery.
If snails or shrimp drop off after cleaning, check water chemistry. Nerite and mystery snails need minerals for healthy shells. Amano shrimp and Otocinclus prefer stable water and steady food. Offer supplemental feeding and monitor parameters until they stabilize.
Use these techniques and tips to improve your vacuuming routine. Keep notes on changes to track improvements. For ongoing problems, troubleshoot step-by-step to find causes and restore balance without stressing plants and animals.
Maintaining a Healthy Aquarium Environment
Make gravel vacuuming a regular part of your routine to keep water quality and plant health up. For tanks with lots of growth or fish, vacuum the surface weekly. For calmer tanks, do it every two to four weeks.
Use a section-by-section cleaning approach to avoid harming delicate plants. Start with small steps if you’re new to gravel vacuuming. This helps you build confidence.
Keep nutrients and stability in check. Stick to your liquid dosing and CO2 schedule for plant needs. Remember, aquasoil supplies nitrogen that fades over time.
Add small amounts of fresh aquasoil or root tabs every three to six months. This avoids big changes. Daily quick checks help you spot problems early.
Control light and stocking levels to fight algae and waste. Use timers for consistent lighting and avoid overstocking. This reduces bio-load.
Use a mix of mechanical filtration and a cleanup crew like Nerite snails or Amano shrimp. They help but don’t replace regular vacuuming. Choose the right equipment and follow best practices for gravel vacuuming.
If algae persists, plants decline, or aquasoil ages, plan a managed substrate refresh. Opt for partial refreshes and replanting over full tear-downs. These steps, along with regular monitoring and gravel vacuuming, keep your tank healthy and thriving.
Leave a Reply