Learn how the triangle composition adds depth to small planted aquariums. This technique uses stones, driftwood, and plants to create a triangular shape. It guides the viewer’s eye and adds depth.
In nano tank design, the triangle is perfect for rectangular tanks. You’ll plan a high point and a slope. Then, decide if the triangle goes left-to-right or right-to-left. Choose a nutrient-rich substrate and select plants for the foreground, midground, and background.
Keep your layout asymmetric to look like nature. Use one or two focal points and leave space to keep the tank open. Place elements using the rule of thirds or Golden Ratio.
Be patient. Set your hardscape and substrate first. Allow cycling before planting or stocking heavily. With careful layering and screen planting, a small tank can feel deep.
Understanding Aquascaping for Depth

Start by thinking in planes. Visual depth in aquascaping comes from a clear foreground, midground, and background. Arrange a substrate slope that rises toward a high corner and falls to a low front point to create perspective.
Use the triangle layout to guide placement. Put taller background plants like Vallisneria or Hygrophila at the peak and low carpeting plants such as Hemianthu callitrichoides at the low point. This reinforces depth perception in aquascaping and makes the tank read larger.
Work large-to-small and bottom-to-top. Place larger stones or wood in the foreground, then add progressively smaller elements behind them. This trick of size and scale strengthens Visual depth in aquascaping and keeps the scene natural.
Balance composition rules with a touch of asymmetry. Use the rule of thirds or the Golden Ratio to position focal points off-center. That placement boosts Depth perception in aquascaping and draws the eye along intended sightlines.
Layer hardscape across multiple front-to-back “screens.” Break flat lines by staggering heights and textures. Vary color contrast and plant texture to guide view direction and emphasize Aquascaping depth techniques.
Choose fauna that preserves scale. Nano or slow-growing fish such as neon tetras, ember tetras, or white cloud minnows maintain proportion and avoid crowding the visual planes.
Promote dense planting with CO2 injection and consistent fertilizers. Healthy, compact growth reduces algae and keeps layers distinct, which helps Aquascaping for depth hold its illusion over time.
Basics of Nano Tank Design

First, gather the essentials for a nano tank. You’ll need a small aquarium, nutrient-rich substrate, and decorations like stones or driftwood. Also, get a variety of plants and tools like Aquascape Pro pinsettes and scissors.
Don’t forget water conditioner, cycling supplies, a CO2 system, fertilizers, and the right lighting for your plants.
Before you start, plan your layout. Use simple techniques like the rule of thirds or Golden Ratio. This helps place plants and decorations in a balanced way. Remember, a small tank looks better with less clutter.
- Build an angled substrate slope that is higher at the peak and shallower at the low end.
- Anchor stones and driftwood so they look natural and stable.
- Plant background species behind midground stems and keep short foreground carpeting plants up front.
Setting up your tank step by step is key. Start with the substrate, then shape the slope, add hardscape, and plant by zone. Fill the tank slowly and test water parameters while cycling. Wait to add fish until everything is settled.
Stick to simple composition rules for beginners. Aim for asymmetry and use division ratios. Choose plants that grow at similar rates for easier care.
- Choose Nano aquascape essentials and tools.
- Sketch Aquascaping layout techniques and triangle direction.
- Build substrate slope and place hardscape.
- Plant by foreground, midground, background order.
- Fill slowly, cycle the tank, then add CO2 and fertilizers as required.
Remember to think about depth when planting. Use tall plants in the back and shorter ones in the front. Angles should guide the eye to the main focus. Tweezers and a brush help refine your design.
The Triangle Composition Explained
The triangle composition puts your heaviest elements in one corner. Then, it slopes down to the opposite corner. Tall plants and hardscape make up the peak. This guides the viewer’s eye and adds depth to your aquascape.
Leave the low side open to show off flow. A good mix is two-thirds plants and one-third water. This keeps your design airy and easy to care for.
Adjust your design to fit your tank’s shape. For long tanks, try an upside-down triangle. For tall tanks, use a pyramid. Rectangular tanks look great with a side triangle.
Make your design asymmetrical. Use different colors, sizes, and textures to draw the eye. Small tanks should have just one or two main points to focus on.
Play with leaf colors and textures to add depth. Use angled lighting to create shadows. Place wood or stones on the opposite side to balance the design.
Think about your plants’ growth and care. Use stem plants for backgrounds where they’re easy to prune. Repeat the triangle shape in smaller areas to add interest and depth.
- Place peak in a corner and slope to the low opposite corner.
- Use negative space to enhance flow and Creating depth in aquascaping.
- Apply contrast and asymmetry to meet Aquascaping design principles.
- Choose plants with maintenance and growth habits in mind.
Planning Your Aquascape Layout
Begin with a quick sketch to mark the triangle direction, highest point, and slope. This sketch helps shape the substrate. Make the tall end deeper and the low end shallower. It’s a simple step before adding sand or rock.
Place hardscape pieces naturally. Don’t stick to strict symmetry. Offset rocks and wood to create a natural look. Use the golden ratio or rule of thirds to position main stones. This follows aquascaping design principles and adds negative space.
Plan your plant zones by height. Use background tall stems, midground bushy plants, and foreground carpeting. Plant densely to prevent algae and ensure lush coverage. Choose plants that grow at similar rates for easy trimming.
Focus on 1–2 focal points only. Too many can clutter a nano tank. Use contrast in color, texture, or height to highlight these points.
Layer hardscape and plants across different depths. Place larger rocks or driftwood slightly back to avoid flat lines. This boosts perspective and supports aquascape depth planning.
Set pathways or sand contrasts to guide the eye. Keep maintenance in mind. Narrow trails can look great but collect debris. Balance visual flow with practical cleaning access.
- Sketch layout and mark triangle direction.
- Build substrate slope: deep at high end, shallow at low end.
- Anchor hardscape off-center using rule of thirds or golden ratio.
- Plant by zones and plant densely for a lush appearance.
- Limit focal points to one or two for clear composition.
Fill the tank slowly and let it cycle. Test water parameters regularly and trim weekly as needed. Regular nutrient monitoring and weekly water changes keep plants healthy. They support the aquascaping design principles you planned.
Selecting Focal Points in the Tank
Start by placing your biggest stone, root, or driftwood in a high corner. This helps anchor the view. Use the rule of thirds or Golden Ratio to position it about one-third across and up the tank.
In a nano tank, stick to one or two focal points. Too many can confuse the eye and lessen depth perception. Make sure the low side has negative space to let the main feature shine.
Contrast helps guide the viewer’s eye. Try pairing red stem plants with green carpet or white sand with dark rock. A focused LED can also highlight texture, creating clear visual stops.
Balance planted triangles with hardscape that points the opposite way. This adds interest and keeps the gaze moving. It makes the layout more engaging.
- Place focal items on different depth “screens” so each occupies a unique plane.
- Vary size and texture to separate elements and boost depth perception in aquascaping.
- Reserve bright or warm colors for focal areas to attract attention.
For depth, choose one main feature, a secondary accent, and keep negative space clear. This makes your layout strong and easy to see at a glance.
Creating Layered Depth with Plants
Begin by dividing your tank into three zones: front, middle, and back. Place carpeting plants like Hemianthys callitrichoides (HC) or Eleocharis parvula at the bottom. These plants create a soft foreground and give the eye a starting point.
For the midground, use plants like Cryptocoryne and Hygrophila. Plant them in groups to add mass without overcrowding. This approach makes your aquascape easy to read and maintain.
Save the top for tall plants like Rotala, Ludwigia, and Vallisneria. Place stems in the far corner to form a triangular shape. This adds height and makes the aquascape look more realistic.
- Work in horizontal layers from front to back to reinforce perspective.
- Scale elements large-to-small and bottom-to-top for a natural slope.
- Choose smaller, slow-growing species and nano fish so inhabitants do not break scale.
Plant densely in each zone to make your display lush and prevent algae. Regular trimming keeps your aquascape looking sharp and consistent.
Think about how plants grow when you choose them. Avoid fast-growing stems that might outgrow your zones. In triangle layouts, keep stems in the corner to maintain a clear taper.
Use the rule of thirds to place visual mass. Put larger clumps off-center and let smaller plants guide the eye to the back. This method creates a strong illusion of depth and makes maintenance easier.
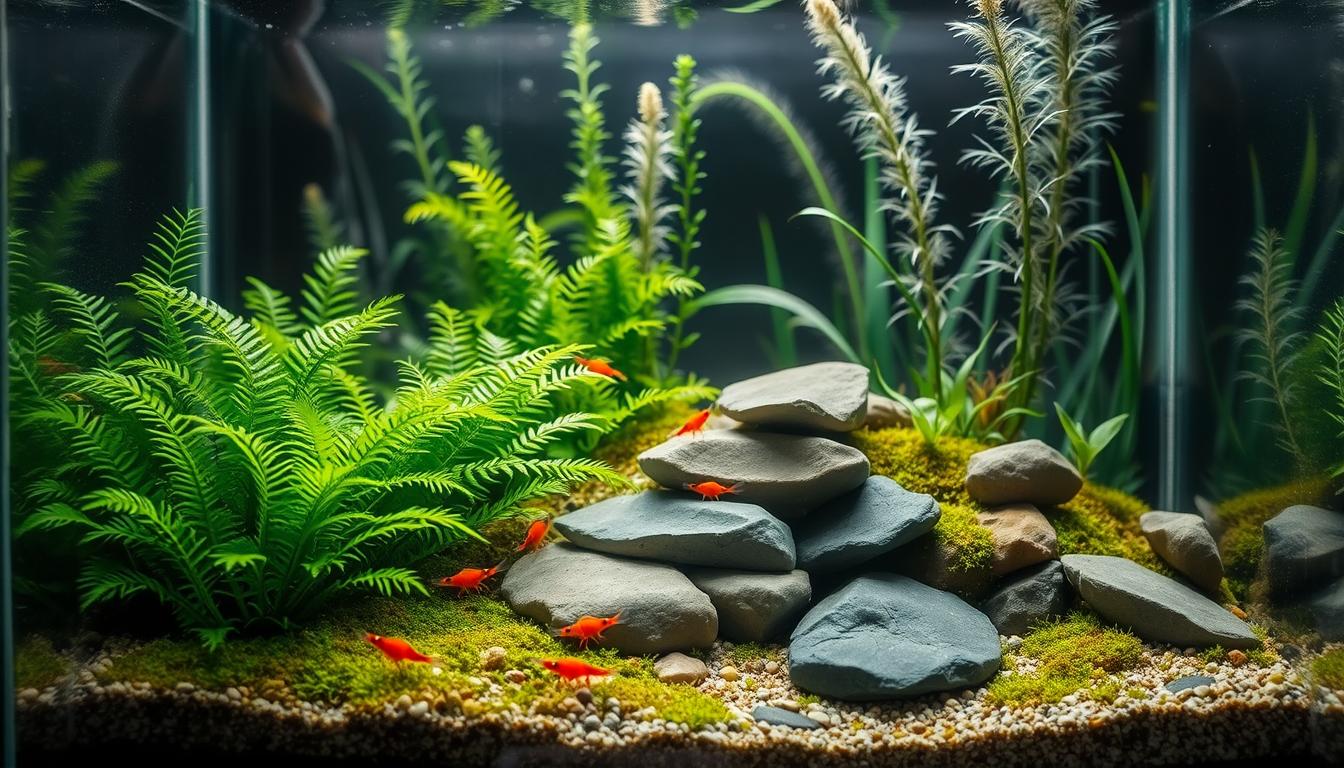
Adding Hardscape Elements
Start by placing the biggest stone or driftwood at the tank’s top corner. This creates a strong triangle. Then, add smaller stones or wood pieces along a diagonal slope. This guides the eye and ties into aquascaping design principles.
Use contrast in size, shape, and texture to add interest. Try a jagged Seiryu stone next to smooth river pebbles. Or pair thick Manzanita driftwood with finer spiderwood. These contrasts make midground and background layers stand out.
Spread hardscape across different depth planes, not in flat lines. Place elements on multiple depth planes for each object to have its own zone. Repeat small triangles of rock or wood pointing in opposite directions. This adds tension and reinforces the triangle composition.
- Anchor pieces so they look natural: use hidden silicone or stainless wire if needed.
- Create subtle pathways in sand or gravel to lead the eye into the background; expect added maintenance.
- Balance opposing stones or wood to counter a heavy planted triangle for dynamic contrast.
During setup, clean detritus from hardscape and adjust placement until it feels organic. Regular maintenance keeps anchored pieces stable and preserves the lines set by your aquascaping layout techniques.
Choose hardscape that complements your triangle layout and plan for long-term care. Thoughtful choices here strengthen aquascaping design principles. They deliver clear aquascaping depth techniques that draw viewers into your nano tank.
Lighting Techniques to Enhance Depth
Use angled lighting to lift your high point and cast intentional shadows. A narrow beam from a spotlight LED can spotlight a rock or stem plant. This gives contrast that builds visual depth in aquascaping.
Balance intensity so foreground plants get brighter light than the background. Brighter foreground and moderated background lighting create clear depth planes. This supports layered growth without stressing low-light species.
- Place large-leafed plants or driftwood where shadows help frame your main view.
- Use darker substrate or a black background panel to increase contrast and hide gear behind the scene.
Match light spectrum and duration to your CO2 and fertilization plan. Strong contrast can improve Aquascaping depth techniques. But it may fuel algae if nutrients and CO2 are not managed.
Try spot and flood combinations to guide the eye along a path. Focused spots draw attention to a focal point. Softer general light keeps the rest of the tank readable, reinforcing visual depth in aquascaping.
- Adjust angles: tilt fixtures to highlight elevations and deepen shadows.
- Control contrast: pair bright foregrounds with subdued backgrounds.
- Protect balance: tune photoperiod and dosing to prevent algae from high-contrast setups.
These aquascaping tips for depth work with common fixtures from brands like Chihiros and Finnex. Use them to refine perspective, emphasize focal points, and make your nano tank feel larger than its actual size.
Final Touches and Maintenance
When you reach the final touches and maintenance stage, focus on a simple routine. This routine preserves the triangle composition. Trim plants regularly to keep the triangular silhouette sharp.
Use consistent dosing of fertilizers and CO2. This encourages steady, lush growth and helps prevent algae outbreaks.
Fill the tank slowly after hardscape placement. This avoids displacing substrate and plants. Then, begin cycling and water testing right away.
Weekly water changes remove dissolved toxins and keep water chemistry stable. Tidy the hardscape and remove detritus to maintain clarity. This reinforces the sense of depth.
Practice patience: let substrate and hardscape settle before adding many plants or fish. Photograph your layout from several angles. Refine asymmetry and negative space as needed.
Choose plants whose growth habits match your desired maintenance level. Use precision tools like pinsettes and aquascaping scissors for careful work.
Follow aquascaping maintenance practices that balance art and routine. Consider a background or printed nature backdrop to enhance illusion of distance. Over time, apply aquascaping tips for depth.
Experiment with breaking composition rules once you understand how Adding depth to aquascape reacts to pruning, light, and flow.
Leave a Reply