Preparing driftwood for your aquarium is key to avoiding surprises. This guide will show you how to clean, cure, and sink driftwood safely. This way, you can add it to your tank without any issues.
Untreated driftwood can release tannins, float, or carry pests and bacteria. These can stress your fish and invertebrates. By following a proper cleaning process, you can prevent these problems and keep your tank stable.
Begin by planning your aquascape. Sketch where each piece will go and decide on its orientation. This helps you choose and prepare wood that fits your design perfectly.
In this article, you’ll learn about selecting wood, initial cleaning, curing, sinking, and finishing touches. You’ll also find out about pest prevention, in-tank upkeep, and water-parameter considerations.
Done correctly, driftwood can enhance your tank’s look, provide habitat, and support blackwater biotopes. It can also anchor plants like Java moss and Anubias. Preparing driftwood properly ensures it adds beauty and function to your aquarium.
Why Use Driftwood in Your Aquarium?

Driftwood makes your tank look natural and adds a focal point. It provides shelter and shaded areas for fish and shrimp. This makes your aquarium feel more like a real environment.
Driftwood does more than just look good. It supports beneficial biofilm and plants like Anubias and Java Moss. Using fishing line or aquarium-safe glue keeps plants in place as they grow.
Driftwood also helps mimic the Amazonian blackwater environment. This is great for tetras like neon and cardinal. The tannins it releases can soften the water, which is better for certain fish.
When adding driftwood, think about its size and placement. A big piece can take over the tank. Plan your layout carefully to avoid stressing your fish and plants.
Not preparing driftwood can cause problems. It might stain the glass, float, or bring pests. But, with the right preparation, you can avoid these issues.
- Functional: creates hiding zones, breeding sites, and currents around branches.
- Aesthetic: unique shapes make each layout one-of-a-kind.
- Biotope: reproduces blackwater chemistry for species-specific setups.
- Practical: requires planning and preparing driftwood to avoid problems.
Choosing driftwood means considering its benefits and upkeep. With proper preparation, it becomes a vibrant centerpiece. It enhances both the habitat and the tank’s look.
Selecting the Right Driftwood for Your Tank

Choosing the right driftwood is key for your aquarium. Malaysian driftwood darkens water and releases tannins slowly. Manzanita holds shape well and is great for hardscaping.
Mopani is heavy and sinks fast. Spiderwood offers dramatic, branchy silhouettes. Cholla wood is porous and perfect for shrimp tanks.
Size and shape are important. Make sure the driftwood fits your tank without crowding. Use vertical pieces for focal points and horizontal for logs and caves.
Think about density too. Denser woods waterlog and sink faster. Porous wood may need soaking.
Hardness affects how long it lasts. Hard woods resist rot and last longer. Soft or decayed wood breaks down faster and can change water quality.
Check if sellers pretreat the driftwood. Pretreated pieces can save time when you want to sink driftwood sooner.
- Look for consistent color and grain for a cohesive layout.
- Buy multiple similar pieces for a matched group or visual motif.
- Inspect for embedded contaminants like metal staples or paint that could harm fish.
Buy from reputable sources like local fish stores or vetted Etsy shops. Avoid garden or reptile wood unless it’s labeled as safe for aquariums. Be cautious collecting from the wild; check local regulations and the ecological impact.
If you prefer immediate use, choose pre-soaked or pretreated pieces. But always clean and boil them for safety. Learn how to prepare driftwood properly, even if it’s treated. Study preservation methods to extend its life. Use finishing techniques sparingly if you plan to alter color or texture.
When picking driftwood, balance aesthetics with practicality. The right choice combines form, function, and safe sourcing. This way, your hardscape looks great and stays healthy for your tank inhabitants.
Preparing Your Driftwood: Initial Steps
Begin by making a layout plan. Sketch your aquarium and try out vertical and horizontal placements on paper. This helps you see how a piece will fit without stressing your fish or plants. It’s a critical step before you even touch the driftwood.
Examine the wood carefully. Look for loose bark, soft rot, trapped soil, and any insects. Remove any obvious debris by hand. Also, check for deep cracks that could harbor pests or break apart later.
Then, dry-brush the surface. Use a clean toothbrush or a stiff nylon brush to scrub away dirt and loose particles. Work in small sections and keep scrubbing until no more flakes come off. Avoid using soap or household cleaners at this stage; they can harm your tank.
After that, rinse the wood thoroughly. Hold it under running water and wash until all visible grit is gone. If possible, use dechlorinated water or reverse osmosis water to reduce chlorine exposure. This rinse step completes the basic cleaning process and prepares the wood for deeper treatments.
Follow these simple tips for prepping driftwood: plan placement first, inspect for weak spots, brush away loose material, and rinse well with safe water. These steps make the preparation process quick and reduce surprises when you sink the wood or run a soak cycle.
Methods for Cleaning Driftwood
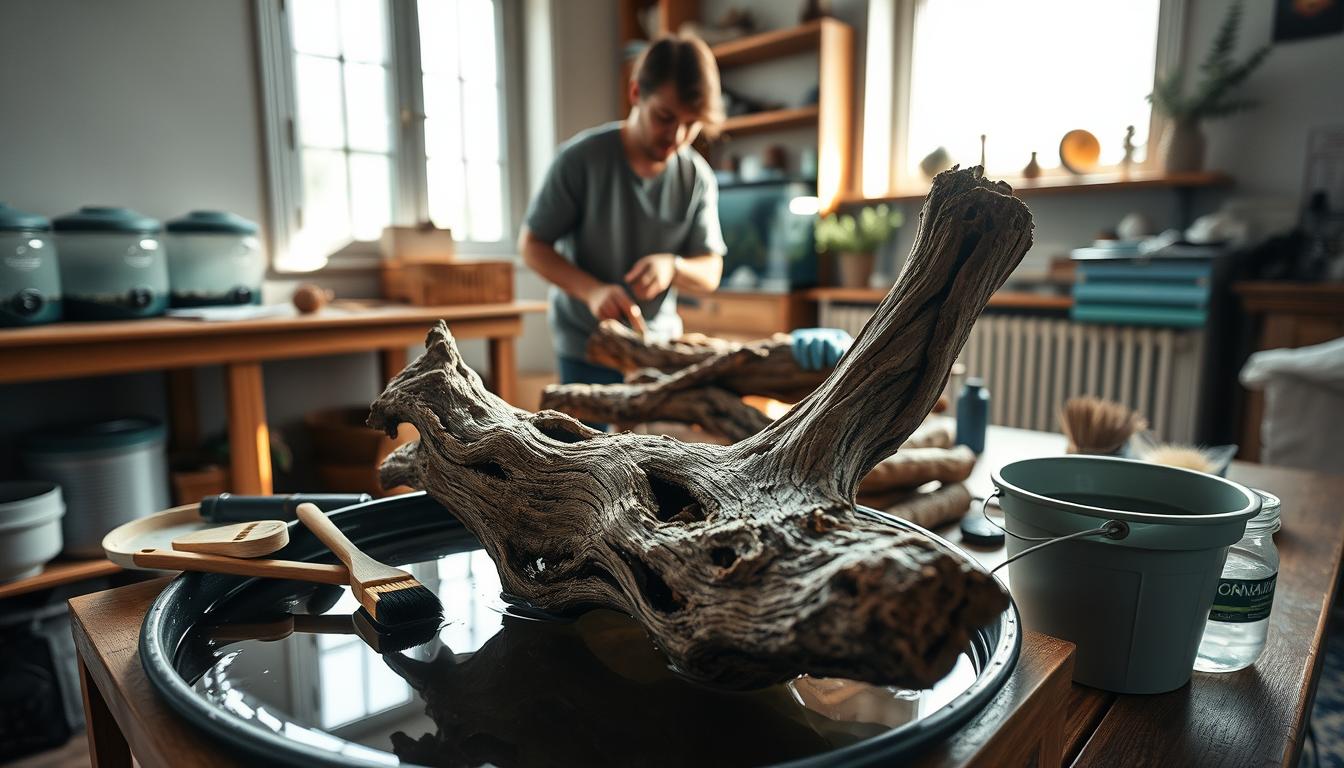
When you bring driftwood home, follow a clear cleaning process to protect your aquarium. Start by scrubbing the piece with a stiff brush under running water. This removes loose debris, sand, and bark that can decay in your tank.
Soaking driftwood is a gentle, effective step. Submerge the wood in a large bucket of dechlorinated or RO water for at least one to two weeks. Change the water as it darkens, rinse the wood between changes, and repeat until the discoloration drops over several days in a row.
Boiling driftwood speeds saturation and aids driftwood sterilization. Place smaller pieces in a large stockpot and boil for one to two hours. This kills algal and fungal spores, accelerates tannin leaching, and helps the wood sink faster. Use caution with oversized or very dense pieces where boiling may not be practical.
Combine methods for the best way to treat driftwood. Scrub first, then boil if possible, and finish with a long soak. This layered approach lowers the risk of introducing pests or harmful organisms into your aquarium.
Sunlight and controlled heat exposure can help with drying and final cleansing for some pieces. Let the wood air-dry in sun for short periods, but avoid chemical treatments. Brands like Aqueon and Seapora recommend natural methods alongside soaking and boiling for safe preparation.
Vendors sometimes pretreated driftwood, yet you should run your own cleaning routine. Proper driftwood sterilization reduces surprises after introduction. Repeat steps when needed until you see stable water results and no visible residues on the wood.
Ways to Sink Driftwood
You can make many pieces sink by soaking or boiling them until water fills the pores. Submerge the wood in a tub, add hot water, and top up as needed. This natural method works for softer pieces but can take days or weeks depending on density.
For sinking driftwood fast, boil the wood in a large pot when possible. Boiling forces air out of the grain and shortens the soaking time. Use caution with large pieces; you can repeat shorter boils if one session is not enough.
Tie driftwood to a rock or slate tile for temporary anchoring while it takes on water. Bury the tile partially in your substrate so the anchor stays hidden. Monofilament fishing line or nylon thread holds well and is easy to remove later.
For a more permanent approach, attach driftwood to heavy bases with aquarium-safe silicone or epoxy. You can screw wood to slate or drill a hole and wire it down. This method keeps larger arrangements stable under current and fish activity.
DIY options let you be creative. Wedge a piece between existing rocks, use suction cups with wire routed under the substrate, or pre-drill small holes to increase porosity and speed up preparing driftwood to sink. Small holes act like vents, letting water replace trapped air faster.
Choosing dense species or pre-treated pieces from reputable sellers such as Seiryu or Mopani that sink immediately reduces effort. Even so, you should follow cleaning steps and boiling recommendations before adding any driftwood to your tank.
- Soak or boil to waterlog porous wood.
- Tie to rocks or slate for temporary anchoring.
- Use silicone, epoxy, screws for permanent anchoring.
- Try monofilament, suction cups, or wedging as DIY fixes.
- Pick dense wood or pre-treated pieces to avoid long waits.
Achieving Desirable Driftwood Color and Texture
Tannins change how driftwood looks in your tank. They darken water and give wood a tea-stained tone. Many aquascapers use this to create Amazonian-style biotopes. If you want that blackwater look, let the driftwood color change naturally.
For lighter tones, soak and boil the driftwood to leach tannins. Repeated rinses during soaking reduce tea staining. This reveals the wood grain and brings out subtler hues.
Keep the surface texture intact while cleaning. Scrub to remove loose fibers and debris, but avoid aggressive sanding. Natural crevices support biofilm and beneficial bacteria, improving both look and function.
Attach plants to age the wood visually. Java Moss, Java Fern, Anubias, and Bolbitis fasten well to driftwood. They create an established, natural feel. Use fishing line or an aquarium-safe glue until roots hold, then remove the line.
Avoid household varnishes and non-aquarium preservatives. They can harm fish and plants. Rely on thorough cleaning, curing, and biological colonization as safe driftwood preservation methods. This approach develops a lasting patina without risking tank life.
- Soak and boil to control tannins and refine driftwood color.
- Scrub gently to keep natural crevices for beneficial bacteria.
- Attach plants to create an aged, natural appearance.
- Use only aquarium-safe finishes when preparing driftwood for aquarium aesthetics.
Follow these steps for driftwood finishing techniques. Thoughtful preparation and patient curing make wood both beautiful and safe for your aquarium.
Timeframe for Preparing Driftwood
When planning your aquascape, treat preparing driftwood timeframe as a schedule item. Most pieces need at least 1–2 weeks of soaking to waterlog and shed tannins. Denser wood like bogwood or manzanita can take several weeks or longer before it stops releasing color.
Boiling shortens waiting time. Boil for 1–2 hours to speed tannin removal and help sterilize the wood. After boiling, continue soaking until the water stays clear for a few days in a row. That answers how long to boil driftwood for routine prep.
Monitor progress by changing soaking water whenever it turns tea-stained. Rinse the piece, top up fresh water, and check daily. Use this routine to track how long to soak driftwood until discoloration is minimal and stable.
Plan ahead and build prep into your timetable. If you buy pretreated wood from a retailer like Petco or LiveAquaria, you should also clean and, if needed, boil it before adding it to your tank. These tips for prepping driftwood help avoid last-minute delays.
- Minimum soak: 1–2 weeks for most pieces.
- Boil: 1–2 hours to speed the process.
- Dense wood: several weeks may be required.
- Anchoring: have rocks, fishing line, or aquarium-safe glue ready if buoyant wood won’t sink.
Expect some pieces to remain slightly buoyant even after long soaks. Keep anchoring materials on hand for instant placement during aquascaping. Use the practical schedule above so your timeline for preparing driftwood stays predictable and stress free.
Preventing Unwanted Bacteria and Pests
To keep your tank healthy, start with a strict driftwood cleaning process. Look at the wood closely, then scrub it with a clean nylon brush. This removes loose debris, insect remnants, and organic matter. Rinse it well with dechlorinated water after scrubbing.
Sterilizing driftwood is key to preventing pests. Boil pieces for 1–2 hours if they’re big enough. This kills spores that could harm your aquarium.
If boiling is hard, soak the wood in hot water for days. Change the water every day. This helps remove tannins and reduces microorganisms. Then, soak it in aquarium-safe water to finish cleaning.
Never use chemical cleaners. Avoid soaps, household disinfectants, or garden treatments. These can poison fish and invertebrates. Use only physical cleaning and heat to sterilize driftwood.
Be careful where you get driftwood. Don’t collect near industrial runoff or busy areas. Check local laws before gathering to avoid breaking them and to reduce contamination risks.
Even well-prepared wood can release tannins or microbes over time. Use activated carbon or Purigen in your filter to keep water clear. Test the water regularly and change it often to catch any problems early.
- Inspect and scrub with a nylon brush.
- Boil for 1–2 hours to sterilize driftwood.
- Soak in hot or dechlorinated water when boiling is impractical.
- Avoid soaps and household chemicals.
- Use filter media like activated carbon or Purigen for ongoing clarity.
Maintaining Driftwood in Your Tank
Keep a simple routine for maintaining driftwood. This will keep your aquarium healthy and attractive. Regular water changes are key. They help reduce tannins and keep water chemistry stable.
Vacuum the substrate around anchored pieces during each change. Check driftwood for soft spots, flaking, or early signs of rot. Remove loose fibers and detritus as you see them.
- Use activated carbon or Purigen in your filter to control tannins if you do not want a blackwater look.
- Trim and reattach plants that grow on the wood; remove old fishing line once roots hold firm.
- Inspect hard-to-reach areas for trapped waste and clean gently with a soft brush.
Softer woods may decay over months or years. When pieces start shedding small fragments, remove debris during maintenance. Plan to replace the wood before it breaks down too much.
Harder varieties like Mopani and Manzanita last longer. Your care approach should match the wood type and your aquarium’s needs.
Follow these tips for prepping driftwood into a long-lasting display: maintain regular checks, manage tannins with filter media, and be ready to swap out any piece that shows persistent decay. Consistent driftwood care keeps your tank stable and visually pleasing.
Understanding the Impact on Water Parameters
Adding driftwood to your aquarium will change how your water looks and feels. The first sign is a tea-like color from tannins. This color is safe for most fish but might alter your tank’s look.
Tannins and pH levels have a subtle relationship. As tannins release, they can make the water slightly acidic and softer. This is good for many Amazonian fish. But, if you have sensitive fish like discus or tetras, watch the pH closely.
Keep an eye on your water by testing it after adding wood and during the curing process. Use reverse osmosis water or commercial buffers to control pH. Choose substrates that match your water’s hardness and alkalinity levels for better control.
The type of filter you use affects how clear your water is and how much tannin it holds. Activated carbon and Seachem Purigen can remove tannins and clear the water. If the tea-stain is too much, try using chemical media for a short time.
Driftwood also changes your tank’s biological balance. Its surfaces support beneficial bacteria, which help with filtration. You’ll see biofilm growth and a bit more organic breakdown. Keep up with regular water tests and partial water changes to manage this.
- Test pH, GH, and KH after adding wood and weekly during curing.
- Use activated carbon or Purigen to reduce tannins if needed.
- Consider RO mixing and buffering for stable driftwood and water chemistry.
- Manage biofilm and organic load with routine cleaning and monitoring.
By being careful when preparing driftwood and regularly testing your water, you can enjoy its benefits without water quality issues. Following these steps helps you balance your tank’s look and stable conditions for your fish.
Final Thoughts Before Adding Driftwood to Your Aquarium
Plan your aquascape before adding wood. This ensures the wood fits well with plants and hiding spots. Look for reputable sources like Aquarium Co-Op or local fish stores for driftwood.
Scrub the wood well with a brush and avoid using soaps. Boiling or simmering pieces can sterilize them and help them sink faster.
Soak the driftwood until the tannin release slows down. This is a key step. Decide if you want a blackwater look or clearer water. If you prefer clearer water, have activated carbon or Purigen ready to capture tannins.
If you like the blackwater look, tannins can be beneficial. They suit species that prefer softer, darker water.
For anchoring, prepare monofilament, slate, rocks, or aquarium-safe silicone. Test-fit the pieces outside the tank. Plan where to place weights for buoyant wood.
Choose plants that attach well to wood, like Anubias, Java Fern, and Java Moss. Use driftwood finishing techniques, such as sanding smooth edges or pre-treating attachment points.
Safety is important: avoid chemically treated or unknown wood. Check local rules before collecting wild pieces. Plan your last steps—soaking, boiling, and anchoring—so installation is smooth.
With proper cleaning, sterilizing, curing, and anchoring, your driftwood will enhance your aquarium’s look. It will also create a lasting home for fish and plants.
Leave a Reply